Creating outlines for images in Canva is a simple yet powerful way to enhance your designs. Whether you’re working on social media graphics, presentations, or marketing materials, an outline can make your images pop. It helps define shapes, adds emphasis, and can guide the viewer's eye to important elements. In this post, we’ll explore how to create effective outlines in Canva, ensuring your images stand out and grab attention.
Understanding the Importance of Outlines in Design

Outlines are more than just decorative elements; they serve several critical functions in design. Here’s why they matter:
- Clarity: Outlines help clarify shapes and forms, making your images easier to understand at a glance.
- Focus: A well-placed outline draws attention to the main subject, guiding the viewer's focus effectively.
- Contrast: Outlines can create contrast, which is essential for ensuring your images stand out against various backgrounds.
- Branding: Consistent use of outlines can enhance brand recognition, making your designs more memorable.
By incorporating outlines into your designs, you can significantly elevate their visual appeal and effectiveness.
Also Read This: how to put images side by side in google docs
Steps to Create an Outline for an Image in Canva

Creating an outline in Canva is straightforward. Just follow these simple steps:
- Select Your Image: Start by uploading your image to Canva. Click on "Uploads" and select the image you want to outline.
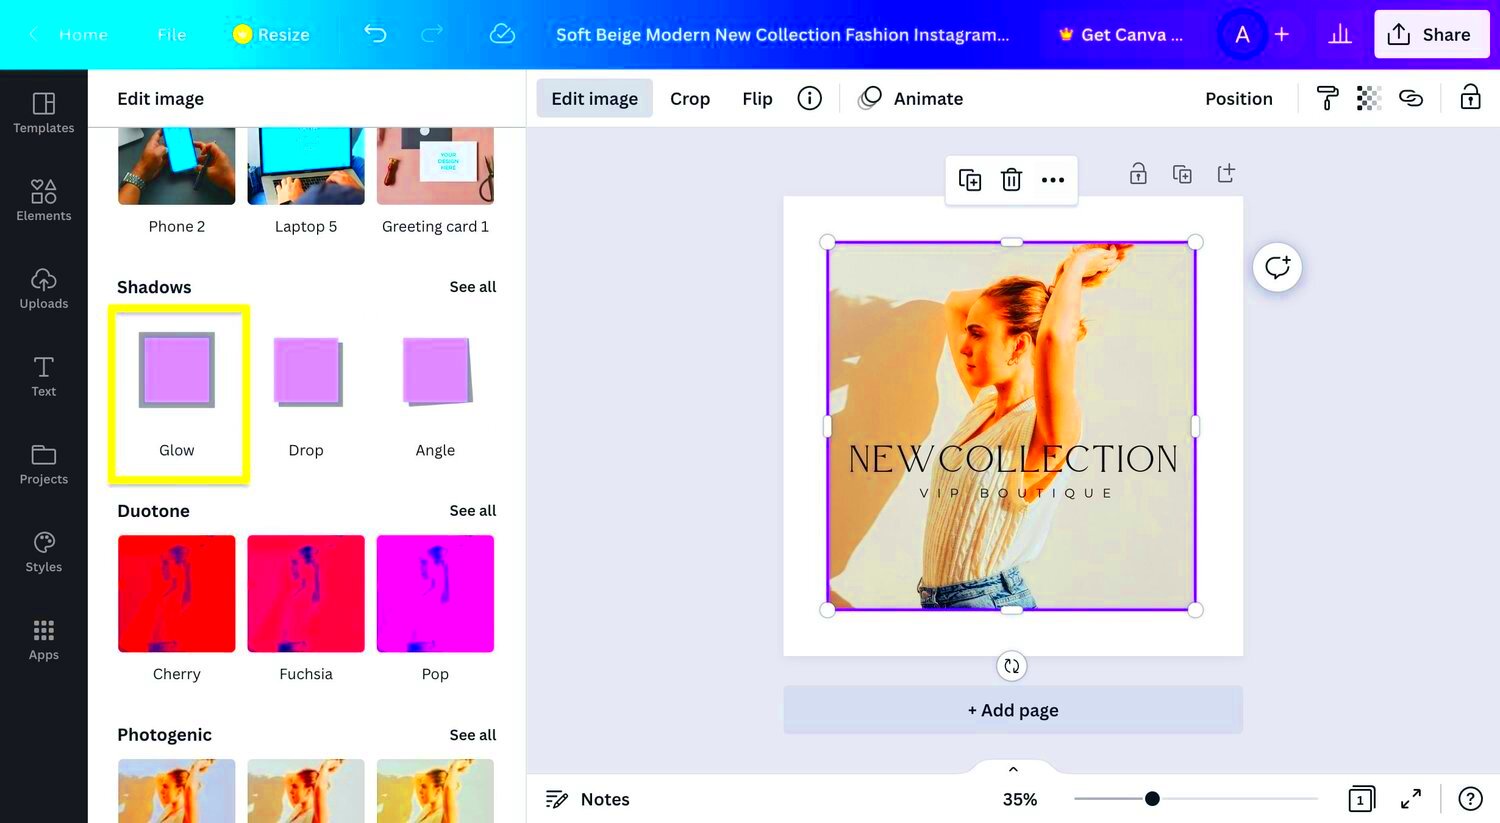
- Add an Outline: After placing your image, click on it to bring up the editing options. Select "Effects" from the top menu and choose "Outline."
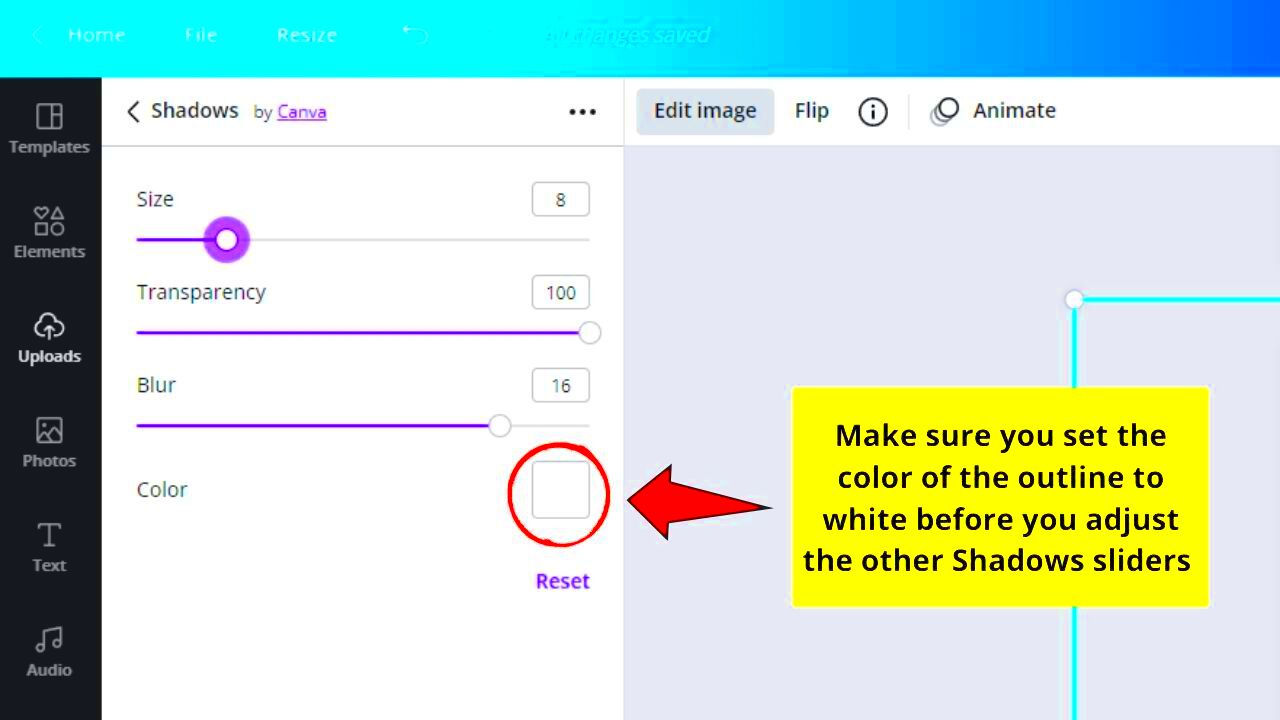
- Adjust the Thickness: Use the slider to adjust the thickness of the outline to suit your design. A thicker outline can make a bold statement, while a thinner outline can provide a subtle effect.
- Choose Your Color: Click on the color box to change the outline color. Make sure it contrasts well with the image for the best visibility.
- Finalize Your Design: Once you’re happy with the outline, make any additional adjustments to your image or background to complete your design.
With these steps, you’ll be able to create stunning outlines that enhance your images and make them more engaging!
Also Read This: Mirroring an Image in PowerPoint
Using Canva Tools to Enhance Your Outline
Canva offers a variety of tools that can help you enhance your outlines, making your designs even more striking. By leveraging these tools, you can add depth and character to your outlines, setting your work apart. Here are some key tools and features to consider:
- Effects: Besides basic outlines, explore effects like shadows or glows that can give your outlines a 3D look.
- Transparency: Adjusting the transparency of your outline can create subtle effects that blend well with your background.
- Text Tools: Pair your outlines with stylish text. Use different fonts and sizes to complement your outlines and create cohesive designs.
- Grid and Frame Tools: Use grids to align your images and outlines precisely. Frames can also help you create unique shapes for your outlines.
Experimenting with these tools can lead to creative outcomes. Don’t hesitate to play around and see what works best for your project!
Also Read This: How to Sell My Photos on Getty Images
Customizing Your Outline with Colors and Styles
Customizing the colors and styles of your outlines is an exciting way to make your designs truly your own. Here’s how you can add your personal touch:
- Color Selection: Choose colors that match your overall theme. Use a color wheel to find complementary colors for your outline.
- Line Style: Canva allows you to select different line styles, such as dashed or dotted outlines. Experiment with these to find what fits your design.
- Layering: You can layer multiple outlines around an image. This technique can create a striking visual effect, drawing even more attention to your subject.
Remember, your outline should enhance, not overshadow, your image. So, play with different styles until you find the right balance!
Also Read This: Simple Steps to Delete an Image in Word
Common Mistakes to Avoid When Creating Outlines
Creating outlines can be fun, but it’s easy to make mistakes that can undermine your design. Here are some common pitfalls to watch out for:
- Overusing Outlines: While outlines can enhance your images, too many can make your design cluttered. Stick to a few key areas.
- Poor Color Choices: Using colors that clash or are too similar to the image can make the outline ineffective. Always test colors against the background.
- Ignoring Scale: If your outline is too thick or too thin relative to your image, it can throw off the visual balance. Always adjust the thickness to fit your design.
- Neglecting Context: Make sure the outline fits the overall theme of your design. An outline that looks great in one context may not work in another.
Avoiding these mistakes will help you create cleaner, more effective designs that catch the viewer's eye!
Also Read This: Transferring an Image onto Fabric
Tips for Using Outlines Effectively in Your Designs
Using outlines in your designs can elevate your work, but there are some key tips to keep in mind for maximum effectiveness. Here’s how to make your outlines stand out without overwhelming your design:
- Keep It Simple: A clean and simple outline often works best. Avoid overly complicated designs that can distract from your main message.
- Use Contrast Wisely: Ensure your outline color contrasts well with both the image and the background. This will help your outline pop and keep the focus on your subject.
- Align with Your Branding: If you’re designing for a brand, make sure your outline colors and styles align with your overall branding strategy. Consistency builds recognition.
- Experiment with Different Shapes: Don’t limit yourself to standard outlines. Experiment with unique shapes or custom outlines that can add a fun twist to your designs.
- Test and Iterate: After creating your design, take a step back and assess it. Ask for feedback from others and make adjustments as necessary to improve your design.
By keeping these tips in mind, you can use outlines to enhance your designs effectively, making them visually appealing and engaging.
Also Read This: How to Get More Likes on EyeEm: 10 Proven Strategies
Frequently Asked Questions About Outlining Images in Canva
Outlining images in Canva can lead to a lot of questions, especially for beginners. Here are some frequently asked questions that might help you:
- Can I outline text as well as images? Yes! You can apply similar techniques to text in Canva, allowing you to create dynamic typography.
- How do I change the outline color after I’ve set it? Simply click on the outlined image, go to the color options, and select a new color for your outline.
- Can I use patterns for outlines? While Canva doesn’t support patterned outlines directly, you can create a shape with a pattern and layer it behind your image for a unique effect.
- What if my outline doesn’t look right? Don’t worry! You can always adjust the thickness, color, or style until you achieve the desired look.
If you have more questions, don’t hesitate to explore Canva’s help center or community forums for additional support!
Conclusion and Final Thoughts
Creating outlines for images in Canva is a fantastic way to enhance your designs and make them stand out. By understanding the importance of outlines, utilizing Canva’s tools, and customizing your designs, you can elevate your work to a new level. Remember to keep your designs simple and aligned with your brand while avoiding common mistakes.
Whether you’re a beginner or have some experience, applying these tips will help you effectively use outlines in your projects. So go ahead, experiment with different styles and techniques, and see how outlines can transform your designs. Happy designing!

 admin
admin


