Hey there, hair enthusiasts! Have you ever been intrigued by the beautiful twist of a snake braid? This trendy hairstyle is not only eye-catching but also surprisingly easy to master. Perfect for beginners, snake braids offer a unique twist on traditional braids and can elevate any look, whether it’s casual or formal. In this tutorial, we'll dive into the essentials of creating a snake braid, turning heads wherever you go. Let’s untangle the mystery behind this stylish braid!
Tools Needed for Creating a Snake Braid
Before we jump into the braiding process, it’s crucial to gather all the tools you’ll need. Having everything at your fingertips can make your styling experience smooth and enjoyable. Here’s a handy list of items you should have ready:
- Hairbrush or Comb: For detangling and smoothing your hair.
- Hair Ties: Use clear or matching hair ties to secure your braid at the end.
- Hair Clips: These help keep sections of hair out of the way while you braid.
- Texturizing Spray: Optional, but it can add grip to slippery hair, making it easier to braid.
- Mirror: A hand mirror or a wall mirror will help you see what you’re doing.
Once you have your tools ready, you’re halfway to achieving a fantastic snake braid! Each item plays a role in ensuring you can create a clean and stylish braid. For example, the hairbrush will help you glide smoothly into the braiding process, while hair clips will prevent any unruly strands from getting in your way.
Remember, the key to a great snake braid is practice. Don’t rush through it—take your time to familiarize yourself with the technique. So, are you ready to gather your tools and start braiding? Let's get to it!
Also Read This: How Creative Videos Like ‘A Foolish Stag’ Teach Life Lessons on Dailymotion
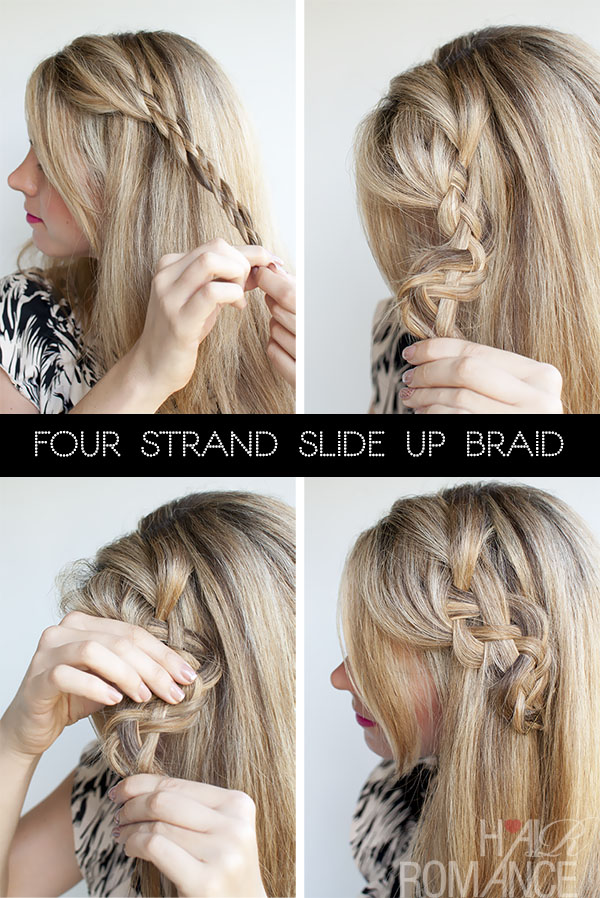
3. Step-by-Step Guide to Making a Snake Braid
Ready to dive into the world of snake braids? This stylish hairstyle is easier than it looks! Let’s break it down into simple steps so you can master it in no time. Grab your hairbrush, some elastics, and let’s get started!
Step 1: Prep Your Hair Before you begin, make sure your hair is clean and dry. If your hair tends to be slippery, a little texturizing spray can help your braid hold better. Brush out any knots for a smooth start.
Step 2: Divide Your Hair Part your hair down the middle or to one side, depending on your preference. Gather a section of hair from one side, about two inches wide, and secure the rest to keep it out of the way. This will be the starting point for your snake braid.
Step 3: Create the Base Braid Begin by dividing the section of hair into three equal parts. Start a regular braid (cross the right strand over the middle, then the left strand over the new middle). Do this for about 5-6 stitches. This base braid will give your snake braid structure.
Step 4: Start the Snake Effect Now, this is where the magic happens! Grab a small piece of hair from the left side and bring it over to the right side. Then, take a small section from the right side and bring it over to the left. This will create the snake-like effect. Keep doing this while continuing your braid. The key is to keep the sections thin for a defined look.
Step 5: Secure the Braid Once you reach your desired length, finish off with a regular braid for a few more stitches to maintain the look, and secure it with a clear elastic. You can pull gently on the sides of the braid to loosen it up and give it a fuller appearance.
Step 6: Finishing Touches If you want a more polished finish, you can add some hair spray to hold everything in place. For a fun twist, add decorative pins or flowers to embellish your snake braid. And voilà! You’ve just created a stunning snake braid!
Also Read This: How to Download Dailymotion Videos on PS Vita: Simple Steps for Video Downloads
4. Common Mistakes to Avoid When Braiding
Even seasoned braid enthusiasts can run into a few hiccups! Avoid these common mistakes to ensure your snake braid looks flawless and stays put:
- Skipping the Prep: Always start with clean, dry hair. Wet or greasy hair can be slippery and make it difficult to hold a braid.
- Taking Too Much Hair: When grabbing sections for the snake effect, keep them small! Too large of sections can lead to a less defined look.
- Neglecting Tension: Maintaining even tension is key. Pull too tightly, and you might cause breakage; too loose, and the braid will fall apart.
- Forgetting the Base Braid: Don’t skip the initial base braid! It provides structure and keeps the snake effect looking sharp.
- Not Using the Right Tools: A good hairbrush and some elastics are your best friends. Invest in quality products that work well with your hair type.
By keeping these tips in mind, you’ll steer clear of common pitfalls and get your snake braid just right. Happy braiding!
Also Read This: How to Add Videos to Dailymotion Playlist: Organizing Your Favorite Content
5. Styling Tips for a Perfect Snake Braid
Creating a perfect snake braid is all about technique and a bit of practice. Here are some styling tips that will elevate your braid game and help you achieve that flawless look:
- Prep Your Hair: Start with clean, dry hair. If you have fine or slippery hair, consider using a texturizing spray or a bit of mousse to add grip.
- Sectioning is Key: Make sure to divide your hair into three equal sections before you start braiding. The more precise your sections are, the neater your braid will look.
- Keep It Tight: While braiding, maintain a consistent tension. This helps to keep the braid looking polished and prevents it from becoming loose over time.
- Practice Makes Perfect: Don't be discouraged if it doesn't look perfect the first time. The snake braid involves a unique weaving technique that may take a few tries to master.
- Use Hair Pins: After finishing your braid, secure it with a hair tie. For added security, you can also use hair pins to tuck in any loose strands.
Lastly, don’t forget to finish off your look with a bit of hairspray to hold everything in place! This is especially helpful if you’re planning to wear your braid for an extended period. Now, let’s explore some variations of the snake braid that you might want to try!
6. Variations of the Snake Braid to Try
Once you’ve mastered the basic snake braid, it’s time to get creative! Here are some fun variations that will add flair to your hairstyle:
- Half-Up Snake Braid: Instead of braiding all your hair, gather the top half and create a snake braid. This looks chic and keeps hair out of your face while still showcasing your locks.
- Snake Braid Pigtails: Divide your hair into two sections and create a snake braid on each side. This playful look is perfect for casual outings or festivals!
- Snake Braid with Ribbon: Weave a colorful ribbon into your snake braid for a pop of color. This is a beautiful touch for special occasions or when you want to brighten up your look.
- Side Snake Braid: Instead of braiding straight down your back, try a side braid. This asymmetrical look adds an element of surprise and is perfect for a bohemian vibe.
- Snake Braid Crown: Create a snake braid around the crown of your head like a halo. This elegant style is great for formal events or weddings.
With these variations, you can switch up your snake braid style depending on your mood or occasion. Have fun experimenting and don’t hesitate to personalize these looks to make them your own!
 admin
admin


