Creating a paper airplane is not just a childhood pastime; it's a delightful blend of art and science that can be enjoyed by people of all ages. In this fun crafting guide, we'll walk you through the simple steps to make your very own paper airplane, whether you're looking to impress your friends with your skills or just want to kill some time. Let's dive into the world of folding and flying, where creativity meets engineering, and discover how to turn a plain sheet of paper into a soaring masterpiece!
Materials Needed

Before we create our paper airplane, we'll need a few essential materials. Don’t worry; you won’t need anything fancy! Here’s what you’ll need to get started:
- Paper: Any standard sheet will do—8.5 x 11 inches is perfect. You can use printer paper, notebook paper, or even colored paper if you want to add a personal touch.
- Ruler: A ruler is great for making straight lines and ensuring your folds are precise.
- Pencil: If you'd like to mark your folds or design, a pencil is a handy tool for this.
- Scissors (optional): Depending on the design you choose, you might want to trim the edges for a sleeker airplane.
- Bone folder or credit card (optional): For super crisp folds, these tools can help you press down on your creases for a cleaner finish.
Gathering these materials is the first step in your paper airplane adventure. Don’t forget to find a nice, open space to fly your creation! Once you have everything ready, you’ll be well on your way to mastering the craft of paper airplane making.
Step-by-Step Instructions

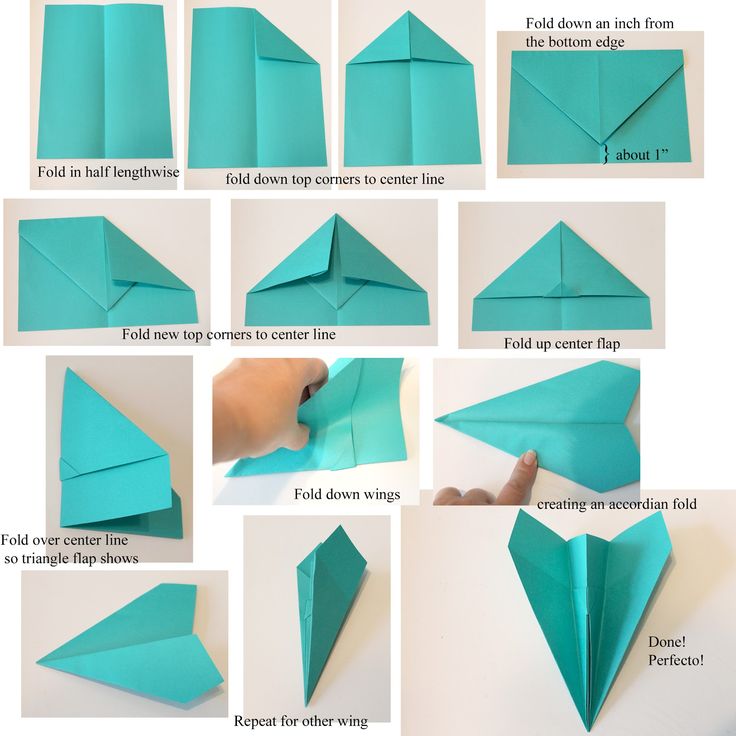
Ready to launch your paper airplane adventure? Let’s dive into the easy-to-follow steps to create your very own flying masterpiece! Remember, practice makes perfect, so don't hesitate to try different designs. Here’s a simple way to make a classic dart-style paper airplane.
- Gather Your Materials: You’ll need a single sheet of letter-sized paper (any color or pattern you like) and a flat surface to work on.
- Make the First Fold: Start by taking your sheet of paper and folding it in half lengthwise. Make sure the edges are lined up and crease it well. Then, unfold the paper to reveal a center crease.
- Create the Nose: Take the top two corners and fold them towards the center crease, forming a triangle at the top. Ensure that both edges are aligned perfectly.
- Fold the Triangles: Now, fold the triangle down so that the top point meets the bottom edge of the paper, reinforcing the shape of the nose.
- Make the Wings: Fold the paper in half along the original center crease (with all the previous folds on the outside). Then, fold down each side to form the wings. Aim to make the wings about an inch wide, or adjust to your preference.
- Adjust and Decorate: Open up your airplane's wings so they're perpendicular to the body. Feel free to draw, color, or add stickers to personalize your plane!
- Take Flight: You’re now ready to try out your paper airplane! Hold it by the bottom edge and give it a gentle toss to watch it soar.
Tips for Improving Your Paper Airplane

Want to maximize your paper airplane’s flying abilities? Here are some handy tips that can help you tweak your design for better performance!
- Use Sturdier Paper: While printer paper works, try heavier paper like cardstock. It can help your plane maintain its shape and fly longer distances.
- Tweak the Wing Design: Experiment with wing sizes and shapes. Wider wings provide more lift but might reduce speed, while narrower wings may fly faster but require more precise throwing.
- Adjust the Center of Gravity: If your airplane tips down during flight, try adding a small paper clip to the nose. This extra weight can help with balance.
- Check Your Creases: Make sure all your folds are sharp and well-creased. Crisp edges can significantly improve aerodynamics.
- Test Different Launch Angles: The angle at which you launch your airplane matters! A slight upward tilt can lead to longer flights.
Remember, the sky's the limit when it comes to creativity and experimentation! Keep trying different designs, and you might create the next world champion of paper airplanes.
How to Create a Paper Airplane with a Fun Crafting Guide
Creating a paper airplane is a delightful and educational craft that can engage both children and adults. This fun activity not only sparks creativity but also involves principles of aerodynamics. Whether you're crafting for fun, competition, or teaching, a simple paper airplane can provide hours of enjoyment. Let’s dive into some easy steps to create your own paper airplane!
Materials Needed
- One sheet of paper (standard A4 or letter size works best)
- Flat surface for folding
- Optional: Markers or stickers for decoration
Step-by-Step Instructions
- Start with the Paper: Lay your sheet of paper on a flat surface, making sure it's oriented in landscape mode.
- Folding the Paper: First, fold the paper in half lengthwise, then unfold it to create a center crease.
- Forming the Wings:
- Fold the top two corners down towards the center crease to form a triangle.
- Fold the triangle down along the crease you made earlier.
- Create the Wings: Fold the outer edges down to meet the bottom edge of the airplane, forming the wings.
- Finishing Touches: Adjust the wings to be symmetrical and decorate your airplane if you wish.
Tips for Flying
| Tip | Description |
|---|---|
| Throwing Angle | Throw the plane at a 10-15 degree angle for optimal flight. |
| Wind Conditions | Calm winds are ideal for flying your paper airplane. |
Creating and flying paper airplanes is not only entertaining but can also enhance fine motor skills, improve hand-eye coordination, and introduce basic physics concepts. So gather your materials, follow the steps meticulously, and enjoy the art and science of paper airplane creation!
 admin
admin


