Have you ever admired a stunning front braid on someone and thought, "I wish I could do that!"? Well, you can! Front braids are not only stylish but also a practical hairstyle that keeps your hair out of your face. Whether you're preparing for a casual day out or a special event, mastering this technique will elevate your look. In this guide, we’ll break down the steps and tips to help you create a gorgeous front braid that turns heads. Let's get started!
Gathering Your Supplies
Before diving into the braiding process, it's essential to gather the right supplies. Having everything on hand will make your experience smoother and more enjoyable. Here’s a list of what you’ll need:
- Hairbrush: A good brush will help detangle your hair, ensuring a neat braid.
- Hair ties: Opt for clear or matching hair ties to keep your braid secure.
- Hair clips: These are perfect for sectioning your hair while you work on your braid.
- Hairspray (optional): If you want to keep your braid in place, a light spritz of hairspray can work wonders.
- Mirror: A handheld or full-length mirror will help you see what you’re doing, especially for the back of your head.
Once you have your supplies ready, you'll be all set to begin! A little prep goes a long way in ensuring a successful braiding session. Now, take a moment to check that your hair is clean and dry. If you want added texture, consider using some styling products like mousse or texturizing spray for better grip when braiding.
With your tools gathered and your hair ready, you're just a few steps away from rocking that beautiful front braid. Ready to learn how to braid? Let’s move on to the next steps!
Also Read This: How a Cricket Ball is Made – Watch the Process on Dailymotion
3. Preparing Your Hair
Before diving into the world of braiding, it’s essential to prepare your hair properly. Think of this as laying the foundation for a beautiful braid. A few minutes of prep can make a world of difference in the final result!
1. Start with Clean Hair: Begin with freshly washed hair. If you have oily or dirty hair, the braid may not hold as well. It's ideal to wash your hair the night before and let it air dry for that perfect texture.
2. Detangle: Use a wide-tooth comb or a brush to eliminate any knots. Starting from the tips and working your way up helps prevent breakage. This is also a great time to use a leave-in conditioner or a detangling spray for added smoothness.
3. Add Texture: If your hair is very straight or fine, consider adding some texture to help the braid hold better. You can use a texturizing spray or a light mousse. Just a small amount will do the trick, giving your hair the grip it needs.
4. Sectioning Your Hair: Depending on how you want your front braid to look, you might want to section off the hair. For a sleek braid, grab a section from the front of your head, about an inch wide. You can use a clip to hold the rest of your hair back to keep it out of the way.
Once you’ve completed these steps, you’re ready to start your braid! Remember, preparation is key—your braid will be much easier to manage with well-prepped hair.
Also Read This: How to Download Dailymotion App on Samsung TV: Easy Installation Steps
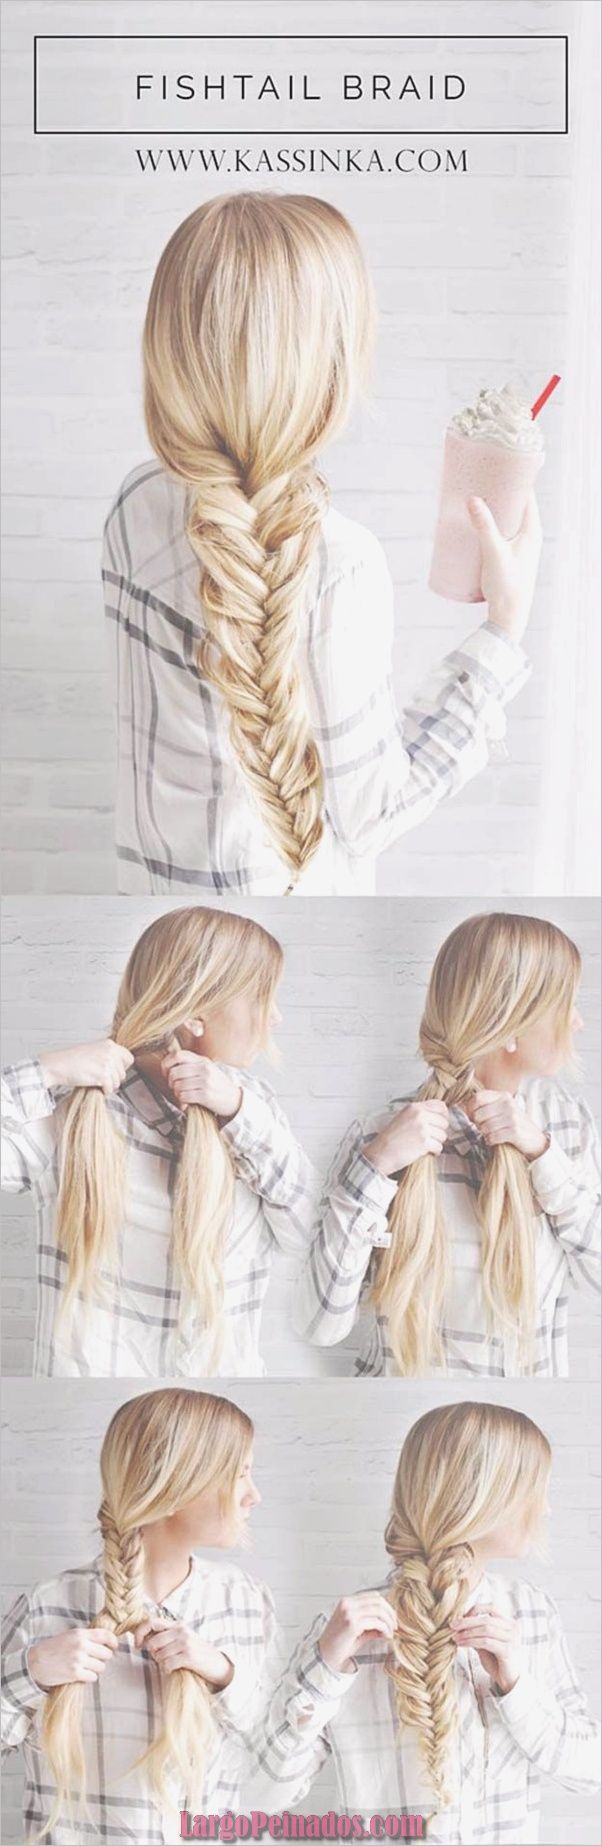
4. Step-by-Step Instructions for Creating a Front Braid
Now that your hair is prepped, it’s time to get creative! Follow these simple steps to create a stunning front braid:
- Gather Your Section: Start by taking the section of hair you prepared earlier. Hold it firmly to keep it from slipping away.
- Divide into Three Parts: Next, split this section into three equal strands. These will be your main components for the braid.
- Start Braiding: Cross the right strand over the middle strand, making it the new middle strand. Then, do the same with the left strand. Continue this pattern, alternating sides.
- Add Hair as You Go: As you braid, begin to incorporate small sections from both the left and right sides into your braid. This will give you that beautiful front braid look. Make sure to keep the tension even as you work.
- Continue Until You Reach the End: Keep braiding until you reach the end of your section. Secure it with a small hair tie or elastic. You can also use a clear elastic for a more discreet look.
- Loosen the Braid: For a softer, more relaxed look, gently pull on the edges of the braid to loosen it slightly. This adds volume and texture.
Voilà! You’ve created a gorgeous front braid that’s perfect for any occasion. Don’t hesitate to play around with the style—try different sizes or add accessories like clips or ribbons to make it uniquely yours!
Also Read This: Explore How to Download Dailymotion Playlist with This Powerful Tool
5. Tips for a Perfect Braid
Creating a stunning front braid is all about technique and a bit of finesse. Here are some valuable tips to ensure your braid turns out flawless:
- Start with Clean Hair: Dirty hair can be slippery and hard to manage. Make sure your hair is clean and dry. If you prefer a little grip, consider applying a lightweight mousse or texturizing spray.
- Use a Mirror: Position a mirror in front of you and, if possible, a second one behind you. This will help you see the back of your head and ensure even tension throughout the braid.
- Section Your Hair Evenly: Before you begin braiding, divide your hair into three equal sections. This will make it easier to weave and ensure your braid looks symmetrical.
- Practice Your Technique: If you’re new to braiding, don’t hesitate to practice on a wig or a friend’s hair first. The more you practice, the more comfortable you’ll become with the movements.
- Keep It Loose: For a more relaxed, bohemian look, don’t pull too tightly on the sections. A looser braid can appear softer and more romantic.
- Finish with a Hair Tie: Once you’re done braiding, secure the end with a hair tie that matches your hair color. This will keep the braid intact without drawing attention to the tie itself.
- Use a Finishing Spray: A light mist of hairspray can help hold your braid in place all day. Look for sprays that offer flexibility so your braid can still move naturally.
By following these tips, you'll create a beautiful front braid that enhances your look perfectly!
Also Read This: How to Make Cartoon Cake: Fun Decorating Tips on Dailymotion
6. Common Mistakes to Avoid
Even seasoned braiders can make mistakes every now and then. Let’s explore some common pitfalls and how to avoid them:
- Smoothing Out the Sections: A frequent mistake is not detangling the hair properly before braiding. This can lead to knots and uneven sections. Always run a brush through your hair before you start.
- Ignoring Hair Type: Different hair types require different approaches. For example, if you have fine hair, a little texturizing spray can help give your braid some volume. On the other hand, thicker hair might need more grip to stay in place.
- Pulling Too Tight: While some tightness is necessary for a structured braid, pulling too hard can cause discomfort and can lead to breakage. Keep it snug but not painful.
- Neglecting to Practice: Many people jump right in without practicing their technique. Take the time to learn the basic movements before attempting intricate styles.
- Forgetting to Secure the Braid: Once you finish braiding, it’s crucial to secure it properly. Skipping this step can lead to your braid unraveling midway through your day.
- Not Personalizing the Style: Don’t hesitate to add your personal touch! Accessories like beads, ribbons, or flowers can elevate your braid from basic to beautiful.
Avoiding these common mistakes will help you achieve the perfect front braid every time. Happy braiding!
Also Read This: Flipping the Screen on Dailymotion for Enhanced Viewing Experience
7. How to Style Your Front Braid
So, you've mastered the art of the front braid—congratulations! Now it’s time to amp up your style and make that braid truly shine. Here are some fun and creative ideas to style your front braid:
- Messy Bun Combo: Pair your front braid with a messy bun for a laid-back, trendy look. Simply pull the rest of your hair into a bun at the back and let the braid cascade elegantly to the side.
- Accessorize: Add some flair with hair accessories. Consider using decorative pins, flowers, or even colorful ribbons. These little touches can elevate your braid from simple to stunning in seconds!
- Half-Up, Half-Down: If you’re feeling playful, try a half-up, half-down style. Secure the top section of your hair into a small ponytail or bun while leaving the braid to frame your face.
- Beachy Waves: For a boho vibe, curl the ends of your hair lightly. This softens the look and creates a lovely contrast with the structured braid.
Remember, the beauty of styling your front braid is that there are no strict rules—just have fun with it! Experiment with different looks until you find the one that suits your personality best. Once you’ve styled it, take a moment to appreciate your hard work; you deserve it!
8. Conclusion and Additional Resources
Congratulations on diving into the world of front braids! With this step-by-step guide, you now have the skills to create beautiful braids that can enhance any look. Remember, practice makes perfect—so don’t get discouraged if it doesn’t come out perfectly the first time. Here are a few additional resources to help you on your braiding journey:
- Video Tutorials: Sometimes, seeing is believing. Check out channels like Dailymotion for a plethora of video tutorials showcasing various front braid styles.
- Social Media Inspiration: Platforms like Instagram and Pinterest are gold mines for hairstyle inspiration. Follow popular hair stylists and search for hashtags like #frontbraid and #braidstyles to see how others are rocking the look.
- Hair Care Tips: Healthy hair makes for beautiful braids. Look for articles on maintaining hair health with oils, masks, and proper washing techniques to ensure your hair is always in top shape.
- Community Forums: Join forums or groups focused on hairstyling. Engaging with others who share your passion can provide support and ideas for new styles to try.
Now go out there and flaunt your stunning front braid with confidence! Happy braiding!
 admin
admin


