Behance is a fantastic platform for showcasing your creative work and connecting with fellow artists. Whether you're a graphic designer, photographer, or illustrator, a well-organized Behance project can make a significant difference in how your work is perceived. In this guide, we’ll walk you through the steps to create a new project and organize your work effectively. Let’s dive in!
Creating a New Behance Project
Creating a new project on Behance is a straightforward process that enables you to present your work in a visually appealing way. Here’s how to do it:
- Log In to Your Behance Account: Start by logging into your Behance account. If you don’t have one yet, sign up for free.
- Select “Create a Project”: Once logged in, navigate to your profile and click on the “Create a Project” button. This option is usually found on the top right corner of the screen.
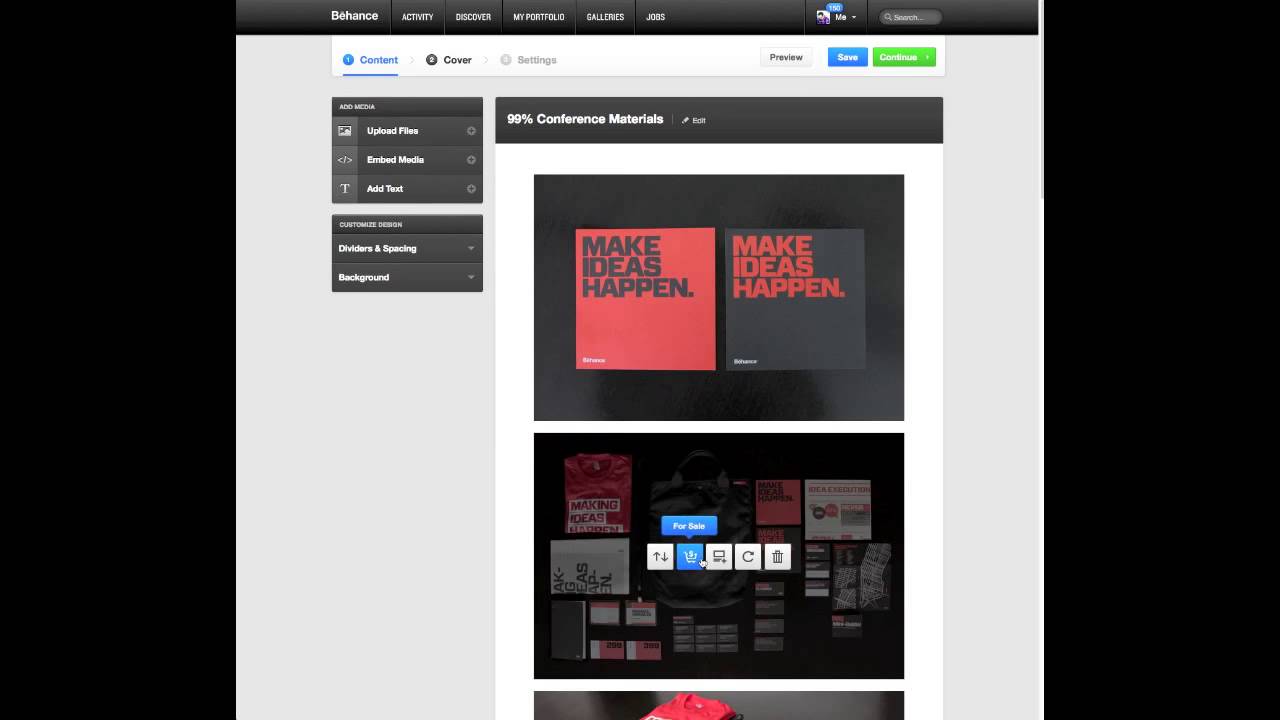
- Upload Your Work: You can upload images, videos, or even PDF files. Click on the “Upload Files” button and choose the files from your device. Behance supports various file types, so you can be creative!
- Arrange Your Content: After uploading, you can easily drag and drop your files to arrange them in the desired order. Take a moment to think about the story you want your project to tell.
- Add Descriptions and Tags: For each piece of work, include descriptions that provide context and details. Use tags to categorize your work, making it easier for others to discover it.
- Customize Your Project: Use Behance's design tools to customize the layout, colors, and text styles. This is your chance to reflect your unique style!
- Preview and Publish: Before going live, make sure to preview your project. Once you’re satisfied, hit the “Publish” button and share your project with the world!
Remember, the key to a successful Behance project is not just the work itself but how you present it. A little thoughtfulness in organization can go a long way! Happy creating!
Also Read This: Understanding Behance Cover Size for Optimal Portfolio Presentation
Steps for Uploading Your Work

Creating a stunning Behance project starts with the uploading process. Follow these straightforward steps to showcase your work effectively:
- Log in to Your Behance Account: Before you can upload anything, ensure you're logged into your Behance account. If you don't have one, sign up—it's free and easy!
- Click on the “Create a Project” Button: Once logged in, look for the “Create a Project” button, usually found on your profile page. It's a bright, inviting button that’s hard to miss!
- Drag and Drop or Upload Files: You can either drag and drop your images and files into the designated area or click to browse your computer. Behance supports various file types like JPG, PNG, GIF, PDF, etc.
- Add Titles and Descriptions: Each piece of work should have a catchy title and a brief description. This is your chance to tell the story behind the project or highlight specific techniques used. Be creative!
- Include Tags: Tags help others find your work. Use relevant keywords that describe your project. For instance, if it’s a graphic design project, include tags like “graphic design,” “illustration,” and “branding.”
- Set the Cover Image: Choose an eye-catching cover image that represents your project well. This is the first thing visitors will see, so make it striking!
- Preview and Publish: Before hitting that publish button, take a moment to preview your project. Check for any mistakes and ensure everything looks great. When you're ready, click “Publish.”
Also Read This: How to Maximize the Potential of Behance for Creative Professionals
Organizing Your Project Effectively
Once you've uploaded your work, organizing it is key to making it engaging and easy to navigate. Here’s how to do that:
- Group Similar Works: If you have various pieces, group them by theme or style. For example, if you’re a photographer, you might have sections for portraits, landscapes, and events.
- Use Sections: Behance allows you to create sections within your project. Use this feature to break down your work into digestible parts. Each section can tell a different story or explore different aspects of a project.
- Utilize High-Quality Images: Ensure all your images are high quality. Blurry or pixelated images can detract from your work. Consider resizing them for a consistent look.
- Incorporate Text Wisely: Balance visuals with text. Add descriptions, insights, or reflections that guide the viewer through your project. Keep it concise but informative.
- Engage with Visual Hierarchy: Use size, color, and placement to create a flow. Highlight the most important pieces by making them larger or placing them at the beginning of your project.
- Include Links and Media: If applicable, link to your website or social media. You can also embed videos or animations that complement your work.
By following these organizational tips, you’ll create a Behance project that not only showcases your work but also engages and informs your audience effectively.
Also Read This: How to Download Portfolio from Behance: Saving Your Portfolio for Offline Access
5. Adding Finishing Touches
After you've uploaded your work and organized your project, it's time to refine it with some finishing touches. This step is crucial because it helps your project stand out and makes a lasting impression on viewers.
Here are a few key elements to consider:
- Project Title: Choose a catchy and descriptive title that encapsulates your work. Aim for something that grabs attention yet remains relevant.
- Project Description: Write a concise and engaging description. Include the purpose of the project, your inspiration, and any challenges you overcame. This gives context to your work and draws viewers in.
- Tags: Use relevant tags to help others find your project. Think about keywords that relate to your work. For instance, if it’s a graphic design project, tags like “graphic design,” “branding,” and “illustration” could be beneficial.
- Cover Image: Select a striking cover image that represents your project well. This is the first thing people will see, so make it count!
- Order of Images: Arrange your images in a logical flow. Start with the most impactful visuals and end with your favorites or a conclusion.
By focusing on these details, you enhance the overall appeal of your Behance project and make it more engaging for your audience.
Also Read This: How to Make a Great Behance Portfolio: Design Tips for an Outstanding Online Presence
6. Publishing Your Project
Now that you've added all the finishing touches, it’s time to publish your project! This is where your hard work finally gets showcased to the world.
Here’s how to smoothly navigate the publishing process:
- Preview Your Project: Before hitting the publish button, take a moment to preview your project. This allows you to see how everything looks and make necessary adjustments.
- Choose Visibility Settings: Decide whether you want your project to be public or private. Public projects are visible to everyone, while private projects can be shared only with selected individuals.
- Publish: When you’re satisfied, click on the “Publish” button. It's that simple! Your project will then be live on Behance, ready for the world to see.
- Share Your Project: After publishing, don’t forget to share your project on social media or with your network. This can help you gain visibility and attract more viewers.
Congratulations! You’ve successfully published your Behance project. Now, sit back and enjoy the feedback and engagement from your audience!
How to Create a Behance Project with Steps for Uploading and Organizing Your Work
Behance is a popular platform for showcasing creative work, allowing designers, artists, and photographers to display their projects to a global audience. Creating a project on Behance is straightforward, but organizing your work effectively can enhance your portfolio's impact. Here’s a step-by-step guide to help you get started:
Step 1: Sign Up or Log In
If you’re new to Behance, you’ll need to sign up for an account. If you already have an account, simply log in.
Step 2: Start a New Project
Once logged in, click on the “Create a Project” button located in the top right corner of your dashboard.
Step 3: Upload Your Work
You can upload various types of media, including:
- Images (JPEG, PNG)
- Videos (MP4)
- PDF files
Drag and drop files or click to upload them from your computer.
Step 4: Organize Your Media
Once uploaded, you can:
- Rearrange images and videos by dragging them.
- Add text descriptions to provide context.
- Include tags to improve searchability.
Step 5: Customize Your Project
Choose a project cover image and layout style. Behance offers various templates to highlight your work attractively.
Step 6: Publish Your Project
After finalizing your project, click the “Publish” button. You can also adjust privacy settings to control who sees your project.
Conclusion
Creating a Behance project is a strategic way to present your work. By following these steps to upload and organize your content, you can effectively showcase your creativity and enhance your professional presence.
 admin
admin