Have you ever needed an image from a Google Slides presentation but weren’t sure how to extract it? You’re not alone! Many users find themselves in this situation, and it can be a bit perplexing. In this post, we’ll explore simple methods to copy images from Google Slides easily. Whether you're a student, teacher, or professional, knowing how to do this can save you time and enhance your projects.
Why Copying Images from Google Slides is Useful
Copying images from Google Slides opens up a world of possibilities for both personal and professional projects. Here are some reasons why this skill can be incredibly beneficial:
- Enhanced Presentations: Using high-quality images can significantly enhance the overall look of your presentations. By copying images directly from slides, you can easily include relevant visuals that reinforce your message.
- Quick Access to Visuals: If you’ve created a presentation that includes charts, graphs, or unique illustrations, being able to copy these images directly saves you the hassle of recreating them. It’s a huge time-saver!
- Resource Gathering: For teachers or content creators, having a collection of images from various presentations can be invaluable. You can build a personal library of visuals that you can reference in future projects.
- Collaboration Made Easy: Working on group projects? Being able to share images quickly from slides can facilitate better collaboration among team members, ensuring everyone is on the same page.
- Creative Use in Other Platforms: Want to use an image in a blog post or social media? Copying images from Google Slides allows you to repurpose content creatively across different platforms, tapping into your original work.
With these benefits in mind, it’s clear that knowing how to copy images from Google Slides is not just a convenience—it's a powerful tool in your digital toolkit!
Also Read This: Get to Know If Shutterstock Contributor Is Safe
3. Step-by-Step Guide to Copying Images
Copying images from Google Slides is a breeze once you know the steps! Let’s break it down so you can snag those images without any hassle.
Step 1: Open Your Google Slides Presentation
First things first, head over to Google Slides and open the presentation that contains the image you want to copy. If you’re not logged in, you’ll need to do that first. Don’t worry; Google makes it easy!
Step 2: Locate the Image
Once your presentation is open, navigate through your slides to find the image you wish to copy. Click on the slide where the image is located. You’ll see it right there, ready for you!
Step 3: Select the Image
Click on the image to select it. You’ll know it’s selected when you see blue borders around it. If you want to copy multiple images, you can hold down the Shift key and click on each image to select them all at once.
Step 4: Copy the Image
Now that your image is selected, it’s time to copy it! You can do this in a couple of ways:
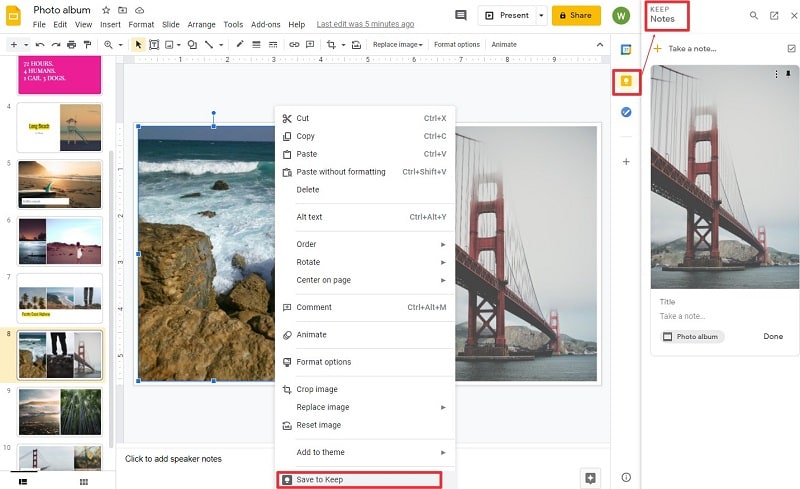
- Right-click the selected image and choose Copy from the context menu.
- Or, simply press Ctrl + C (or Cmd + C on a Mac) to copy the image.
Step 5: Paste the Image
After copying, navigate to the application where you want to paste the image—be it Google Docs, an email, or even your desktop. Click where you want the image to go, then:
- Right-click and select Paste.
- Or use the shortcut Ctrl + V (or Cmd + V on a Mac) to paste your image.
And voila! You’ve successfully copied an image from Google Slides. Easy, right? You can repeat these steps for any other images you need. Just remember, if you copy multiple images at once, they will paste in the same order you selected them!
Also Read This: Guide to Finding the Location of an Image Online
4. Common Issues and Troubleshooting
While copying images from Google Slides is generally straightforward, you might run into a few hiccups along the way. Don’t worry; here are some common issues and how to solve them!
Issue 1: Image Not Copying
Sometimes, you might find that the image doesn’t copy at all. This could happen if:
- The image is embedded in a way that restricts copying.
- You’re trying to copy from a presentation that’s in view-only mode.
To fix this, ensure you have editing permissions for the presentation. If it’s view-only, ask the owner for access or make a copy of the presentation to your Google Drive.
Issue 2: Paste Function Not Working
If you’ve successfully copied the image but can’t paste it, check the application you’re trying to paste into. Some apps may not support image pasting from Google Slides directly. In this case, try:
- Using a different application that supports images, like Google Docs or an image editor.
- Saving the image to your computer first, then uploading it to the desired application.
Issue 3: Poor Image Quality
If your copied image appears blurry or low quality, it’s possible that it was a low-resolution image to begin with. For better quality:
- Try downloading the image directly from the source if possible.
- Check if there’s an option to export or save the image in a higher resolution.
Final Tip: If you’re still facing issues, consider taking a screenshot of the image as a last resort. Just remember to crop it afterward to remove any unwanted parts!
With these troubleshooting tips, you should be able to overcome any obstacles and copy images from Google Slides with ease. Happy copying!
Also Read This: The Controversy Surrounding YouTube Shorts and Their Common Criticisms
5. Tips for Using Images Appropriately
When you're copying images from Google Slides, it's crucial to ensure you're using them appropriately. Not every image can be freely used, and respecting copyright and licensing is key. Here are some friendly tips to help you navigate this:
- Check the Source: Always look at where the image originates. If it’s from a reputable site with clear usage rights, you’re in a good spot. Websites like Unsplash or Pixabay offer free images you can use without worrying about copyright.
- Credit the Creator: If you do use an image that requires attribution, make sure to include a credit line. It’s a simple way to show respect for the artist’s work. For example, “Image by Artist Name on Unsplash.”
- Avoid Watermarked Images: Unless you have permission or a subscription, steer clear of images with watermarks. These are typically protected by copyright and using them without permission can lead to legal troubles.
- Use Public Domain Images: Public domain images are free to use in any way you like. Websites like Public Domain Pictures are great resources.
- Be Mindful of Context: Make sure your images match the context of your content. An image that feels out of place can confuse your audience. For instance, if you're discussing eco-friendly practices, use images related to nature and sustainability.
By following these tips, you can ensure that your use of images not only enhances your content but also respects the rights of creators. It’s all about creating a balanced and ethical approach to image usage!
6. Conclusion
Copying images from Google Slides doesn’t have to be a daunting task. With the right methods and an understanding of how to use images responsibly, you can enhance your presentations, blogs, or social media posts effortlessly. Remember to:
- Use the built-in tools provided by Google Slides for seamless image copying.
- Respect copyright laws and always check the usage rights of the images you choose.
- Be intentional about your image selection—choose images that truly support and enhance your message.
Incorporating high-quality visuals can significantly boost engagement and comprehension, making your content more appealing to your audience. So whether you’re prepping for a meeting or crafting a blog post, just remember these tips and you’ll be on your way to using images effectively and appropriately. Happy creating!
 admin
admin


