When it comes to printing images, DPI—Dots Per Inch—plays a crucial role in determining the quality of the final product. Imagine holding a stunning photograph or a beautifully designed poster; the crisp details and vibrant colors contribute to an engaging visual experience. Achieving high-quality prints requires understanding DPI and its significance, especially if you're aiming for professional results. In this post, we’ll explore what DPI is, why it matters, and how to convert images to 300 DPI for stunning print-quality outcomes.
Understanding the Basics of Image Resolution

Now that we’ve introduced DPI, let’s dive deeper into the concept of image resolution and how it relates to printing. Image resolution refers to the amount of detail an
When discussing image resolution, it’s essential to differentiate between pixel dimensions and DPI:
- Pixel Dimensions: This is the width and height of an image stated in pixels (e.g., 1200 x 1800 pixels). Higher pixel dimensions increase potential print size and quality.
- DPI: This indicates how many dots of ink a printer uses per inch of the printed image. A higher DPI generally signifies better print quality.
To better understand image resolution, consider the following points:
- Resolution Matters: A 300 DPI image can be printed at larger sizes while maintaining quality. Conversely, a lower DPI (like 72 DPI, commonly used for screens) may appear pixelated when enlarged for print.
- Target Output: Always consider where your image will end up. If you’re creating artwork for an exhibition, you’d likely need a higher resolution than if you were sharing an image on social media.
- Adjusting Resolution: You can adjust an image's DPI using tools like Adobe Photoshop or GIMP. However, simply changing the DPI without altering pixel dimensions may not improve quality—it’s a balancing act!
Here’s a handy table summarizing common DPI settings for various outputs:
| Output Type | DPI Recommendation |
|---|---|
| Digital Display | 72 - 96 DPI |
| Standard Printing | 150 DPI |
| High-Quality Print (Photos, Art) | 300 DPI |
| Large Format Printing | 150 - 300 DPI (depending on viewing distance) |
In conclusion, understanding the basics of image resolution is crucial for anyone interested in producing high-quality prints. Knowing how DPI interacts with pixel dimensions will empower you to make informed decisions about your images and ensure you get the best results for your printing projects. Whether you're a photographer, designer, or hobbyist, this knowledge will elevate your work to new heights!
Also Read This: Selecting Images in Procreate
3. Step-by-Step Guide to Convert Images to 300 DPI

Converting your images to 300 DPI (dots per inch) might sound technical, but it’s a straightforward process that can significantly enhance the quality of your prints. Whether you're using Photoshop, GIMP, or another image editing tool, I've laid out a clear, step-by-step guide to help you achieve that high-quality print finish.
Using Adobe Photoshop
- Open Your Image: Launch Photoshop and open the image you want to convert. You can do this by clicking on File > Open and selecting your image file.
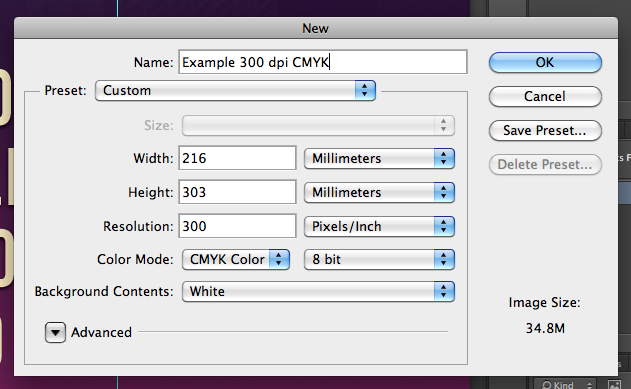
- Check the Current DPI: Go to Image > Image Size. In the window that pops up, look for the Resolution field. This is where you can see the current DPI.
- Adjust the DPI: If it’s not set to 300 DPI, enter 300 in the resolution box. Make sure that the Resample option is checked, which allows Photoshop to add or remove pixels when changing the resolution.
- Verify Dimensions: Check the dimensions of your image; if they change significantly and you need to maintain the same print size, consider adjusting them here. You might need to adjust the width and height to match your desired print size.
- Save Your Image: Click OK to apply the changes, and then save your image by clicking on File > Save As. Choose a suitable format (like TIFF or PNG) to keep the quality intact. Don’t forget to save your original file as well!
Using GIMP
- Open Your Image: Start GIMP and open your image file by navigating to File > Open.
- Access the Image Properties: Go to Image > Print Size. Here, you’ll see the current resolution.
- Change the Resolution: Set the X and Y resolution to 300 pixels/inch. Ensure that the option for Maintain aspect ratio is selected if you don’t want changes in image proportions.
- Check Image Size: Review the size to ensure it matches your printing requirements. Adjust the width and height if necessary, but keep the quality in mind!
- Export Your Image: Click on File > Export As to save your file in a high-quality format.
And just like that, you've successfully converted your image to 300 DPI! You’re ready to print with confidence that your images will come out looking sharp and professional.
Also Read This: How to Change the Perspective of an Image in PowerPoint
4. Tips for Ensuring High-Quality Print Results

Getting the perfect print doesn’t just stop at converting your image to 300 DPI. Here are some essential tips to ensure that your prints come out looking absolutely stunning:
Choose the Right File Format
- TIFF: This format is lossless and ideal for high-quality prints, preserving all the details of your image.
- PNG: Great for images with transparency. However, ensure that you are working with a high-resolution version.
- JPEG: While this format is widely used, it uses lossy compression, so only choose JPEG for photos where file size is a concern, but always with high quality settings.
Adjust Color Settings
Before you print, make sure your image’s color profile is set to CMYK (Cyan, Magenta, Yellow, Black). This is the standard color model used in color printing. You can easily check and change this in your image editing software.
Print with the Right Equipment
Make sure you're using a good quality printer. A professional-grade printer will provide better color accuracy and sharpness compared to standard home printers. If you're unsure, consider having your image printed at a professional printing service.
Check Printer Settings
- Paper Quality: Always select a high-quality paper setting when printing.
- Print Preview: Use the print preview feature to catch any mistakes before you waste paper and ink.
Test Print
Before going for the final print, do a test print on a smaller scale. This helps you detect any potential issues with colors or clarity. Once you’re satisfied, you can proceed with the full-sized print!
Remember, quality matters. Taking the time to ensure your image is properly prepared can make a world of difference in the final output!
Also Read This: Fixing Grainy Images for Clearer Quality
5. Common Mistakes to Avoid When Converting Images

When it comes to converting images to 300 DPI for high-quality printing, there are several pitfalls that even seasoned designers can fall into. Avoiding these common mistakes can save you time and ensure your prints look as good as possible.
Here are some common mistakes to watch out for:
- Not Starting with a High-Resolution Image: Attempting to convert a low-resolution image to 300 DPI will often lead to pixelation and loss of detail. Always choose images that are as high-resolution as possible from the start.
- Ignoring the Aspect Ratio: Changing the DPI without considering the aspect ratio can lead to distorted images. Make sure to maintain the original proportions when resizing to avoid stretching or squishing the image.
- Overlooking File Format: Some image formats, like JPEG, can lose quality with repeated editing and saving. If you’re going to convert an image, start with a lossless format such as PNG or TIFF whenever possible.
- Not Using Proper Software: Relying on basic image viewers to change DPI settings can be inadequate. Using professional software like Adobe Photoshop or GIMP ensures you have the necessary tools and settings to achieve the best results.
- Underestimating the Image Size: While DPI affects print quality, it’s also essential to consider the physical dimensions of the image. A 300 DPI image may still look poor if it's too small in dimension—make sure it’s large enough for the intended print size.
By being mindful of these common mistakes, you can significantly improve your chances of creating stunning, high-resolution prints that truly capture the essence of your images. Remember, a little care in the preparation stage can go a long way in achieving professional-quality prints!
6. Conclusion: Achieving the Best Quality Prints with 300 DPI Images
Converting images to 300 DPI is a crucial step for anyone looking to produce high-quality prints. It may seem technical, but with a few streamlined processes and considerations, anyone can achieve excellent results.
To recap, here are the steps to keep in mind for achieving the best quality prints:
- Always start with the highest quality source material available.
- Use proper software to change image settings without degrading quality.
- Maintain the correct aspect ratio to avoid distortion when resizing.
- Be aware of the physical dimensions of your image to ensure it fits your printing needs.
- Avoid common mistakes that could ruin your efforts—keep an eye on resolution, file formats, and editing techniques.
Once you master the process, you’ll find that converting images to 300 DPI is straightforward, and the payoff is immense. High-quality prints can elevate your projects, whether they be photographs, marketing materials, or art prints.
So go ahead, take those stunning images and get ready to print! With 300 DPI, you can rest assured that your creations will look crisp, vibrant, and ready to impress.
 admin
admin


