Nose contouring is a game-changer for anyone looking to enhance their facial features without undergoing drastic changes. It’s all about creating shadows and highlights that shape your nose, giving it a sleeker appearance. Before diving into the how-to, it’s essential to understand the basics.
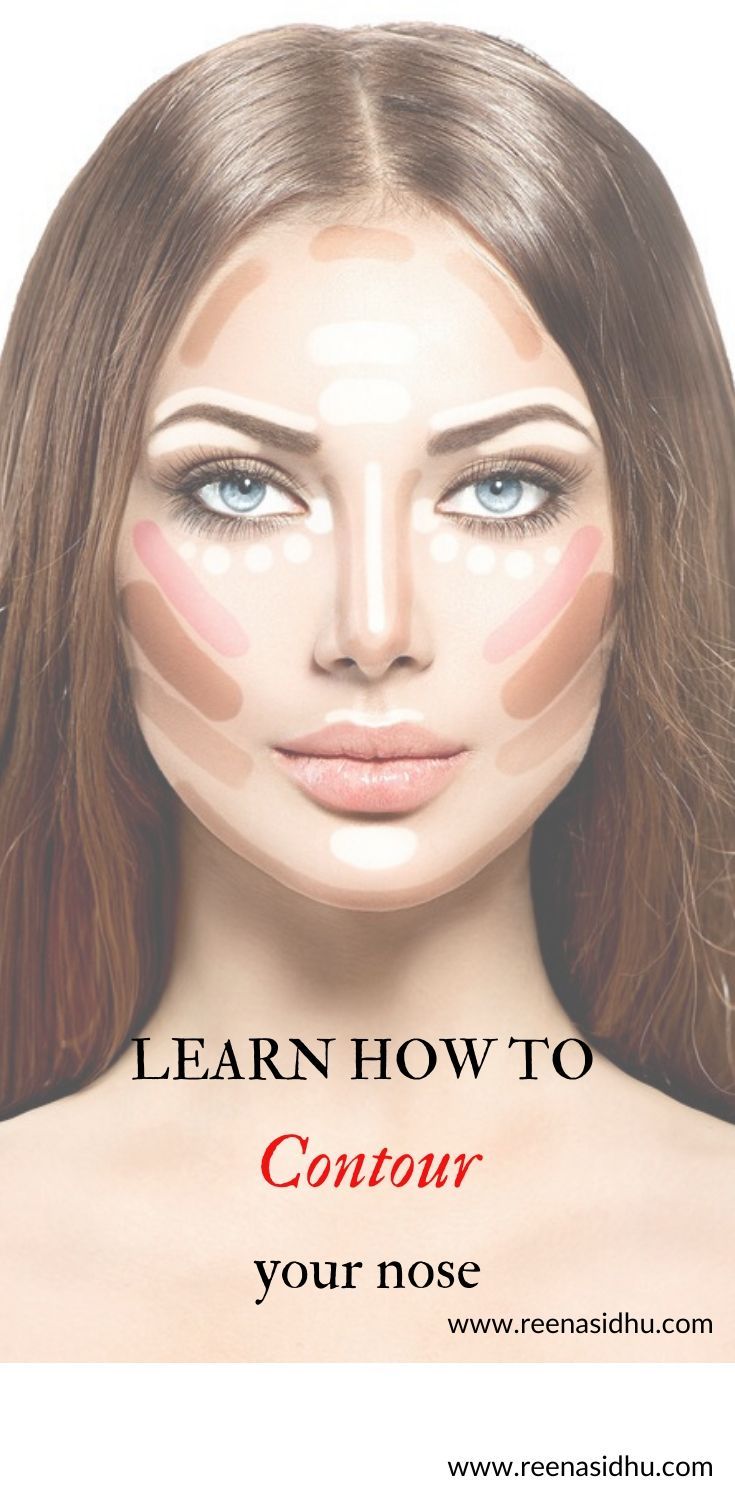
At its core, nose contouring relies on the principle of light and shadow. By applying darker shades to the sides of your nose, you can create an illusion of depth, which makes the nose appear slimmer. Conversely, highlighting the bridge or tip can draw attention and add dimension.
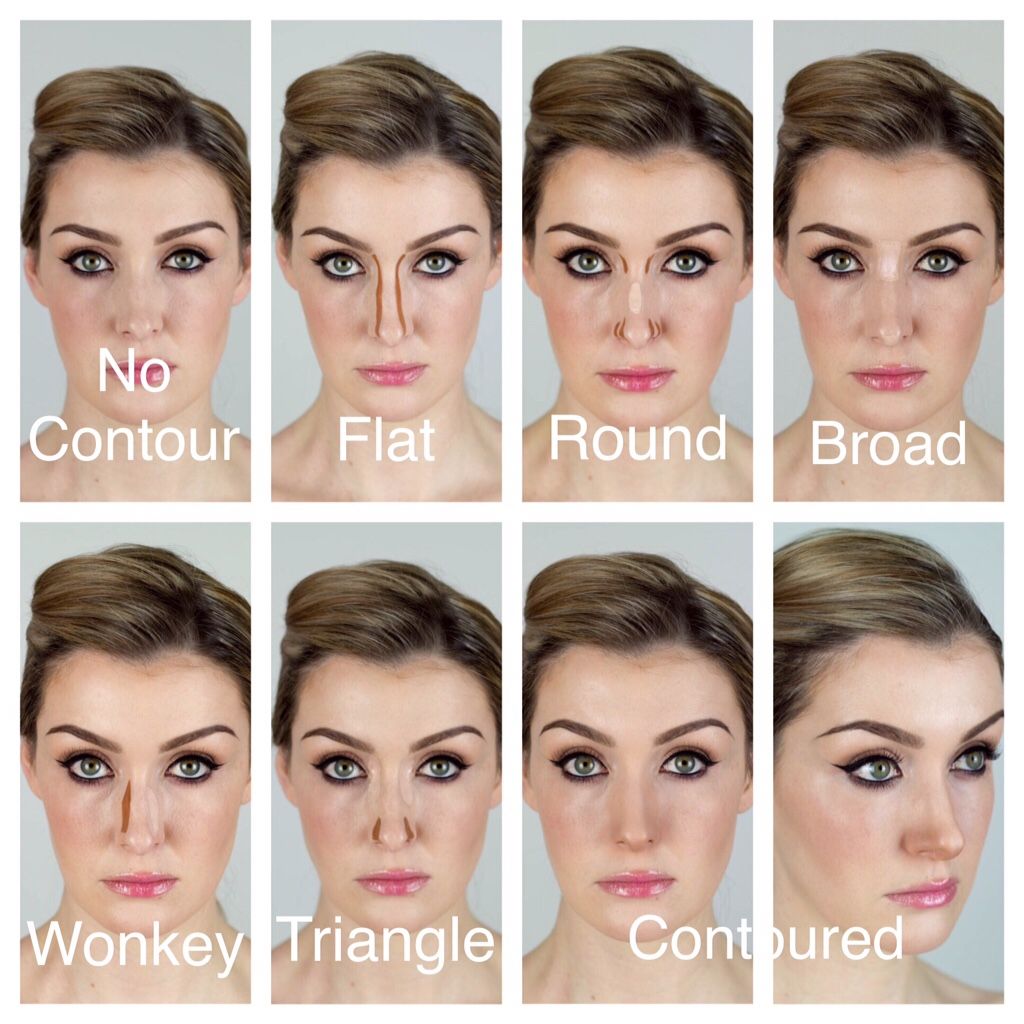
When thinking about the ideal nose shape, consider the shape of your face. For instance:
- For round faces: Aim for subtle contouring that elongates the nose.
- For oval faces: You can contour more dramatically, focusing on symmetry.
- For square faces: Softening the harsh lines can make the nose appear more delicate.
To begin, you'll want to assess the natural features of your nose. Is it straight, slightly crooked, wider at the base, or more narrow? Recognizing these traits will help in determining where to apply contour. Generally, the goal is to:
- Make the nose appear straighter.
- Provide the illusion of length.
- Optically narrow the width.
Understanding these fundamentals will help you feel more confident as you experiment with your contouring techniques. Remember, practice makes perfect, and makeup is all about enhancing your natural beauty. Don’t forget to have fun while experimenting!
Essential Makeup Tools for Nose Contouring
Getting your nose contour just right relies heavily on the tools you choose. Having the right makeup tools at your disposal can make all the difference in achieving a polished look. Let's dive into the essentials you’ll need for successful nose contouring.
1. Contour Products
- Cream Contour: Cream formulas are fantastic for beginners as they blend easily. Choose a shade that’s 1-2 shades darker than your skin tone.
- Powder Contour: If you have oily skin or prefer a matte finish, powder contour is your best bet. Just remember to set it with a setting spray or powder.
- Highlighter: A good highlighter will bring attention to your nose’s bridge and tip. Cream or liquid highlights work best for a dewy look.
2. Brushes and Tools
- Angled Brush: An angled brush is perfect for precise contour application along the sides of your nose.
- Small Blending Brush: A smaller blending brush helps to diffuse any harsh lines, giving your contour a seamless finish.
- Beauty Blender: This versatile tool is great for buffing in cream contours and highlighters, creating a natural looking finish.
3. Additional Essentials
- Setting Spray: A good setting spray will ensure your makeup stays in place all day, especially important for contouring.
- Mirror: A handheld or tabletop mirror will help you see all angles of your face as you apply.
- Makeup Wipes: For any mistakes or to clean your tools in between colors, makeup wipes are handy and essential.
In summary, the right tools can elevate your nose contouring game significantly. Play around with different products and techniques to discover what works best for your unique features. Remember that mastering contouring takes time and practice, so be patient with yourself! Happy contouring!
Also Read This: DIY Pearl Bracelets at Home: Step-by-Step Video on Dailymotion
3. Step-by-Step Guide to Contouring Your Nose
Ready to get started on your nose contouring journey? Here’s a simple, step-by-step guide that will help you achieve that refined look you desire. Grab your makeup brushes and let’s go!
- Gather Your Materials: You’ll need a few essential items:
- Contour Cream or Powder (choose a shade that is 2-3 shades darker than your skin tone)
- Highlighter (go for a shade 1-2 shades lighter than your foundation)
- Foundation or BB Cream
- A good quality makeup brush or makeup sponge
- A fine-tipped brush or makeup pencil for precision
- Prime Your Skin: Start with a clean, moisturized face. Apply your foundation or BB cream evenly across your face to create a smooth, uniform canvas.
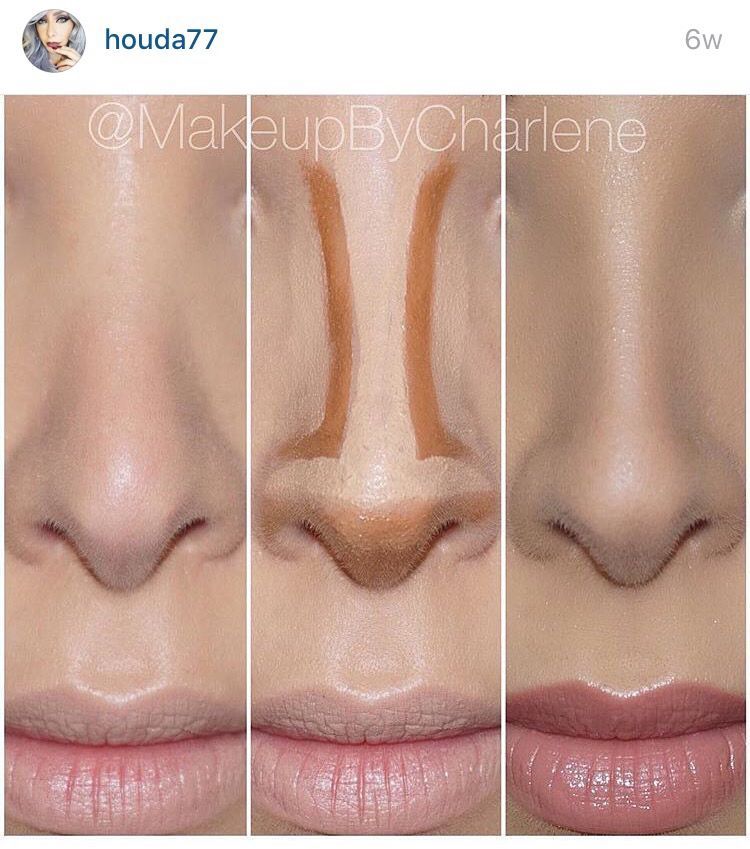
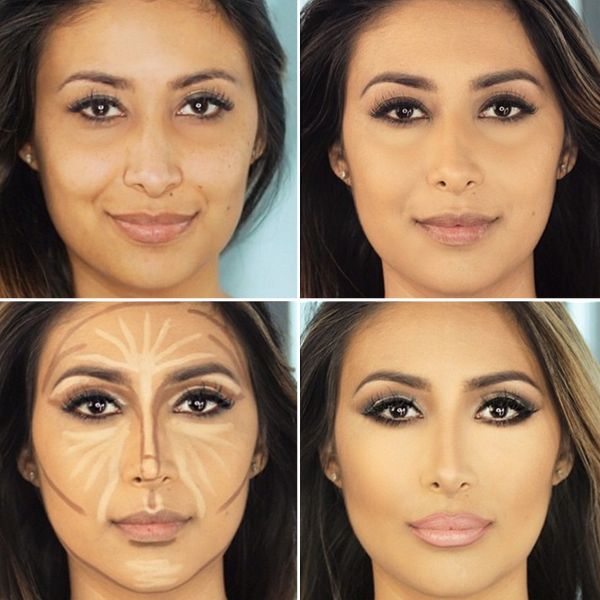
- Define the Contour Lines: Using your contour product, draw two straight lines down the sides of your nose. Aim for a narrow line to create the illusion of a slimmer nose. You can also add a slight line at the tip to help refine it further.
- Blend, Blend, Blend: Use your makeup sponge or brush to blend the contour lines into your skin. The goal here is to eliminate harsh lines and create a seamless transition between your normal skin and the contour. Be patient—it makes all the difference!
- Highlight the Center: Now it’s time to enhance the bridge of your nose! Apply your highlighter down the center of your nose, blending it well. This will draw attention to the area and make your nose appear slimmer.
- Define the Tip: If you want to give your nose an even more refined appearance, add a small dot of highlighter to the tip of your nose and blend it out lightly.
- Set It All: Finally, to ensure your hard work lasts all day, set your makeup with a translucent setting powder. This will keep shine at bay while maintaining your beautiful contour!
And there you have it! A quick and easy guide to contouring your nose. With a little practice, you’ll be able to do it in no time and feel confident showing off your new look!
Also Read This: How to Create an Adorable Owl Charm with Dailymotion DIY Guide
4. Common Mistakes to Avoid in Nose Contouring
While contouring can enhance your features, there are a few common pitfalls that can lead to less-than-ideal results. Avoid these mistakes to make sure your nose contouring is top-notch!
- Using the Wrong Shades: Choosing a contour color that’s too dark or too warm can create an unnatural look. Stick with cooler tones that mimic shadows for the best effect. Remember, you want to enhance, not overpower.
- Over-Contouring: It’s easy to get carried away when applying contour, but less is often more. Start with a light hand; you can always build up the color if needed. Gradually layering gives a more realistic appearance.
- Ignoring Blendability: Harsh lines are the enemy! Always make sure to blend thoroughly. If your lines are too strong or visible, your contour will look staged rather than natural. A good blend goes a long way!
- Skipping Highlighter: Highlighter is crucial for that polished look! Forgetting to highlight the bridge of your nose can leave your contour looking flat. Make sure you add that touch of luminosity.
- Neglecting Other Features: Remember, your nose is just one part of your face! Don’t forget to balance out your look with well-defined cheekbones, a popping brow, and beautifully blended eye makeup for a cohesive appearance.
- Not Considering Lighting: The lighting in which you apply your makeup plays a significant role. Natural light is your best friend—if you only do your makeup indoors, take a look outside to ensure the colors look natural in various lighting.
By avoiding these common mistakes, you’ll be able to ace your nose contouring like a pro! Keep practicing, and soon enough, you’ll find the techniques that work best for you.
Also Read This: How to Watch Videos on Dailymotion
5. Best Makeup Products for Nose Contouring
When it comes to nose contouring, having the right products can make all the difference. Here’s a quick rundown of some of the best makeup products you can use to achieve that sleek, refined nose shape you desire. Whether you’re a contouring novice or a seasoned pro, these products will help you get the results you're looking for.
- Contour Stick: A creamy contour stick is a game-changer for quick and easy application. Look for a cool-toned shade that is one or two shades darker than your natural skin tone. Brands like NARS and Fenty Beauty offer fantastic options.
- Contouring Palette: A contour palette usually has several shades, both cream and powder. This allows you to mix and match to find the perfect hues for your skin tone. Consider the Anastasia Beverly Hills Contour Kit for a versatile choice.
- Highlighter: Adding a highlighter to the bridge of your nose can really accentuate your contouring. A liquid highlighter or a powder with a fine shimmer works best—think products like Becca Shimmering Skin Perfector or Benefit Cosmetics High Beam.
- Makeup Brushes: Tools are just as important as the makeup itself! A fluffy brush for blending your contour and a smaller precision brush for detailed work on the nose are essential. Find brushes from Real Techniques or Sigma Beauty that fit your needs.
- Setting Spray: To keep your contour in place all day, a good setting spray is key. Look for something that controls shine but doesn’t make your makeup feel heavy, like the Urban Decay All Nighter Setting Spray.
Remember, the ideal products may vary depending on your skin type and personal preferences. Don’t hesitate to try out a few different products to find what works best for you!
Also Read This: Easy Tutorial for Beginners to Learn Bhangra Dance Steps on Dailymotion
6. How Lighting and Angles Affect Nose Contouring
One thing that often gets overlooked in the world of contouring is the impact of lighting and angles. Understanding how both of these elements can dramatically affect the way your makeup looks can help you refine your technique and achieve that flawless finish.
Lighting is your best friend when it comes to makeup. Natural light is ideal for contouring because it offers a more honest view of how your makeup appears. Here are some tips on working with various lighting:
- Natural Daylight: When you can, do your makeup in front of a window. The soft, diffused light will help you see shadows and highlights more clearly, allowing for a more natural contour.
- Indoor Lighting: Artificial lighting can create harsh shadows; if you must do your makeup indoors, try to use soft white bulbs instead of yellow or fluorescent lights. If lighting is very dim, you may tend to apply more product than necessary, leading to a less flattering look.
- Flash Photography: If you plan on being photographed, remember that flash can wash out makeup, making your contour less apparent. In this case, you might want to amp up your highlight to ensure it captures well on camera.
As for angles, this is really about knowing your face. Here’s how to work with your features:
- Face Shape: Each person’s face shape is different, and some angles will enhance your features better than others. Practice various angles in the mirror to see which side of your face you prefer.
- Turn Your Head: Avoid applying makeup straight on; turn your head a bit to visualize how the contour will look from different perspectives.
- Check Yourself: Aside from looking straight in the mirror, take a photo of yourself from the side and front to see how your makeup looks in 2D.
In summary, both lighting and angles play crucial roles in how your nose contour appears. Experiment with different settings and positions to find your best angles and achieve a look that’s not just great in person, but on camera too!
Also Read This: How to Do Facial at Home Step by Step on Dailymotion: A Complete Guide to Skin Care
7. Real-Life Examples of Successful Nose Contouring
If you're still a bit skeptical about the power of nose contouring, let’s delve into some real-life examples that showcase just how transformative this technique can be. Whether you're a makeup novice or a seasoned pro, these examples prove that with a little practice and the right products, you can achieve a beautifully sculpted nose that enhances your overall look.
Many beauty influencers and celebrities have shared their contouring journeys, providing inspiration and guidance. Here are some notable examples:
- Kim Kardashian: Often credited with bringing contouring into the mainstream, Kim has shared various tutorials showcasing her signature nose contour technique. By strategically applying a darker shade along the sides of her nose and a highlighter down the bridge, she creates the illusion of a slimmer nose.
- Aimee Song: This fashion blogger and entrepreneur demonstrates how a lighter concealer along the bridge and well-blended shadows can create a subtle yet impactful difference. Her fresh and natural approach focuses on lifting the nose without looking overly done.
- NikkieTutorials: Famous for her bold makeup looks, Nikkie’s contouring technique emphasizes blending. She often reminds her viewers that blending is key to achieving a natural result. Her videos showcase how she uses cream products for a soft finish, perfect for photography and videos.
Each of these examples highlights different techniques and approaches to nose contouring. Remember, the best technique is one that complements your unique features! Take inspiration from these successful contouring stories, but don't feel pressured to recreate them perfectly. Instead, try to adapt their methods to fit your own facial structure and preferences.
In addition to celebrity examples, many makeup enthusiasts share their transformations on platforms like Instagram and TikTok. Searching for hashtags like #NoseContouring or #MakeupTransformation can lead you to a treasure trove of creative ideas. You’ll see diverse face shapes, skin tones, and makeup styles, all showcasing the versatility of this technique. This community can be a fantastic source of tips, tutorials, and support as you experiment with your own nose contour.
8. Conclusion and Final Tips for Perfecting Your Technique
Now that you’ve learned the ins and outs of nose contouring, it’s time to put this knowledge into practice! Remember, the goal isn’t to completely change your appearance but to enhance your natural beauty. Here’s a quick recap along with some final tips to help you perfect your technique:
- Practice Makes Perfect: The more you practice, the more comfortable you’ll become with the products and techniques. Don’t get discouraged if your first attempts aren't what you hoped for—keep at it!
- Use the Right Products: Invest in good-quality makeup that matches your skin tone and blending preferences. Cream contours can provide a more natural look, while powders can be great for a more defined finish.
- Lighting Is Key: Always check your makeup in different lighting. Natural light is your best friend when it comes to contouring, as it gives you a true sense of how your makeup looks.
- Stay Balanced: Remember to contour in a way that balances the rest of your makeup look. If your eyes are the focal point that day, keep your nose contour subtle to maintain harmony.
- Review and Adjust: After applying your contour, take a step back and assess the overall effect. Sometimes a little adjustment or additional blending can make all the difference.
Nose contouring can be an incredibly empowering tool, allowing you to express your creativity and enhance your features in a way that feels good to you. So, go ahead, grab your makeup brushes, and start sculpting your way to a slimmer-looking nose. Have fun with it, and remember that the most important thing is to feel confident and beautiful in your own skin!
 admin
admin