When you're working with images, whether for printing or web display, understanding their dimensions is crucial. The size and resolution of an image determine how it will look, both in physical prints and on digital screens. If an image is too small for a print job, it can appear pixelated or blurry. On the other hand, if an
Understanding Image Dimensions for Print

For printing, image dimensions refer to the physical size of the image (in inches or centimeters) and the resolution, which is typically measured in DPI (dots per inch). To get the best results, you need an
Here are a few key points to consider:
- Print Size: The physical dimensions of the image depend on what you're printing (e.g., business cards, posters, brochures).
- DPI (Resolution): 300 DPI is usually recommended for high-quality prints, as it ensures crisp details.
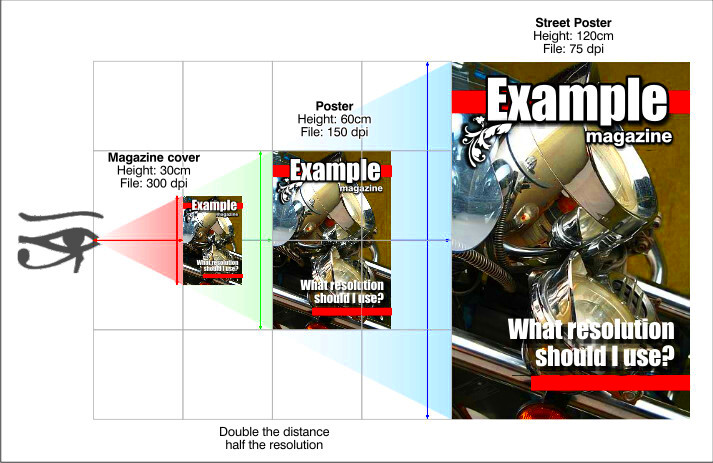
- Image Size vs. Print Size: You need to make sure the image's resolution is appropriate for the desired print size. A large image with low resolution will not produce a good print, even if the size seems adequate.
For example, if you're printing a large poster, you need an image with a higher DPI and large dimensions to maintain sharpness when enlarged. For smaller items, such as flyers, a lower resolution might be acceptable.
Also Read This: Printing a Mirror Image PDF
Understanding Image Dimensions for Web Display

When it comes to web display, image dimensions work a bit differently. Since images are viewed on screens, the primary focus shifts to pixel dimensions (width and height) and file size. Unlike printing, where you focus on DPI, web images need to be optimized for fast loading while still looking clear on various screen sizes.
Consider the following aspects when preparing images for the web:
- Pixel Dimensions: Images are measured by their width and height in pixels. Common web image sizes include 1920x1080 for large images and 800x600 for smaller ones.
- File Size: Large files can slow down your website, which affects loading time and user experience. Compressing images without compromising too much quality is key.
- Responsive Design: Images should scale well on different screen sizes, so make sure they look great on mobile phones, tablets, and desktops.
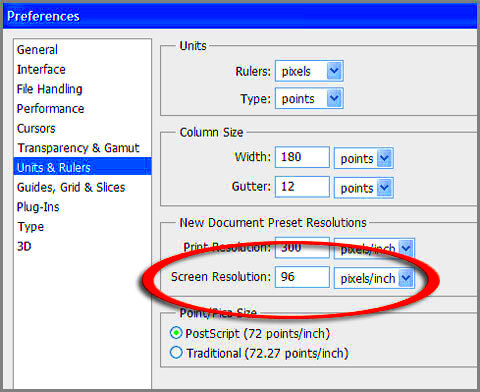
- Resolution for Screens: Unlike print, 72 DPI is typically sufficient for web images, as screens display images in lower resolution than printed media.
For example, if you have an image for a website header, you'll want a high resolution for clarity, but you also need to ensure it's not too large in file size to prevent slow page loading. Keeping your web images well-optimized can significantly improve both your site's performance and the user experience.
Also Read This: Step-by-Step Process for Downloading Fonts from Behance
How to Check Image Dimensions Using Tools

Knowing how to check the dimensions of an image is essential for ensuring it’s suitable for your intended use, whether for print or web. Thankfully, there are many tools available to help you easily find out the image's width, height, and resolution. Some tools are built right into your computer’s operating system, while others are online tools designed for quick access.
Here’s how you can check image dimensions:
- Built-in Tools: On Windows, simply right-click the image file and select "Properties." In the "Details" tab, you’ll find the image's dimensions (width x height) and resolution. On macOS, right-click and select "Get Info" to see similar details.
- Online Tools: Websites like ImageResize.org and ResizeImage.net allow you to upload an image and instantly view its dimensions along with the option to resize or crop the image as needed.
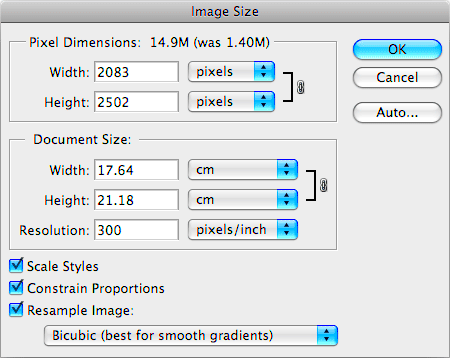
- Editing Software: Software like Adobe Photoshop or GIMP lets you check and adjust dimensions. In Photoshop, open the image, then go to "Image" and select "Image Size" to see and modify its resolution and pixel dimensions.
By using these tools, you can quickly check whether an image is the right size for your project. For web use, it’s essential to check the file size as well, which can also be viewed using these same methods or with specific file compression tools.
Also Read This: How Imago Images Simplifies Access to Premium Visual Content
Best Practices for Optimizing Image Size
Optimizing image size ensures that your images not only look great but also load quickly, especially on websites. Properly optimized images contribute to better website performance, improved SEO, and an overall better user experience. While high-quality images are important, they shouldn’t slow down your page speed.
Here are some best practices for optimizing image size:
- Resize Images: Before uploading an image to a website, resize it to the exact dimensions needed. Don’t use a larger image if a smaller one will suffice.
- Compress Images: Use image compression tools like TinyPNG or ImageOptim to reduce the file size without sacrificing much quality.
- Choose the Right File Format: JPEG is great for photos, while PNG works better for images with transparent backgrounds. For simple graphics and icons, SVG files are highly efficient.
- Use Image Sprites: For websites with multiple small images, such as icons, combine them into a single image sprite. This reduces the number of HTTP requests and speeds up page loading.
- Set Appropriate Resolution: For web images, a resolution of 72 DPI is usually sufficient. For print, make sure the DPI is higher (typically 300 DPI).
By following these best practices, you ensure your images are optimized for their intended use. This helps maintain the balance between image quality and website performance, enhancing both your design and user experience.
Also Read This: How to Submit to Getty Images as a Beginner Guide to Uploading and Selling
Common Issues When Handling Image Dimensions
Handling image dimensions can sometimes lead to issues, especially if the image doesn’t meet the necessary requirements for print or web use. These issues can range from poor quality to performance problems. Being aware of these common challenges and knowing how to fix them will help you avoid mistakes that can affect your final product.
Some of the most common image dimension issues include:
- Pixelation: This happens when an image is resized to a larger dimension without a high enough resolution. Pixelated images look blurry and low-quality, especially when printed.
- Wrong Aspect Ratio: If the image is resized without maintaining the original aspect ratio, it can become stretched or squished. This can distort the image and make it look unprofessional.
- Large File Size: Images with large file sizes can slow down website load times. This is particularly problematic for web pages, where faster loading times are crucial for good user experience.
- Incorrect DPI for Printing: Images intended for printing at high quality must have a resolution of 300 DPI. If an image has a lower DPI, it will print with less detail and look blurry or pixelated.
- Not Optimized for Different Devices: Images that aren’t optimized for mobile devices can appear blurry or take too long to load. Responsive design techniques are necessary to ensure images scale properly across devices.
To avoid these problems, always check the image dimensions before using them for web or print. Tools for resizing, compressing, and adjusting resolution can help you avoid these issues and create images that are sharp, clear, and optimized for their intended use.
Also Read This: Removing a Color from Images in Photoshop
How to Adjust Image Dimensions for Print and Web
Adjusting image dimensions correctly is key to ensuring that your image looks sharp, clear, and fits the intended use, whether it's for print or the web. Whether you're resizing an image for a website or preparing it for a printed brochure, making sure you adjust the dimensions properly will prevent issues like pixelation, distortion, and poor quality.
Here are steps for adjusting image dimensions for both print and web:
- For Print: Open the image in editing software like Adobe Photoshop. Select "Image" then "Image Size." Adjust the resolution to 300 DPI and resize the image based on the required print dimensions (e.g., 8x10 inches for a photo). Make sure to maintain the aspect ratio to avoid stretching the image.
- For Web: Use a tool like Adobe Photoshop or an online editor to resize the image in pixels. Common web dimensions for images are 1920x1080 pixels for large images or 800x600 for smaller images. Ensure that the image file is compressed to reduce its size for faster loading times.
- Maintaining Quality: When resizing images, make sure to use tools that preserve quality. Avoid stretching images to fit a large size, as this can lead to pixelation. Always check the resolution after resizing to ensure clarity.
- File Format Considerations: For print, use formats like TIFF or PNG to maintain quality. For web, JPEG is usually a good choice for photos, while PNG is better for images with transparency or sharp lines.
Properly adjusting the dimensions of your images will ensure they look their best, whether you're preparing them for digital display or high-quality printing.
Also Read This: Duration of License for Adobe Stock Photos
Why Image Dimensions Are Important for Design Projects
Image dimensions play a critical role in design projects, from web graphics to print materials. The right image size ensures that your design looks professional, loads quickly, and fits well into your layout. Incorrect image dimensions can lead to poor user experience, slow website load times, or low-quality prints.
Here’s why image dimensions matter in design projects:
- Visual Appeal: The size of an image affects how it fits within your design. A large image that doesn't fit the layout will appear awkward, while a small image may lose its impact. Correctly sized images ensure a balanced, professional look.
- Performance and Speed: On the web, large images can significantly slow down loading times. Optimized images with the right dimensions and file sizes load quickly, improving user experience and website performance.
- Print Quality: For print projects, using the right image size and resolution is crucial for ensuring that the print is crisp and detailed. Low-resolution images can result in blurry, pixelated prints.
- Responsive Design: In today’s digital world, images need to be responsive, meaning they should adjust to different screen sizes. Whether it's for mobile devices, tablets, or desktops, having the correct dimensions helps ensure images look good on all devices.
- Consistency: Maintaining consistent image dimensions across a project ensures a cohesive design. Whether you're working on a website or a marketing brochure, consistent image sizing helps create a professional and polished final product.
By paying attention to image dimensions in your design process, you ensure your project will have the right impact and functionality, whether it's viewed online or printed on paper.
Also Read This: Is VectorStock a Good Investment for Designers
FAQ
Q1: What are the best image dimensions for a website header?
A1: A common size for website headers is 1920x1080 pixels. This size ensures good resolution while maintaining a manageable file size for fast loading. However, it's important to check your website’s design specifications for exact dimensions.
Q2: How do I know if an image is the right size for printing?
A2: For printing, your image should have a resolution of at least 300 DPI (dots per inch) at the desired print size. For example, if you want to print a 4x6 inch photo, your image should be 1200x1800 pixels (4 inches x 300 DPI by 6 inches x 300 DPI).
Q3: Can I use any image size for social media?
A3: Social media platforms have recommended image dimensions that you should follow for the best results. For example, Instagram profile pictures should be 110x110 pixels, while Facebook cover photos should be 820x312 pixels. Be sure to check the platform’s guidelines for the most up-to-date image size recommendations.
Q4: How can I reduce the file size of my images without losing quality?
A4: You can use image compression tools like TinyPNG or JPEGmini to reduce the file size without significantly affecting quality. These tools compress the image while maintaining good visual clarity, which is essential for faster website loading times.
Q5: What is the best image format for the web?
A5: For the web, JPEG is ideal for photos and images with gradients, while PNG is better for images with transparency or sharp edges. WebP is another efficient format that provides good quality at smaller file sizes, though not all browsers support it.
Conclusion
Understanding and managing image dimensions is essential for achieving optimal results, whether you're preparing visuals for print or web use. The correct dimensions not only ensure high-quality images but also contribute to improved performance, whether it’s for faster web loading times or clearer prints. By learning how to check and adjust image dimensions, optimizing image size, and applying best practices, you’ll create designs that look sharp, professional, and engaging. Whether working on a website, social media, or printed materials, paying attention to image dimensions ensures your project looks its best on any platform.


