When it comes to sharing images online, especially on professional platforms like LinkedIn, it’s crucial to get the sizing right. The right image dimensions can ensure that your content looks sharp and professional, without any distortion or poor-quality visuals. Whether you're uploading a cover photo, profile picture, or post image, understanding how to check and adjust
In this section, we’ll explore why image dimensions are important, and how they can impact your social media presence, especially on LinkedIn. We’ll also discuss the tools and techniques you can use to make sure your images fit perfectly on the platform.
Understanding Image Dimensions and Resolution

Before you start resizing images, it’s important to understand what image dimensions and resolution mean. Both are key elements that determine how an image will appear on a screen. Let’s break them down:
- Image Dimensions: This refers to the width and height of an image, usually measured in pixels (px). For example, a LinkedIn cover photo might need to be 1584px wide by 396px tall.
- Resolution: This refers to the level of detail an image holds. Higher resolution images are sharper and more detailed, while lower resolution images can appear blurry or pixelated. Resolution is usually measured in DPI (dots per inch).
Why do these matter? Incorrect image dimensions can cause images to appear stretched, cropped, or pixelated. A proper understanding of both image size and resolution will help you create visually appealing and professional-looking posts on LinkedIn.
Also Read This: Understanding the Cost of Adobe Stock
Tools to Check Image Dimensions

There are several tools available to help you check the dimensions of an image before you upload it. Some are simple to use, while others provide more advanced options for resizing and adjusting image quality. Here are a few popular tools you can consider:
- Online Image Resizers: Websites like iLoveIMG and ResizeImage.net offer easy-to-use platforms to check and resize your images. You can upload an image, see its dimensions, and then adjust it to fit LinkedIn’s recommended sizes.
- Software Tools: Programs like Adobe Photoshop, GIMP, and Paint.NET also provide advanced options for resizing and checking image dimensions. These tools allow you to view image properties like pixel dimensions and DPI.
- Built-in Image Viewers: Most operating systems (Windows, macOS) allow you to check an image’s dimensions directly. Simply right-click the image file and choose “Properties” (Windows) or “Get Info” (Mac). You’ll see the width and height in pixels.
Using these tools will help ensure that your images are perfectly sized for LinkedIn and other platforms, maintaining a professional appearance without sacrificing quality.
Also Read This: How to Upload Longer Videos on YouTube
How to Check Image Dimensions Using LinkedIn Image Downloader

When you download images from LinkedIn, it’s important to make sure that the images are the correct size for your needs. The LinkedIn Image Downloader tool can be a handy resource for quickly checking the dimensions of an image without the need for other software or online tools. This tool allows you to easily view image properties and ensure your visuals meet the necessary dimensions before you use them for posts or profile updates.
Here's how you can check image dimensions using the LinkedIn Image Downloader:
- Step 1: Open the LinkedIn Image Downloader tool on your browser.
- Step 2: Paste the URL of the LinkedIn post or profile that contains the image you want to download.
- Step 3: Click the "Download" button to fetch the image.
- Step 4: Once the image is downloaded, right-click on it and select "Properties" (Windows) or "Get Info" (Mac) to view the dimensions.
By using this method, you can make sure the downloaded image is exactly what you need and avoid wasting time adjusting poorly sized images. This tool helps save you from downloading oversized or undersized images that could negatively impact your LinkedIn posts.
Also Read This: Can You Post Gifs on LinkedIn? the Answer May Surprise You
Common Mistakes to Avoid When Sizing Images
Resizing images may seem simple, but there are several common mistakes that can lead to poor quality visuals or improperly sized images that don’t display well on LinkedIn. To ensure your images look great, it's essential to avoid these common pitfalls:
- Using Low-Resolution Images: A low-resolution image will appear pixelated or blurry, especially on high-definition screens. Always start with a high-resolution image to maintain quality when resizing.
- Forgetting Aspect Ratio: Changing the width or height of an image without maintaining the correct aspect ratio can stretch or squash it, resulting in an unnatural appearance.
- Not Checking Dimensions Before Uploading: Uploading an image without checking its dimensions can lead to a poorly sized image that doesn’t fit the layout of your LinkedIn post, profile, or banner.
- Ignoring Platform Guidelines: LinkedIn has specific image size requirements for profile pictures, cover photos, and posts. Ignoring these recommendations can cause your image to look cropped or distorted. Make sure to follow LinkedIn's recommended sizes.
By being mindful of these mistakes, you can avoid poor-quality images and ensure that your visuals appear as intended on LinkedIn. Taking a few extra moments to check the dimensions before uploading can make a huge difference in your content's impact.
Also Read This: how to get hex color from image
Tips for Resizing Images for LinkedIn Posts
When resizing images for LinkedIn, there are a few best practices to keep in mind to ensure your visuals look crisp and professional. Whether you're uploading a post, profile image, or banner, these tips will help you optimize your images for the platform:
- Use LinkedIn’s Recommended Sizes: LinkedIn provides specific image size recommendations for posts, profile pictures, and cover photos. Adhering to these guidelines ensures that your images display correctly across all devices. For example, the recommended size for a LinkedIn post image is 1200px x 627px.
- Maintain the Aspect Ratio: Make sure to maintain the correct aspect ratio when resizing your images. For posts, maintaining a 1.91:1 aspect ratio works best. For profile images, a square 1:1 ratio is recommended.
- Optimize Image Resolution: While it's important to have high-quality images, avoid using overly high resolution that could slow down load times. Aim for images that balance quality and file size—usually around 72 DPI works well for web images.
- Resize for Mobile: LinkedIn is used on a variety of devices, so be sure your images look good on both desktop and mobile. Testing how your image displays on different screen sizes can help ensure it’s optimized for all users.
By following these resizing tips, you’ll ensure your LinkedIn images look professional and load efficiently. Whether it's for a post or a profile, proper image resizing enhances your overall LinkedIn presence.
Also Read This: How to Land a Job at Getty Images for Exciting Career Opportunities
Why Image Dimensions Affect User Experience
The dimensions of an image can significantly impact how a user interacts with your content, especially on platforms like LinkedIn. Images that are improperly sized—whether too small or too large—can lead to a poor user experience. If the image is too small, it may appear blurry or pixelated. On the other hand, if it's too large, it might cause the page to load slowly or be cropped in an awkward way, making your post look unprofessional.
Here are a few reasons why image dimensions are so important:
- Visual Clarity: Images that are the correct size will load clearly, displaying high-quality visuals without pixelation or blurriness.
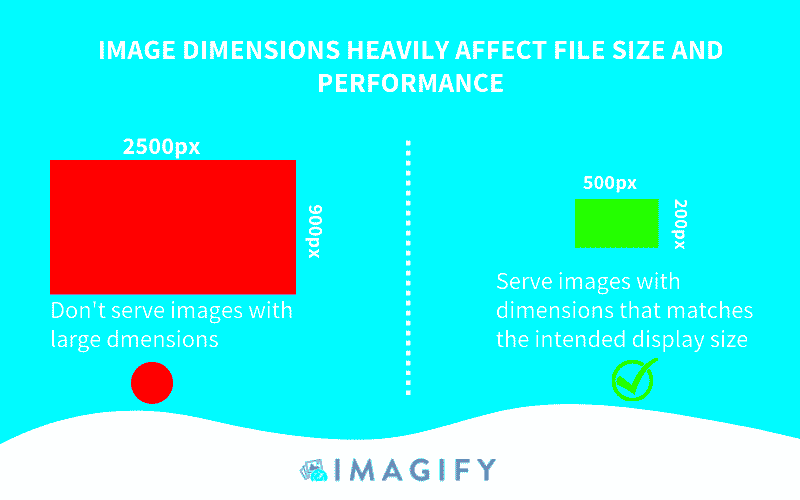
- Load Time: Images that are too large in file size can slow down the loading time of a page, which can frustrate users and lead to higher bounce rates. Properly sized images help the page load faster, improving the overall experience.
- Perfect Fit for Layout: When images are correctly sized, they fit perfectly into the layout, ensuring they display as intended. Whether it's a cover photo or a profile image, the image dimensions should align with LinkedIn’s requirements to avoid awkward cropping or stretching.
In short, the right image dimensions ensure your content is visually appealing, loads quickly, and is displayed correctly, providing a seamless experience for your LinkedIn audience.
Also Read This: Simplifying Image Downloading with the Best 123RF Images Downloader
Optimizing Image Sizes for Faster Load Times
Optimizing your images for faster load times is a crucial step in improving user experience. While high-quality images are important, large file sizes can slow down your website or LinkedIn page. Slow loading times can lead to frustrated users, potentially causing them to leave your page. By optimizing images, you can strike a balance between quality and performance.
Here are some key tips for optimizing image sizes without sacrificing quality:
- Resize Images: Ensure your images are resized to the exact dimensions needed for your post or profile. This prevents the browser from having to resize images automatically, which can slow down the loading time.
- Compress Images: Compress images to reduce their file size. Tools like TinyPNG and CompressJPEG can significantly reduce file sizes while maintaining image quality.
- Choose the Right Format: JPEG, PNG, and WebP are commonly used formats for web images. JPEG is great for photos with a lot of detail, while PNG is better for images with transparent backgrounds. WebP offers high-quality images with smaller file sizes, making it a good choice for optimizing performance.
- Use Lazy Loading: Implement lazy loading, which allows images to load only when they are about to be viewed by the user. This can drastically improve page load times, especially for long pages with many images.
By following these tips, you can ensure your images are optimized for faster load times, ultimately enhancing the overall user experience on LinkedIn and other platforms.
Also Read This: Making Money from Shutterstock Images: Exploring Revenue Opportunities
FAQ
Q1: How do I know if my image is the right size for LinkedIn?
A1: LinkedIn has specific image size recommendations. For example, the recommended size for a LinkedIn post image is 1200px x 627px, while the profile picture should be 400px by 400px. You can check the dimensions of your image using various tools like the LinkedIn Image Downloader, or image editing software like Photoshop or GIMP.
Q2: Can I upload images of any resolution to LinkedIn?
A2: While LinkedIn allows you to upload images with various resolutions, it’s best to use images with a resolution of 72 DPI for web content. This ensures that your images load quickly without losing too much quality on high-resolution screens.
Q3: What happens if I upload a large image to LinkedIn?
A3: If you upload a large image, it may slow down the loading time of your page or post. LinkedIn automatically compresses images, but uploading oversized images can still result in poor display quality or longer loading times, which negatively affects user experience.
Q4: How can I optimize my image sizes without losing quality?
A4: To optimize image sizes, you can resize your images to the exact dimensions needed, compress them to reduce file size, and choose the appropriate file format (JPEG, PNG, or WebP). Tools like TinyPNG or CompressJPEG can help with this.
Q5: Are there tools to automatically resize my images for LinkedIn?
A5: Yes, there are several online tools and apps, such as iLoveIMG and ResizeImage.net, that can automatically resize your images to fit LinkedIn’s recommended dimensions, saving you time and effort.
Conclusion
In conclusion, checking and optimizing image dimensions is crucial for maintaining a professional appearance on LinkedIn. By ensuring your images are the right size, you can improve both the visual quality and user experience of your content. Remember to follow LinkedIn's recommended image sizes, avoid common mistakes, and use the right tools for resizing and compressing images. This will not only enhance the overall presentation of your posts and profile but also help in creating a seamless and fast-loading experience for your audience. Taking these extra steps will go a long way in boosting engagement and maintaining a polished LinkedIn presence.


