Changing your Facebook ID name can feel like a daunting task, but it doesn’t have to be! Whether you’ve recently changed your last name, want to reflect a new identity, or just prefer to go by a nickname, understanding the process can make it a breeze. In this guide, we’ll break down everything you need to know about changing your Facebook ID name effectively, ensuring it aligns with Facebook’s policies and guidelines. Let’s dive in!
Understanding Facebook ID Names

Before we dive into the nitty-gritty of changing your Facebook ID name, it's essential to understand what a Facebook ID name is and why it matters. A Facebook ID name is essentially the name associated with your profile, and it serves as your digital identity on the platform. Here’s a breakdown:
- Real Name Policy: Facebook has a real name policy, which means users are encouraged to use the name they go by in everyday life. This helps maintain accountability and connect real people in the digital space.
- Display Name: The name displayed on your profile is linked to how others recognize you. You can include a first name, last name, and, optionally, other components like nicknames or initials.
- Profile URL: Your Facebook ID name often impacts your profile URL, creating a unique link associated with your name. For instance, if your name is John Doe, your URL might look like facebook.com/johndoe.
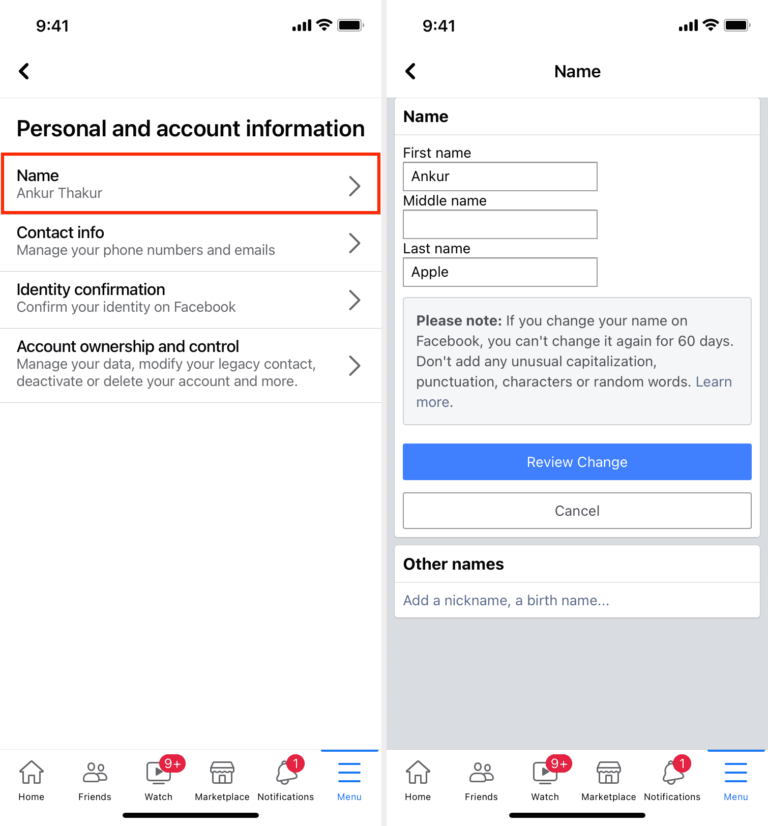
It’s also crucial to know that there are some limitations in place regarding how often and in what ways you can change your name. Facebook allows users to change their name but places restrictions to prevent abuse. Typically, users can change their names every 60 days. Furthermore, names that include symbols, numbers, or unnecessary punctuation might be flagged by Facebook's systems.
By keeping these points in mind, you can approach your name change with a better understanding of the platform’s rules and the significance of your online identity. Thus, you can ensure that you're making a choice that reflects who you are while remaining within Facebook’s guidelines!
Reasons to Change Your Facebook ID Name

Changing your Facebook ID name can often be a beneficial move, but have you ever considered why you might want to do it? Let’s explore some common yet compelling reasons.
- Personal Rebranding: Whether you've undergone a significant life change like marriage or divorce, or simply want to freshen up your online presence, a new name can represent who you are today.
- Professional Needs: If you’re using Facebook for business purposes, aligning your ID name with your professional brand can help potential clients or employers find you more easily.
- Privacy Concerns: Many Facebook users prefer a more private online presence. Changing your name to something more personal can enhance your privacy while still allowing you to connect with friends and family.
- Cultural or Religious Reasons: Some individuals may wish to change their names to reflect cultural practices or religious beliefs, allowing their social media identity to align with their values.
- Correcting Mistakes: Perhaps you made a typo when initially setting up your account or used an outdated name. Adjusting your Facebook ID can correct these errors and present you more accurately.
Overall, changing your Facebook ID name can help reflect your identity better and enhance your digital experience.
Steps to Change Your Facebook ID Name
Ready to change your Facebook ID name? Don’t worry! The process is pretty straightforward. Here’s a step-by-step guide to help you through it.
- Log into Your Account: First things first, log into your Facebook account using your credentials.
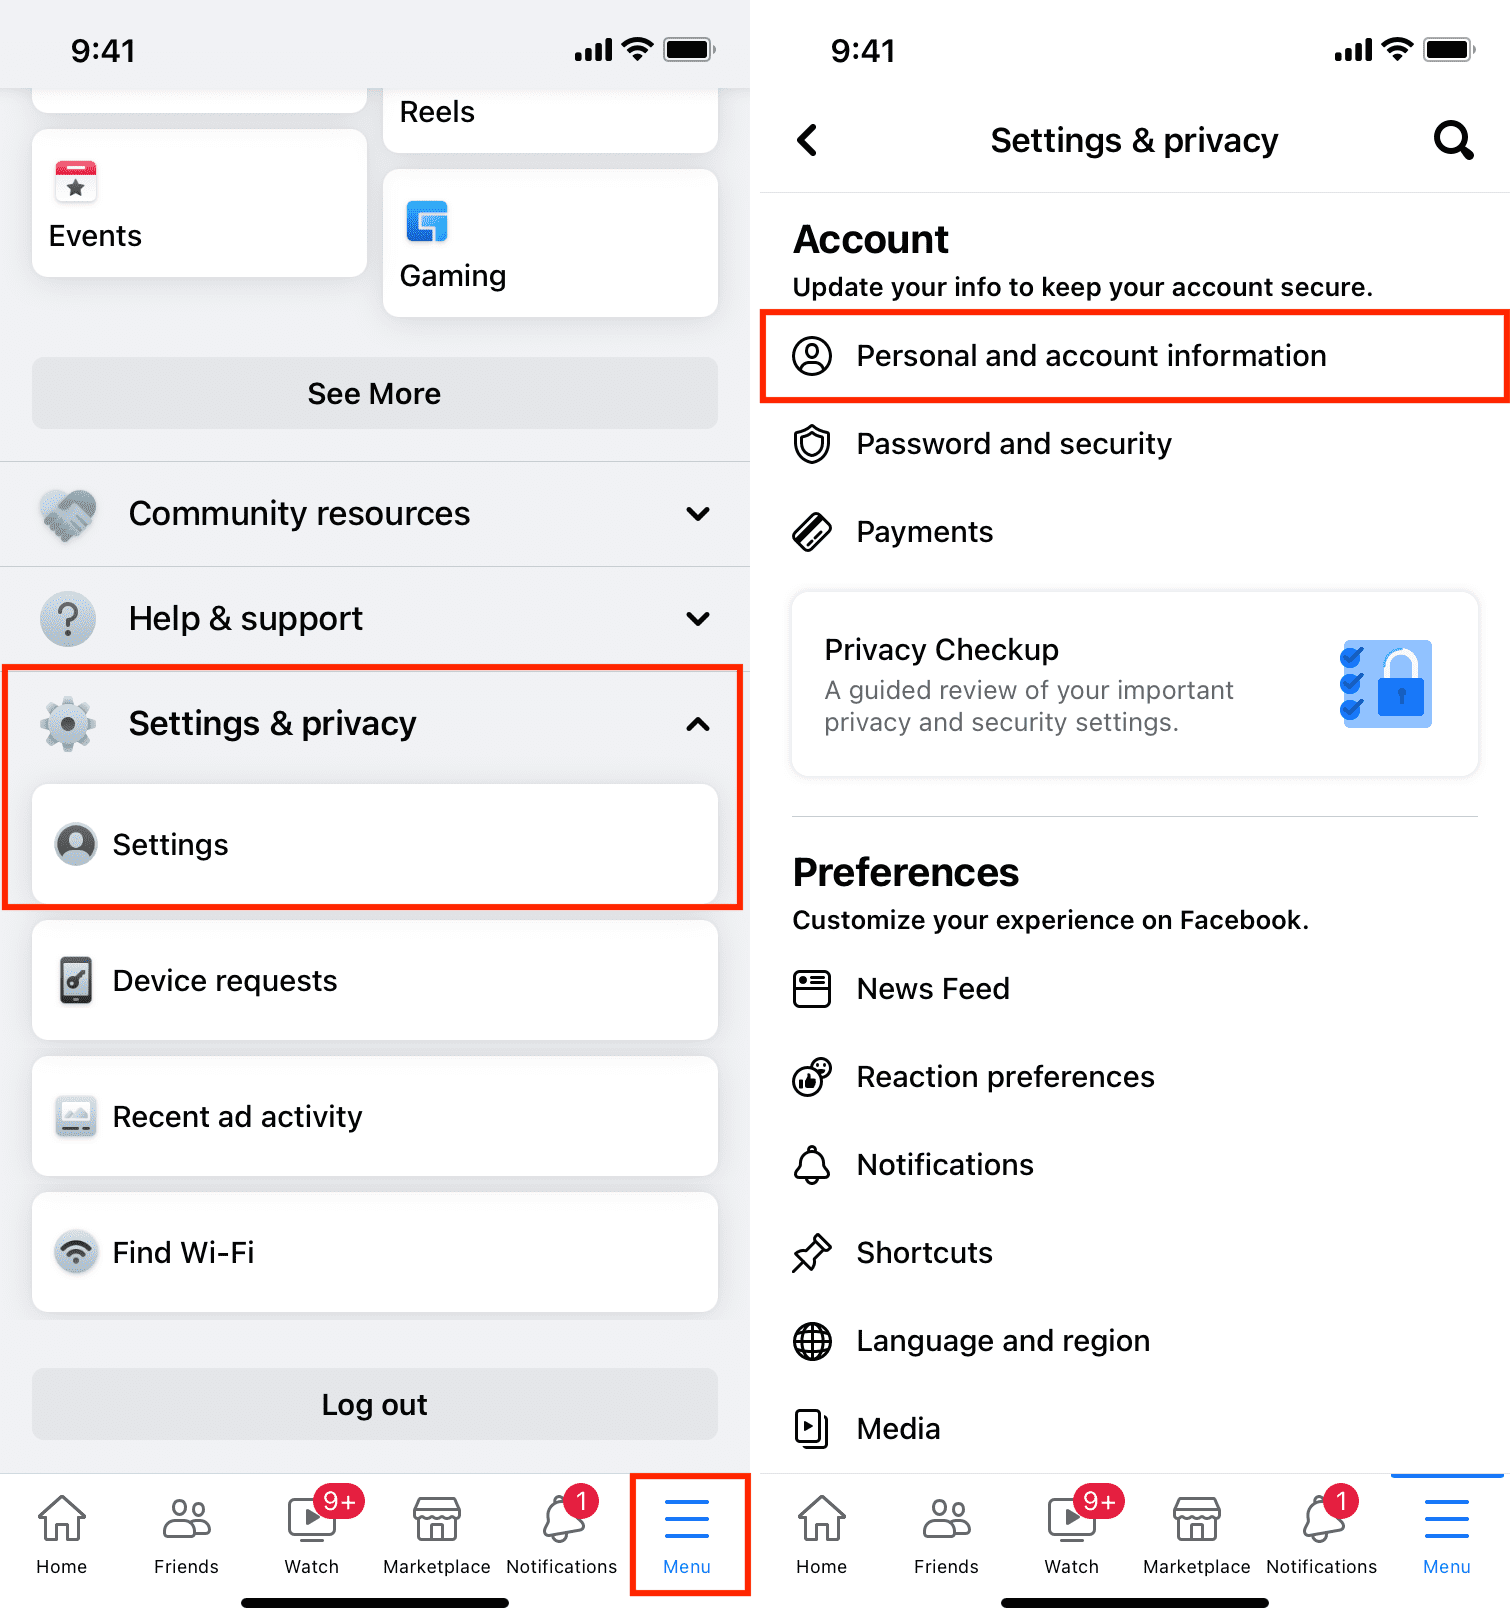
- Go to Settings: Click on the downward arrow at the top right corner of your homepage and select “Settings & Privacy,” then click on “Settings.”
- Select Name: From the left-hand menu, locate and click on “General.” You’ll see your name displayed here.
- Edit Your Name: Click “Edit” on the right side. Here, you can type in your new first, middle (if applicable), and last name. Remember that Facebook has guidelines on what names are acceptable, so make sure yours complies!
- Review Changes: You might want to consider how your new name will appear to others. Facebook will offer a preview, so check if it looks good!
- Save Changes: Once you are satisfied, click “Review Change.” You may need to enter your password to confirm.
- Wait for Approval: It’s essential to note that Facebook may take some time to review your change, so be patient!
And voila! Just like that, you’ve successfully changed your Facebook ID name. Enjoy your new identity online!
Common Issues You May Encounter
Changing your Facebook ID name may seem like a straightforward process, but there are several hiccups you might face along the way. Let’s break down the common issues and how to tackle them effectively.
- Approval Delays: Sometimes, Facebook takes longer than usual to approve your name change. This can be frustrating, especially if you’re eager to show off your new ID. If it's been over a week, consider following up with Facebook support.
- Name Rejection: Your new name might get rejected if it doesn’t meet Facebook’s naming guidelines. For instance, names that appear fake or inappropriate won’t fly. To avoid this, stick to the rules - use your real name or a recognized variation.
- Inactivity Lock: If you’ve changed your name recently, you may be locked out of making any more changes for a period. Facebook generally restricts name changes to once every 60 days. Patience is key!
- Profile Warnings: After changing your name, Facebook may prompt you to confirm your identity to ensure it’s really you. Be prepared with any identification documents if needed.
- Loss of Tagging: You may notice that your friends can no longer tag you immediately after changing your ID. This is temporary but can cause confusion.
Understanding these potential issues can save you time and trouble, so you can focus on what matters: connecting with your friends!
Tips for Choosing a New Facebook ID Name
When it’s time to update your Facebook ID name, you want to make sure it reflects your personality or brand while still being easy for others to recognize. Here are some helpful tips to consider:
- Keep It Simple: Your name should be easy to read and pronounce. Avoid using excessive symbols or numbers that can make it confusing.
- Consider Your Audience: If you’re using Facebook for professional networking, opt for a name that suits that context. A more casual name might work better for personal accounts.
- Think About Branding: If you’re an influencer or business, include keywords related to your niche. This helps your profile be easily discoverable.
- Check the Availability: Before you settle on a name, use Facebook’s search feature to see if someone else is already using it. You want to stand out, not blend in!
- Get Feedback: Sometimes, it helps to run your new name by friends or family for their opinion. They might provide insights you hadn’t considered!
With the right name, you can ensure you're making the best first impression on Facebook, so choose wisely!
How to Change Your Facebook ID Name Effectively
Changing your Facebook ID name is a straightforward process, but there are specific guidelines to ensure that the name change is accepted by Facebook. Here are the steps you need to follow to change your name effectively:
- Log into Your Facebook Account: Visit the official Facebook website and enter your credentials to log in.
- Access Settings: Click on the downward arrow in the top right corner and select "Settings & Privacy," followed by "Settings."
- Go to Name Settings: In the left sidebar, click on "General." Here, you will see your name listed.
- Enter Your New Name: Click on "Edit" next to your name. Enter your new first name, middle name (if applicable), and surname in the designated fields.
- Review Facebook's Name Standards: Ensure your new name adheres to Facebook’s name guidelines, which include:
- Using your real name
- Avoiding unusual capitalization
- No symbols, numbers, or special characters
- No offensive words
After submitting your name change, Facebook might take some time to review the request. Keep in mind that you can only change your name once every 60 days, so make sure you are satisfied with the new name and that it meets Facebook’s criteria.
Conclusion
Changing your Facebook ID name effectively requires careful attention to guidelines and a few simple steps, ensuring that your new name reflects your identity while abiding by Facebook's naming policies.


