Updating your email ID on LinkedIn might seem like a trivial task, but it’s crucial for maintaining your professional network. Whether you've changed jobs, adopted a new email provider, or simply wish to keep your LinkedIn profile fresh, modifying your email ID ensures you don't miss important updates and opportunities. In this guide, we'll discuss how to change your email ID with ease and highlight why it matters.
Reasons to Update Your Email ID on LinkedIn

There are various reasons why keeping your LinkedIn email ID current is important. Let’s dive into some of the most common and significant reasons:
- Job Changes: If you've switched companies or roles, your new job might provide you with a company email. It’s a good idea to use that for LinkedIn communications as it aligns with your professionalism.
- Professionalism: Maintaining an updated email adds to your professional image. Using a personal email that may not appear professional can give off the wrong impression.
- Security: If you’ve experienced any security issues with your old email account, changing it to a more secure option can help protect your LinkedIn profile and personal information.
- Changing Email Providers: You might have moved to a new email provider that you prefer over your old one. Keeping your LinkedIn email consistent with your daily communication makes it easier for contacts to reach you.
- Better Organization: Using a dedicated email for professional networking helps you keep work-related communications organized, ensuring that important messages are never lost.
- Notifications: With the right email set up, you’ll receive important notifications promptly, helping you stay engaged and up-to-date with your connections.
Making sure your LinkedIn email is current and appropriate can greatly impact your networking success and professional image.
Steps to Change Your Email ID on LinkedIn
Changing your email ID on LinkedIn is a straightforward process, and I'll guide you through it step by step. Just follow these instructions to ensure you stay connected with your network:
- Log into Your LinkedIn Account: Start by visiting LinkedIn and logging into your account using your current credentials. If you're logged in, you can skip this step.
- Access Your Settings: Once you're logged in, navigate to the upper right corner of the homepage. Click on your profile picture or the ‘Me’ icon, then select ‘Settings & Privacy’ from the dropdown menu. This is where all your account management happens.
- Go to Account Preferences: In the Settings menu, you’ll see several tabs on the left. Click on the ‘Account preferences’ option. This section lets you modify your account details, including your email address.
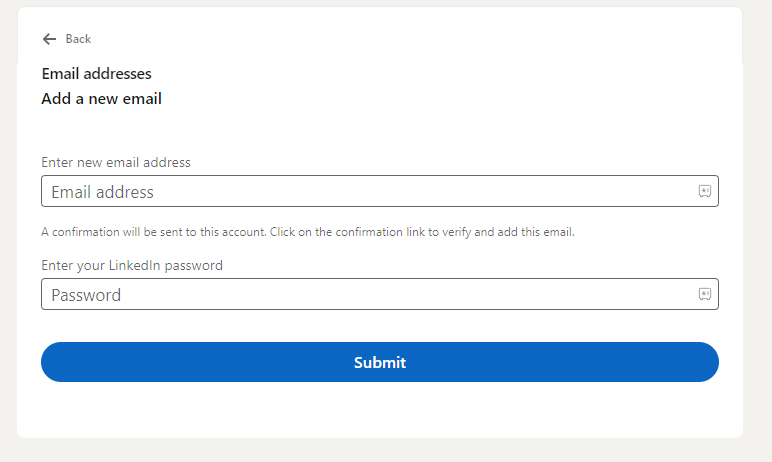
- Change Your Email Address: Under the ‘Email addresses’ section, you’ll see your current email address listed. Click on ‘Add email address’ to input your new email. You’ll have to enter the email twice to ensure that there are no typos.
- Save Your Changes: Once you've entered the new email, don't forget to hit ‘Save’ or ‘Send verification’—you’ll see that option. This ensures your new email is saved to your account.
And that's it! You've successfully changed your email ID on LinkedIn. However, the process isn't complete just yet. You need to verify your new email before it becomes your primary contact point.
Verifying Your New Email Address
After changing your email address, verification is crucial to make sure you receive notifications and messages at your new email. Here’s how to verify your new LinkedIn email address:
- Check Your Inbox: Once you’ve added your new email address, head over to your email inbox. Look for a verification email from LinkedIn. It might take a few minutes to arrive, so hang tight!
- Open the Verification Email: Once you find the email, open it. The subject line usually mentions verifying your new email address. Inside the email, you will find a confirmation link.
- Click on the Verification Link: Click the link provided in the email. This action will redirect you back to LinkedIn, confirming that you've successfully verified your new email.
- Return to LinkedIn Settings: After clicking the link, it’s a good idea to go back to your account settings on LinkedIn to ensure your new email is listed as your primary email address. You might want to remove your old email to keep things tidy.
Congratulations! You've not only changed your email ID on LinkedIn but also verified it. This means you’re all set to stay updated with important notifications and messages!
Troubleshooting Common Issues
Changing your email ID on LinkedIn should be a straightforward process, but sometimes, you might run into a few hiccups along the way. Here are some common problems and quick fixes to help you navigate through:
- Verification Email Not Received: Sometimes, the verification email that LinkedIn sends to your new email might not reach your inbox. First, check your spam or junk folder. Ensure you are checking the right email account and that your email service is functioning properly.
- Login Issues: If you’ve changed your email and can’t log in, make sure you're using the correct email address associated with your account. You might need to try logging in with your old email or using LinkedIn’s password recovery option.
- Linking Issues: If your new email is still not linked to your account, it may be due to a temporary glitch. Try logging in and out, or refreshing your browser's cache and cookies to clear out any old data.
- Email Already in Use: If you receive an error that your new email is already associated with another LinkedIn account, you will need to either use a different email or recover the other account.
If you've exhausted these steps and still encounter issues, consider reaching out to LinkedIn's customer support. They can guide you through the hiccups effectively.
Conclusion
Changing your email ID on LinkedIn is a simple task that can keep your professional network updated. By following the steps outlined in this guide and taking a few precautions, you can ensure a seamless transition to your new email address. Here's a quick recap:
- Go to your account settings and navigate to the email section.
- Add your new email, verify it, and ensure you remove the old one if necessary.
- Regularly check for any communication from LinkedIn in case further actions are required.
Remember, keeping your LinkedIn profile up-to-date is crucial for maintaining connections and being visible to potential employers or collaborators. So, whenever you change your email, don't forget to update it on LinkedIn. Happy networking!
 admin
admin


