You’ve probably noticed that some YouTube videos have eye-catching images while others seem a bit plain. Those images are called thumbnails, and they play a crucial role in grabbing viewers’ attention. In this blog post, we’ll explore simple steps to change your YouTube video thumbnails and why taking the time to customize them is worth it. Whether you’re a content creator or just looking to improve your channel's appearance, these insights will help you stand out in the vast sea of videos!
Why a Custom Thumbnail Matters
When it comes to YouTube, first impressions can make all the difference. A well-designed custom thumbnail can dramatically influence whether a viewer clicks on your video or scrolls past it. Let’s dive into the reasons why a custom thumbnail is essential for your videos:
- Catch Attention: In a world filled with content, catching a viewer’s eye is crucial. A visually appealing thumbnail gives your video the chance it deserves to be noticed among countless options.
- Conveys Information: Thumbnails provide an opportunity to convey the essence of your video. They can hint at the subject matter, set the tone, or even showcase a key moment, giving potential viewers a reason to click.
- Branding: A consistent thumbnail style can help establish your brand. Whether it’s using a particular color scheme or font, a recognizable style makes your videos instantly identifiable.
- Improves Click-Through Rate (CTR): Custom thumbnails can significantly increase your video’s CTR. A more enticing thumbnail often translates to more views, as users are more likely to choose your video over others with bland images.
- Professionalism: An unprofessional or automated thumbnail might turn viewers away. Custom thumbnails demonstrate effort and care in content creation, signaling to viewers that your video is worth their time.
Let’s not forget the psychological aspect, too. Thumbnails that evoke curiosity or emotion can entice users to engage. Whether you're using a captivating face, bold text, or vibrant colors, the goal is to create curiosity while remaining true to the content of the video.
In short, taking the time to craft a custom thumbnail can significantly boost your video’s success. By making it attractive and relevant, you not only increase the likelihood of attracting viewers but also strengthen your overall channel identity. Ready to create that perfect thumbnail? Let’s move on to the easy steps of changing your YouTube video thumbnail!
Also Read This: How to Play YouTube on Sonos for Seamless Audio Streaming
3. Requirements for Changing Your YouTube Thumbnail
Before diving into the actual process of changing your YouTube thumbnail, it's essential to know what you need to have in place. You can’t just pick any random image and throw it up there. Here are the requirements you need to meet:
- YouTube Account Type: First and foremost, you must have a verified YouTube account. If your account isn't verified, you won't have the option to upload a custom thumbnail.
- Thumbnail Image Specifications: YouTube has some specific requirements for thumbnail images. Ensure that your thumbnail meets the following criteria:
- Minimum resolution: 1280 x 720 pixels
- File size: Under 2 MB
- File formats: JPG, GIF, BMP, or PNG
- Aspect ratio: 16:9 is recommended, as it works best on various devices.
- Compelling Image: While it's not a strict requirement, using a visually compelling and relevant image can significantly impact your video's performance. Thumbnails are often the first impression viewers get, so make it count!
Additionally, it's always a good idea to create thumbnails that are consistent with your channel's branding. Utilizing your channel colors, fonts, and style can help in building a recognizable identity. Remember, your thumbnail should not only reflect the content but also attract viewers' attention.
Also Read This: Which YouTuber Am I? Take the Quiz to Find Your YouTube Personality
4. Steps to Change Your YouTube Thumbnail on Desktop
Now that you know the requirements to change your thumbnail, let's move on to the steps! Changing your thumbnail on a desktop is straightforward. Follow these easy steps:
- Log into Your YouTube Account: Head over to the YouTube website and sign in using your account credentials.
- Go to YouTube Studio: On the top-right corner of the page, click on your profile icon. From the dropdown menu, select YouTube Studio.
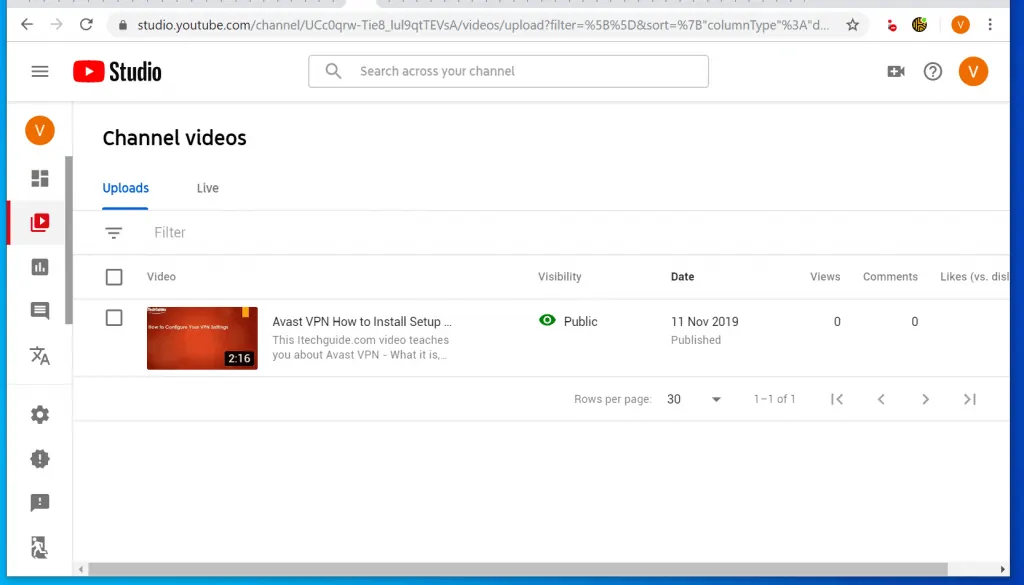
- Select Content: In the left sidebar, click on Content. This will display all of your uploaded videos.
- Choose the Video: Find the video you want to change the thumbnail for. Hover over it and click on the Edit (pencil icon) that appears.
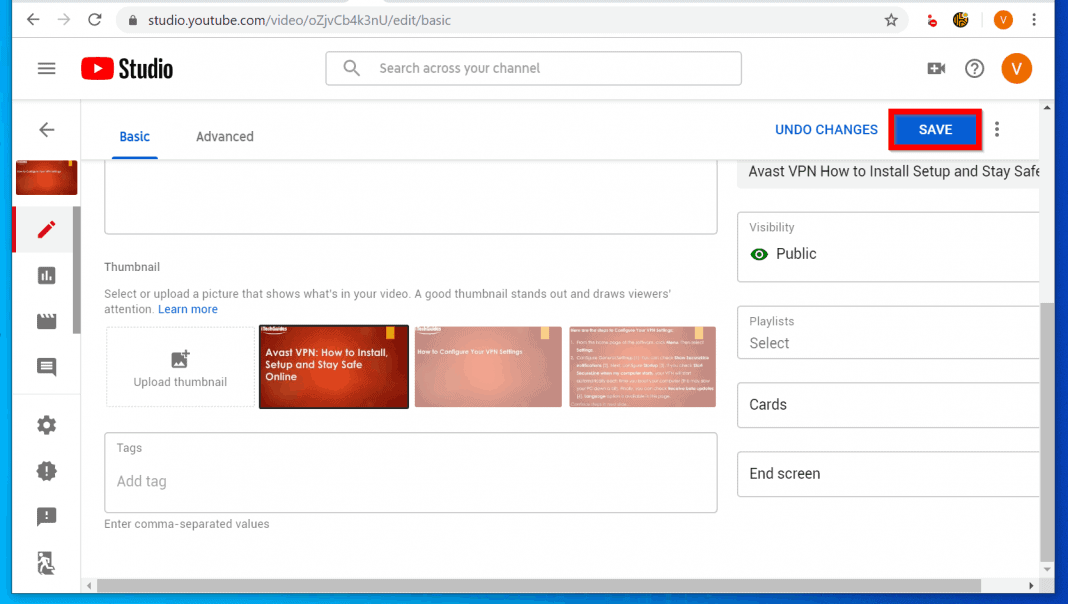
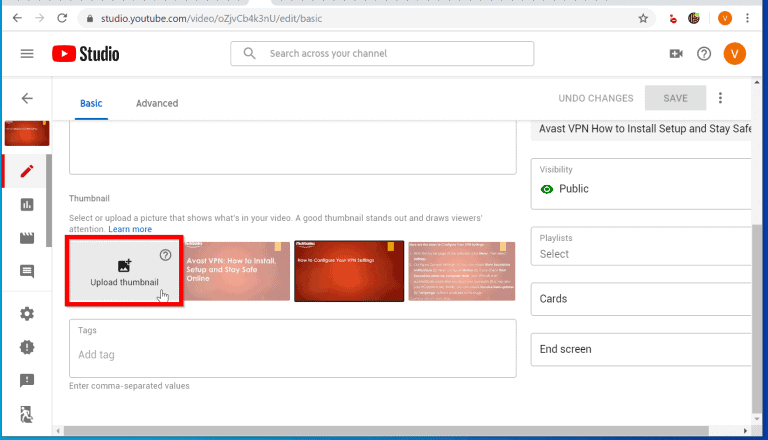
- Change Thumbnail: Now, look for the Thumbnail section on the right side of the screen. You will see your current thumbnail along with a few options. To upload a custom thumbnail, click on the Upload thumbnail button.
- Select Your Image: A file explorer window will open. Locate the image you prepared earlier, select it, and hit Open.
- Save Changes: After the new thumbnail is uploaded, don't forget to click on the Save button in the upper-right corner to apply the changes. You might need to wait a few moments for the changes to take effect across the platform.
And there you have it! Your YouTube video's thumbnail has officially been changed. Don’t forget to preview how it looks in your channel and adjust if necessary. Happy thumbnail creating!
Also Read This: How to Delete Watched Recordings from Your YouTube TV Library
5. How to Change YouTube Thumbnail Using Mobile App
Changing your YouTube thumbnail using the mobile app is a breeze! Whether you're on the go or just prefer to make edits from your smartphone, the YouTube app has got you covered. Here’s how to do it step-by-step:
- Open the YouTube App: Start by launching the YouTube app on your mobile device. Make sure you’re logged in to the account that owns the video you want to edit.
- Go to Your Channel: Tap on your profile icon located at the top right corner of the screen. From the dropdown menu, select "Your Channel" to access your videos.
- Select the Video: Find the video for which you want to change the thumbnail. Tap on the video to open its details.
- Tap on the Edit Icon: Look for the edit icon (it usually looks like a pencil) and tap on it. This brings up the video editing options.
- Choose a New Thumbnail: Scroll down to the thumbnail section. You’ll see a few automatic thumbnails generated by YouTube. If you prefer to use a custom thumbnail, tap on “Upload thumbnail” and select the image you’ve prepared from your phone’s gallery.
- Save Your Changes: After selecting a new thumbnail, don’t forget to save your changes. Look for the "Save" button, usually at the top right, and tap it to apply the update.
And that’s it! Your new thumbnail should now be live on your video. It's worth noting that while the app makes the process convenient, having a well-designed thumbnail can significantly impact your video's success. So let’s dive into some best practices for thumbnail design.
Also Read This: How to Remove YouTube from Your TV: Step-by-Step Guide
6. Best Practices for Designing YouTube Thumbnails
A great thumbnail can make a world of difference in attracting viewers to your videos. Here are some essential best practices to design captivating thumbnails:
- Use High-Quality Images: Ensure that your thumbnail image is high resolution. A blurry or pixelated thumbnail can make your video appear unprofessional and turn potential viewers away.
- Keep It Simple: Avoid cluttering your thumbnail with too much text or imagery. A busy thumbnail can confuse viewers. Aim for a clean design that communicates your video’s essence at a glance.
- Incorporate Text Strategically: If you choose to include text, make it bold and legible. Use a concise phrase or a few keywords that summarize the content. Make sure it contrasts well with the background for easy readability.
- Utilize Brand Elements: If you have a brand color or logo, incorporate them into your thumbnails. Consistently using brand elements helps viewers recognize your content quickly.
- Craft Engaging Faces: If your video features you or someone else, consider close-up shots of faces displaying emotions. Thumbnails with expressive faces often draw more clicks as they create a personal connection with viewers.
- Test Different Designs: Don’t hesitate to experiment! A/B testing your thumbnails can reveal what resonates best with your audience. Try different images, colors, and styles to see what brings in the most views.
By following these best practices, you’ll be well on your way to creating eye-catching thumbnails that boost your video’s visibility and click-through rate. Remember, your thumbnail is often the first impression viewers will have of your content, so make it count!
Also Read This: How to Create a YouTube Subscription Link for Your Channel
7. Common Issues When Changing Thumbnails and Troubleshooting Tips
Changing your thumbnail on YouTube can seem like a straightforward task, but sometimes things don’t go as planned. Here are some common issues you might encounter and helpful tips to troubleshoot them:
- Thumbnail Not Uploading: If you find that your chosen thumbnail isn't uploading, check the file format and size. YouTube accepts .JPG, .GIF, .BMP, or .PNG formats, and the file size should ideally be under 2MB.
- No Thumbnail Options Available: Sometimes, users may notice that the option to select a custom thumbnail is grayed out. This usually happens if your account isn’t verified. Make sure your account is in good standing and consider verifying it if you haven’t already.
- Thumbnails Disappearing: If your new custom thumbnail isn’t appearing on your video, try refreshing your browser or clearing its cache. Sometimes old data can cause display issues. Also, ensure that you’ve saved your changes!
- Policy Violations: YouTube has strict policies. If your thumbnail violates their guidelines, it could be removed, or worse, your channel might receive a strike. Always ensure that your thumbnail content is suitable and aligns with YouTube's community guidelines.
- Image Not Updating: If you’ve uploaded your new thumbnail but it still shows the old one, it could be a caching issue. This can be resolved by waiting a little while or viewing the video in incognito mode.
Troubleshooting Tips: Next time you face these issues, remember these troubleshooting tips:
- Double-check that your thumbnail meets all of YouTube’s specifications.
- Verify that your account is in good standing and properly verified.
- Clear your browser cache or try using a different browser for uploading.
- Visit YouTube’s support channels or community forums if issues persist, as they often have updates on common problems and solutions.
In case of any ongoing troubles, reaching out to YouTube support can be helpful. They can provide detailed assistance, especially if the issues seem unusual.
8. Conclusion: Enhancing Your Video’s Appeal with Thumbnails
In the world of YouTube, first impressions matter, and your thumbnail is often the first thing viewers will notice. As we've discussed, having a compelling thumbnail can significantly enhance your video's appeal, making it stand out in a crowded field. With just a few easy steps, you can create eye-catching and engaging thumbnails that not only attract clicks but also give your audience a glimpse of what to expect from your content.
Remember, a good thumbnail can transform the fate of your videos, leading to increased views, better engagement, and ultimately, a larger audience. So don’t hesitate to experiment with colors, text, and images until you find what truly resonates with your viewers!
In conclusion, always keep your target audience in mind when designing your thumbnails. Think about what will grab their attention, what is relevant to your video’s content, and how you can convey that quickly and effectively. With these easy steps and tips up your sleeve, you're all set to take your YouTube channel to new heights.
Happy thumbnail designing!
 admin
admin


