Introduction to Image Shaping in Photoshop
Adobe Photoshop is an incredible tool that allows you to manipulate images in ways that can transform your creative projects. Whether you're a professional graphic designer or a hobbyist, changing the shape of an image can add a unique touch to your work. With just a few simple steps, you can adjust the outline of an image, apply filters, or create completely new shapes. In this post, we’ll walk you through the basics of shaping images in Photoshop, so you can easily enhance your designs and make your photos pop!
Also Read This: how do you embed an image
Understanding the Basics of Photoshop Tools
Before diving into image shaping, it's essential to familiarize yourself with some of the key tools Photoshop offers. Here are a few fundamental tools that every designer should know:
- Selection Tools: These tools, including the Rectangular Marquee Tool and the Lasso Tool, help you select parts of your image that you want to modify. Selecting an area is the first step to changing its shape.
- Transform Tool: Accessed via Ctrl + T (or Cmd + T on a Mac), this powerful tool allows you to resize, rotate, and skew your selection to achieve the desired shape.
- Pen Tool: Perfect for creating custom shapes, the Pen Tool enables you to draw precise paths that can be converted into selections, fill shapes, or add effects. It might take a little practice to master, but it’s incredibly versatile!
- Layer Masks: Masks provide a non-destructive way to change the shape of an image. By painting on a mask, you can hide or reveal parts of the layer based on your design needs.
- Filter Gallery: This collection of filters allows you to apply various artistic effects to transform your image without permanently altering the original layer.
Now that you have an overview of the basic tools, here’s how each contributes to changing the shape of your image:
Selection Tools are your first step in transforming any image. Choose a selection that encapsulates the area you wish to modify. For quick shapes, use the Rectangular Marquee Tool, but for more complex selections, the Lasso Tool might be better suited for the job.
Once you've selected your area, the Transform Tool can help you squeeze, stretch, or rotate your shape. Want your image to be oval instead of rectangular? Just select it and use the Transform Tool to adjust accordingly.
If you're aiming for precision, the Pen Tool is your best friend. It allows you to create custom shapes that can not only cut out portions but can also generate entirely new imagery. Tweak and adjust the anchor points to mold your shape just the way you want it.
Utilizing Layer Masks is perfect for those who want to keep their original image intact. By masking parts of a layer, you can achieve various effects without making irreversible changes. This is particularly useful for adjustments in brightness or contrast without affecting the whole image's aesthetic.
Lastly, don't forget about the Filter Gallery. Here, you can apply creative effects that change the visual perception of your image's shape indirectly. Play with the distort filters to give the appearance of movement or depth.
By mastering these tools, you'll have a solid foundation for shaping images creatively in Photoshop. Each tool offers different approaches and possibilities, so dive in and experiment!
Also Read This: how to skew an image in canva
3. Choosing the Right Image for Shaping
When it comes to changing the shape of an image in Photoshop, selecting the right image is crucial for achieving the best results. Not all images are created equal, and some lend themselves better to shape alterations than others. Here are a few tips to help you choose the perfect image:
- High Resolution: Opt for images with high resolution. Higher resolution means more pixels, which provides more detail and reduces the chance of distortion when reshaping.
- Simple Background: Images with simple or solid backgrounds are easier to manipulate. They allow your focus to be on the subject without unnecessary distractions.
- Clear Subject:** Choose images where the main subject is clear and distinct. This makes it easier to select and reshape without affecting other elements.
- Interesting Shapes: Images that already have interesting shapes or contours can be a fun starting point. This could include portraits, objects, or landscapes with defined lines.
- Consider the End Goal: Think about how you want the final image to look. If you have a specific shape or design in mind, be sure the original image can accommodate that vision.
In summary, take your time to scout for the right image. A little extra effort in this initial step will pay off when you start to shape and transform your artwork. Remember, the more you love the image you choose, the easier it will be to get creative with it!
Also Read This: How to Copy Images on a Chromebook
4. Step-by-Step Guide to Changing Image Shapes
Now that you've chosen the right image, it’s time to dive into the magic of Photoshop! Here’s a simple step-by-step guide to changing the shape of your image:
- Open Your Image: Launch Photoshop and open the image you want to reshape by navigating to File > Open.
- Duplicate the Layer: Before making changes, duplicate your original layer. This ensures that you always have the original image to go back to. Right-click on the layer and select Duplicate Layer.
- Select the Shape Tool: Choose the shape tool from the toolbar on the left. You can pick from various shapes – rectangles, circles, or even custom shapes!
- Draw Your Shape: Click and drag on your canvas to draw the desired shape over the part of the image you want to keep. You can adjust the size and position as needed.
- Create a Clipping Mask: With the shape layer selected, hold down the Alt key (or Option on a Mac), then click between the shape layer and the image layer in the layers panel. This will create a clipping mask, meaning the image will only show through the area of the shape.
- Edit Your Image: Now you can further edit the image within the shape! Use various tools to adjust colors, add effects, or even apply filters. The artistic world is your oyster!
- Save Your Work: Once you're happy with your creation, be sure to save it! Click on File > Save As to choose your file format (PNG or JPEG are popular) and save your masterpiece.
And there you have it! These steps should guide you through the process of changing the shape of an image in Photoshop with ease. Remember, practice makes perfect, so don’t hesitate to experiment with different shapes and effects to find what works best for you!
Also Read This: Cross-App Melodies: Playing SoundCloud While Enjoying Roblox – A Sonic Experience
5. Using Layer Masks for Shape Modification
When it comes to making precise adjustments to the shape of an image in Photoshop, layer masks are your best friend. They offer seamless control allowing you to modify shapes without permanently damaging your original image. This technique is essential for anyone looking to create stunning visuals while preserving the original file. So, let’s dive into how you can effectively use layer masks for shape modification!
Here's a step-by-step guide to get you started:
- Open Your Image: Begin by launching Photoshop and opening the image you want to modify.
- Add a Layer Mask: Select your image layer and click the Add Layer Mask button at the bottom of the Layers panel. This adds a white thumbnail next to your image thumbnail.
- Select the Brush Tool: Choose the Brush Tool (B) and set your foreground color to black. Painting with black on the layer mask will hide parts of your image, while painting with white will reveal them.
- Paint to Modify Shape: Gradually paint over the areas of your image you wish to remove or modify. Don’t worry about making mistakes; you can always switch back to white and refine any areas you’d like to bring back.
- Adjust Brush Settings: For more finesse, consider altering the brush size and hardness. A softer brush can create smoother transitions, which is especially useful for images with complex edges.
- Fine-Tune Your Edges: Use a smaller brush or the smudge tool to refine the edges and make your shape modification even more natural.
And there you have it! With layer masks, you can explore infinite possibilities in modifying your image shapes while keeping your original file intact. Plus, it’s non-destructive, which means you can always revert back if you change your mind!
Also Read This: Why Designers Are Drawn to Imago Images for Premium Stock Visuals
6. Applying the Warp Tool for Creative Shaping
If you’re looking to get a little more adventurous with your image shaping in Photoshop, the Warp Tool is a fantastic choice! This tool allows for creative manipulation of your images, giving you the ability to bend, stretch, and creatively alter any shape you’re working with. Here’s how you can effectively utilize the Warp Tool to achieve stunning results:
Getting started with the Warp Tool is easy. Here are the steps:
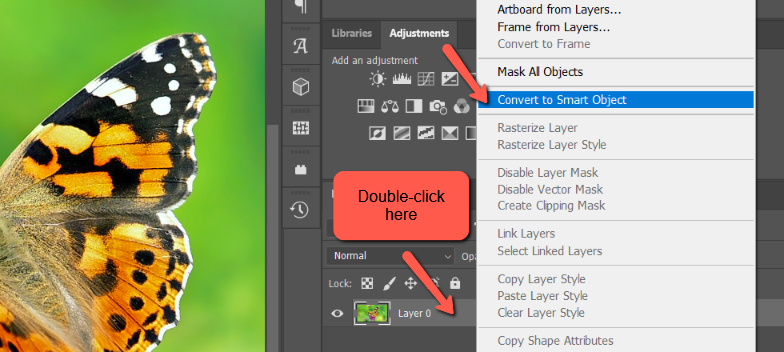
- Select Your Layer: First, click on the layer containing the image you want to warp.
- Convert to a Smart Object: Right-click on your layer and choose Convert to Smart Object. This lets you apply the warp effect non-destructively.
- Access the Warp Tool: Go to the Edit menu at the top, select Transform, and then choose Warp. A grid will appear over your image.
- Warping the Image: Click and drag the points or lines that form the grid. You can also click and drag any of the handles that appear on the grid to create unique curves and shapes.
- Explore Different Warp Shapes: In the Options bar, tap on the dropdown for Warp Options to select from various preset shapes—be it arc, flag, or custom options to enhance your creativity further.
- Finalize the Transformation: Once you’re happy with your adjustments, press the Enter key (Return on Mac) to apply the warp. If you’re not satisfied, you can double-click on the Smart Object thumbnail in the Layers panel to adjust the warp again.
Using the Warp Tool can create dramatic effects that might even surprise you! Whether you’re shaping an object creatively in a photo collage or making adjustments to a figure in a portrait, the possibilities are endless with this powerful tool. It’s all about playfulness and exploration!
So why not give it a try? You’ll find that it not only enhances your skill set in Photoshop but also adds a fun element to your creative workflow!
Also Read This: 10 Creative Ideas for Capturing Unique and Artistic Photos
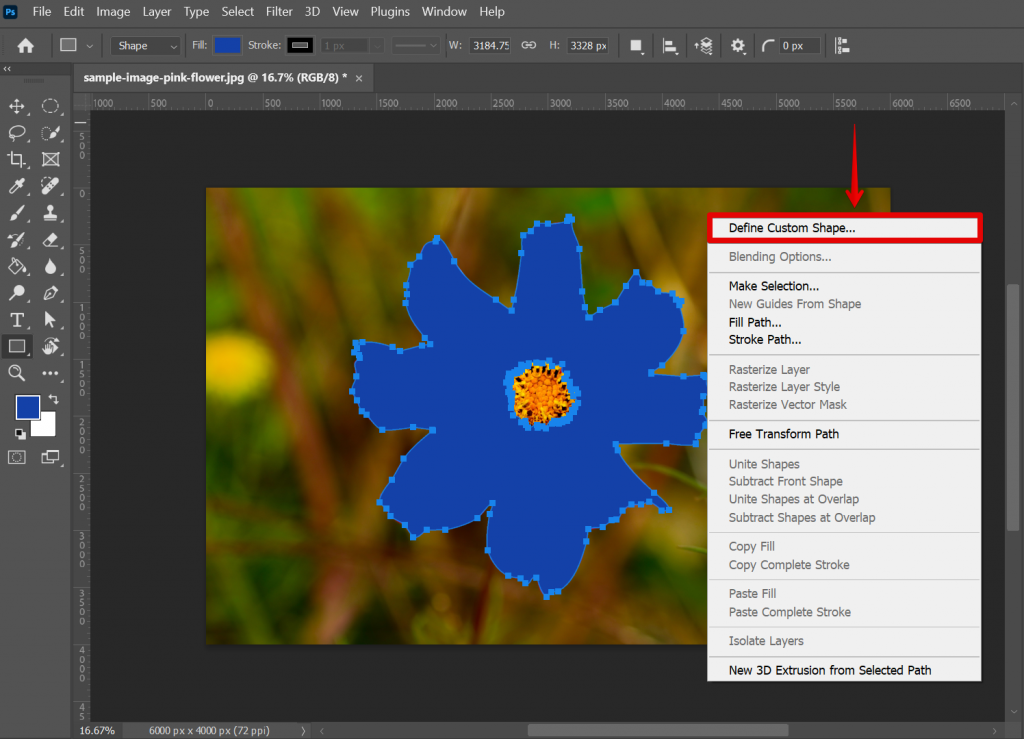
7. Exploring the Pen Tool for Custom Shapes
If you're looking to change the shape of an image in Photoshop, one of the most powerful tools at your disposal is the Pen Tool. This tool allows you to create custom paths and shapes, making it ideal for intricate designs and precise edits. While it may seem intimidating at first, with a little practice, you'll find it incredibly rewarding.
To get started with the Pen Tool, follow these simple steps:
- Select the Pen Tool: You can find the Pen Tool in the toolbar on the left side of the screen. It looks like a fountain pen nib.
- Creating Anchor Points: Click on your canvas to create anchor points. These points will define the shape's outline you are making.
- Curving Lines: If you click and drag while placing anchor points, you can create curves. This is where you can really start to add personality to your shapes!
- Closing the Path: To close your shape, simply click back on the first anchor point you created. Photoshop will connect the dots, forming a complete shape.
- Editing Your Path: If you need to adjust the shape, you can use the Direct Selection Tool (the white arrow) to click and drag anchor points or paths to reshape your design.
Custom shapes created with the Pen Tool can be incredibly useful. For example, if you want to shape an image to fit within a unique logo or branding element, the Pen Tool is your friend. Don't forget that you can also convert your paths into selections for further manipulation. This can open up a realm of creative possibilities—whether you're mask making or cutting out objects from their background.
Although mastering the Pen Tool takes practice, you’ll find that it gives you much more control over your designs compared to the basic selection tools. And before you know it, you’ll be crafting stunning, custom shapes in no time!
Also Read This: Embroidering Images for Unique DIY Projects
8. Tips for Maintaining Image Quality While Shaping
When you're working on changing the shape of an image in Photoshop, preserving the quality of your image is a top priority. There’s nothing worse than pouring your creativity into a project only to have it look pixelated or distorted! Here are some helpful tips to make sure your image quality stays top-notch:
- Work with high-resolution images: Always start with the highest resolution file available. The more pixels you have, the better quality you can maintain. Images with lower resolution will lose detail the more you manipulate them.
- Use Smart Objects: Converting layers to smart objects allows for non-destructive editing. This means you can transform, scale, and reshape without losing image quality, as Photoshop retains the original file data.
- Limit Rasterization: When you apply effects or convert your layers, avoid rasterizing unless absolutely necessary. Rasterizing can lead to loss of detail, especially if the shape you’ve created is scaled up.
- Check your image size: Regularly check your image size (Image > Image Size) to ensure that adjustments aren't inadvertently enlarging or shrinking your image. Keep the proportions locked to avoid unexpected distortions.
- Save in the Right Format: When you're done, choose a format that maintains quality. For web use, consider PNG or TIFF, while JPEG is good for photographs. Just remember to adjust the quality settings based on your needs!
By keeping these tips in mind, you can ensure that your images remain sharp and professional, no matter how creatively you shape them in Photoshop. Remember, the quality of your image speaks volumes about your design skills, so take the time to tweak and adjust as necessary!
Also Read This: How to Transfer Printed Images to Metal
9. Common Mistakes to Avoid When Changing Image Shapes
Changing the shape of an image in Photoshop can be an exciting venture, but it’s all too easy to stumble into some common pitfalls. Here are a few mistakes you'll want to avoid:
- Not Working on a Duplicate Layer: One of the biggest blunders is editing directly on your original layer. Always create a duplicate before making any changes. This ensures you can revert back to the original if something goes awry.
- Ignoring Aspect Ratio: When resizing images, many users stretch or squash their images without maintaining the aspect ratio. This leads to distorted images that can appear unprofessional. Remember to hold the 'Shift' key while resizing to keep that ratio intact.
- Overusing the Warp Tool: The Warp Tool is fantastic, but it can lead to unnatural shapes if over-applied. Use it sparingly and always zoom in to check how it looks at 100%.
- Skipping the Feathering Step: When cutting out shapes, it’s important to feather your selection. Skipping this can lead to sharp, unnatural edges that disrupt the flow of your image.
- Underestimating Background Interaction: Changing the shape of an object can lead to awkward interactions with the background. Always check how your newly shaped object blends with its environment. Use layer masks if necessary to create seamless transitions.
- Not Paying Attention to Resolution: When changing shapes, make sure your image resolution is high enough. Lower resolutions can lead to pixelation, especially when you try to enlarge an image. Aim for at least 300 DPI for print and 72 DPI for web.
Avoiding these common mistakes can save you a lot of time and frustration. Take your time and be mindful of these tips as you explore the power of Photoshop!
10. Conclusion and Next Steps in Photoshop Skills
Congratulations on reaching the end of this guide! You’ve now learned how to change the shape of an image in Photoshop easily, along with common pitfalls to avoid. So what's next? Here are some steps to continue your Photoshop journey:
- Practice Regularly: The best way to improve your Photoshop skills is through consistent practice. Set aside time each week to experiment with different tools and techniques. Try creating various projects like posters, social media graphics, or even digital art.
- Tutorials and Online Courses: Dive deeper into Photoshop by taking advantage of the plethora of online tutorials and courses available. Websites like Udemy, Skillshare, and even YouTube offer fantastic resources for learners at all levels.
- Join Online Communities: Engage with fellow Photoshop enthusiasts by joining forums or social media groups. Platforms like Reddit and Facebook have dedicated communities where you can share your work, get feedback, and exchange tips.
- Experiment with Related Software: Don’t limit yourself to Photoshop. Explore complementary software such as Adobe Illustrator for vector graphics or Adobe Lightroom for photo editing. Each tool has unique capabilities that can enhance your overall skills.
- Keep a Portfolio: Document your work by keeping a portfolio. This not only helps you track your progress but also showcases your skills if you decide to seek freelance opportunities or job positions in the creative field.
Remember, becoming proficient in Photoshop is a journey. Embrace the learning process, and don’t be afraid to make mistakes along the way. Each one is a step towards mastering this powerful tool. Happy editing!
 admin
admin


