Google Slides offers a simple yet powerful way to customize your images. Changing the shape of an image can be an excellent way to match your content's aesthetic or fit it better into your slide layout. Whether you're creating a presentation for business, school, or personal use, having the ability to adjust the shape of your images can make them look more professional and visually appealing.
In this guide, we'll walk you through how to easily change the shape of your images, and explain why this feature is essential for making your slides stand out.
Why You Might Want to Change the Shape of an Image

Changing the shape of an image in Google Slides is not just about making things look prettier; it can serve several practical purposes. Here are a few reasons why you might want to modify your images:
- Improved design consistency: Changing the shape helps maintain a consistent visual theme in your presentation.
- Better fit for the slide layout: Sometimes, images in their original shape don’t fit well with the surrounding text or other elements. Changing the shape can help make the image fit better within your design.
- Enhancing focus: Using shapes like circles or frames can help highlight certain parts of an image, making it the focal point of your slide.
- Creative expression: It allows you to be more creative and playful with your images, adding a unique touch to your slides.
Incorporating shapes also makes your presentation more dynamic and engaging, which can captivate your audience’s attention more effectively.
Also Read This: Saving Images from Google Slides in Just a Few Clicks
Step-by-Step Guide to Change the Shape of an Image in Google Slides

Now, let’s dive into the steps for changing the shape of an image in Google Slides. Follow these simple instructions, and you’ll be able to modify your images in no time:
- Insert the Image: First, ensure that the image is on your slide. You can do this by clicking on the "Insert" menu, selecting "Image," and choosing the source of your image.
- Select the Image: Once your image is on the slide, click on it to select it. This will activate the editing tools for the image.
- Open the Cropping Tool: Click on the "Crop Image" icon in the toolbar, located near the top of the screen. This will open the cropping options for the image.
- Choose the Shape: In the toolbar, you’ll see an option that says "Mask Image." Click on the drop-down arrow next to it to display a variety of preset shapes like circles, rectangles, or stars.
- Adjust the Shape: Once you've selected your desired shape, you can resize the image by dragging the corners to make it fit the shape properly.
- Fine-Tune the Image: After masking your image, you can still adjust the position within the shape. Double-click on the image to reposition or resize it within the new shape to get the perfect fit.
With these steps, you can quickly transform any image on your Google Slides presentation into a custom shape. The best part? It’s very easy to do, even for beginners!
Also Read This: CapCut Compositions: Adding Music from Spotify to Your CapCut Projects
Using Built-In Shapes to Modify Your Image
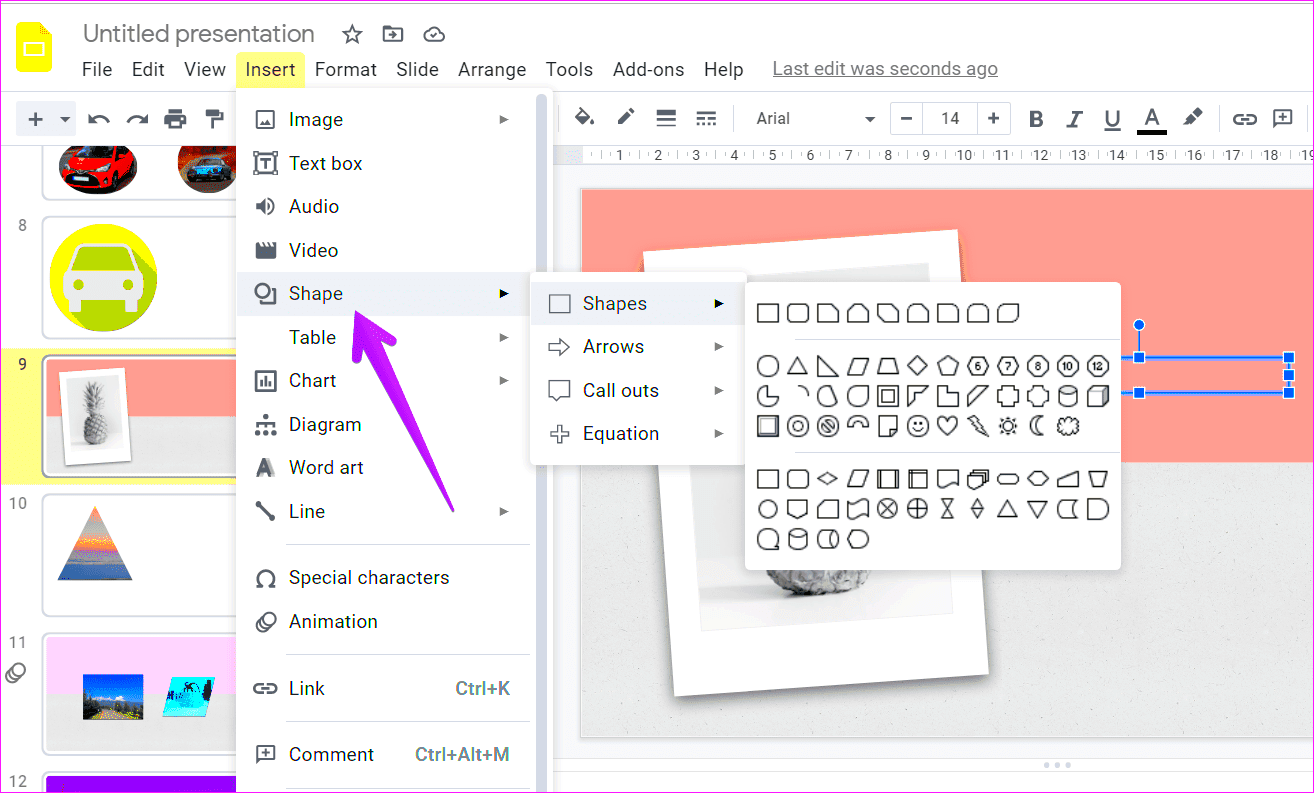
One of the easiest ways to modify an image in Google Slides is by applying built-in shapes. These pre-designed shapes are available directly in the Google Slides toolbar and offer a quick way to make your images look more polished or creative without needing any complex design skills.
Here’s why using built-in shapes is a great option:
- Variety of Shapes: Google Slides provides several built-in shapes like circles, ovals, triangles, stars, and even speech bubbles. This gives you flexibility to pick a shape that fits your presentation’s style.
- Quick to Apply: With just a few clicks, you can change the shape of any image, which saves time compared to editing images in external software.
- Consistent Design: Applying these shapes ensures that your images stay consistent in terms of design, making your slides look more professional.
Here’s how to apply these built-in shapes:
- Click on the image you want to modify.
- In the toolbar, click the "Mask Image" button and then select "Shapes" from the dropdown menu.
- Choose the desired shape from the list.
- Once the shape is applied, you can adjust the size or position of the image within the shape.
With these easy steps, you can transform your images to fit a variety of shapes, making them look more cohesive with your overall slide design.
Also Read This: Finding and Managing Your Scheduled Posts on LinkedIn
How to Crop an Image to a Custom Shape
If you want to go beyond the basic shapes offered in Google Slides and crop your image into a custom shape, you’re in luck! Google Slides allows you to crop images in creative ways, letting you create unique visuals that fit perfectly with your presentation.
To crop an image into a custom shape, follow these steps:
- Select Your Image: First, click on the image you want to crop.
- Access the Masking Tool: Next, click on the "Crop Image" button in the toolbar, which will give you the option to change the shape of your image.
- Choose the Shape: You’ll see an option to mask the image. Click on the drop-down arrow and choose the shape you want. You can also click on “Custom” to manually adjust the crop shape.
- Adjust the Crop: Drag the corners or edges of the crop box to fine-tune the shape to your liking. This will allow you to focus on specific parts of the image.
- Apply the Crop: Once you’re happy with your custom crop, click outside the image to apply the changes.
Custom cropping is perfect for creating creative, personalized visuals that can help your presentation stand out. You can crop your images into irregular shapes like hearts, arrows, or any custom form that fits your content.
Also Read This: Resizing Images in Paint: A Quick Guide
Adjusting the Image’s Size After Changing Its Shape
After changing the shape of an image in Google Slides, you may want to adjust its size to ensure that it fits perfectly within your slide layout. Resizing an image can be tricky if you don’t do it correctly, as it can distort the image or leave parts of it out of the frame. Thankfully, there are simple ways to resize your image without affecting its quality.
Here’s how you can adjust the size of your image after you’ve changed its shape:
- Click on the Image: Select the image by clicking on it. This will highlight the image and show resizing handles on the corners and sides.
- Resize the Image: Drag any of the corner handles to adjust the size. Make sure to drag from the corners to maintain the image’s aspect ratio and avoid distortion.
- Use the Aspect Ratio Lock: If you want to ensure the image maintains its proportions, hold down the "Shift" key while resizing. This will keep the image's aspect ratio intact.
- Adjust the Shape After Resizing: After resizing, you might need to tweak the shape of the image again. If it no longer fits well within the shape, you can adjust the shape's mask by following the same steps as before.
By following these steps, you’ll be able to resize your images to the perfect dimensions without affecting their overall appearance. Whether you’re making them bigger to fill the space or smaller to fit neatly alongside text, resizing can help enhance your design without sacrificing image quality.
Also Read This: Editing Images in PDF Format Made Simple
Common Mistakes to Avoid When Changing the Shape of an Image
When changing the shape of an image in Google Slides, it's easy to make mistakes that could affect the overall look of your presentation. Knowing what to avoid can save you time and help you create better designs. Here are some common mistakes to be aware of:
- Distorting the Image: One of the biggest mistakes is resizing the image unevenly, which can distort its proportions. Always resize from the corners to maintain the image’s original aspect ratio and prevent it from becoming stretched or squished.
- Forgetting to Adjust the Image Position: After changing the shape, the image inside the shape may not be positioned properly. It’s important to adjust the image within the new shape to avoid unnecessary empty spaces or misalignment.
- Choosing Incompatible Shapes: Sometimes, selecting a shape that doesn’t match the image content can make your slide look unprofessional. For example, fitting a portrait-style image into a circle may not highlight the subject well. Always consider the context of the image before applying a shape.
- Overcomplicating the Design: Adding too many shapes or complex designs can make your slide look cluttered. Simplicity often works best, so aim for clean, simple designs that complement the overall presentation.
- Ignoring Image Quality: Changing the shape or resizing too much can lead to a loss of image quality. Always ensure that your image is high resolution before making any adjustments, especially if you plan to enlarge it.
By being mindful of these common mistakes, you can ensure that your images look great and fit seamlessly into your slides without any unwanted issues.
Also Read This: YouTube View Count: A Global Exploration of Statistics
How to Restore the Original Shape of an Image
Sometimes, after changing the shape of an image, you may decide that the new shape doesn’t work as well as you thought. Thankfully, Google Slides makes it easy to restore the original shape of an image. Here’s how you can revert the changes:
- Select the Image: Click on the image you want to restore. Make sure it’s selected so you can access the editing options.
- Open the Mask Options: In the toolbar, click on the "Mask Image" button, which shows the current shape applied to the image.
- Choose the “None” Option: In the dropdown menu, select the "None" option. This will remove the shape mask, returning the image to its original rectangular form.
- Adjust the Image: After restoring the shape, you can still adjust the image’s position or size if needed. This ensures that the image looks properly aligned with the rest of your slide elements.
Restoring the original shape is quick and easy, giving you the flexibility to experiment with different shapes without worrying about permanent changes. With just a few clicks, you can always return to the image’s natural form if you change your mind.
Also Read This: Understanding YouTube Earnings for 100 Million Views
FAQ
Here are some frequently asked questions about changing the shape of an image in Google Slides:
- Can I change the shape of an image after inserting it into a slide?
Yes, you can change the shape of an image at any time after inserting it into your slide. Simply select the image, click the "Mask Image" button, and choose a new shape. - Will changing the shape of the image affect its resolution?
Resizing or changing the shape may affect the appearance of the image, but it won’t affect its resolution unless you enlarge the image significantly. Always use high-quality images for the best results. - How do I ensure the image maintains its proportions when resizing?
To maintain the image’s proportions, hold down the "Shift" key while resizing from the corners. This keeps the image’s aspect ratio intact. - Can I crop an image into a custom shape?
Yes, you can crop an image into a custom shape by using the "Mask Image" option and selecting "Custom" in the shape dropdown. You can then adjust the shape to fit your image as needed. - What if I don’t like the shape and want to restore the image?
If you want to restore the image to its original shape, simply click on the image, open the "Mask Image" dropdown, and select the "None" option to remove the shape mask.
These are just a few common questions that many users have. If you have more, feel free to explore Google Slides' help options or reach out for further assistance!
Conclusion
Changing the shape of an image in Google Slides is a simple yet powerful way to enhance your presentations. It allows you to customize your visuals, ensuring that they fit seamlessly into your slide layout and complement your content. By following the steps outlined in this guide, you can easily apply built-in shapes, crop images to custom forms, and adjust the size of your images without compromising their quality. Remember to avoid common mistakes, such as distorting the image or choosing incompatible shapes, and always ensure that your visuals align with your presentation’s theme. With these tips in mind, you’ll be able to create more engaging and professional-looking slides in no time!

 admin
admin


