Changing your email ID on LinkedIn is a straightforward process, yet it’s one that many users overlook. Whether you're rebranding yourself professionally or simply want to update your contact information, knowing how to make this change is essential. This guide will lead you step-by-step through the process, ensuring you stay connected with your network without missing a beat.
Why You Might Need to Change Your Email ID on LinkedIn
There are several reasons you might find yourself needing to update your email ID on LinkedIn. Let's explore the most common scenarios:
- Change of Employment: If you've switched jobs, you might want to update your email to align with your new work address.
- Rebranding: Entrepreneurs and freelancers often change their business names, requiring a corresponding email update.
- Increased Professionalism: You may start with a personal email that doesn’t match your professional persona (like a favorite hobby or nickname) and decide to transition to a more professional-sounding email.
- Privacy Concerns: If you've been using a personal email that you now want to keep private, changing it to a more formal or work-related address can enhance your security and professionalism.
- Organizational Email Change: Sometimes, companies update their domain names. If you’ve been notified about this, updating your LinkedIn email is crucial to stay aligned with your organization.
Changing your email ID on LinkedIn isn’t just about keeping it updated; it's also about maintaining your professional brand. An email tied to your current job or business can lend more credibility to your profile. Moreover, if you change jobs frequently, keeping your LinkedIn profile updated with your latest contact information ensures that potential employers, recruiters, and colleagues can reach you effortlessly.
Additionally, sometimes it simply comes down to practicality. You might realize that your old email is no longer accessible, or you might switch to an email provider with better features, spam protection, or security offerings. Whatever the reason, keeping your LinkedIn email current is an essential part of managing your online professional presence.
With the importance of networking and maintaining your online identity, understanding when and why to update your email ID can make a significant difference in how you connect with others on LinkedIn. Now that we've established why this change might be necessary, let’s dive into the how-to guide on changing your email ID!
Also Read This: How Do I Change My LinkedIn Email Address? Updating Your LinkedIn Contact Information
3. Prerequisites for Changing Your LinkedIn Email ID
Before diving into the process of changing your LinkedIn email ID, it’s essential to have a few things in order. This will ensure a smooth transition and help avoid any hiccups along the way. Here’s what you need to have ready:
- Access to Your LinkedIn Account: This may seem obvious, but you need to be able to log in to your LinkedIn account. If you forgot your password, it's good to reset it first.
- New Email Address: Have the new email address you want to use ready. Make sure it's one you can access immediately, as LinkedIn may send a confirmation email to this address.
- Old Email Address: If you’re changing your email and want to maintain the old one for further verification, keep it handy. LinkedIn might use it during the process.
- Two-Factor Authentication: If you have two-factor authentication set up (which is a great security measure), make sure you have access to your mobile device or authentication app.
- Updated Account Settings: Review your current account settings. It’s good to be aware of your current email settings, especially if you've associated multiple emails with your account.
Once you have all of these prerequisites in place, you’re ready to proceed to the next step. It's always a good idea to double-check that you have everything you need, as this will make the process smoother and faster.
Also Read This: How to Use LinkedIn Learning Courses: A Guide to Maximizing Your LinkedIn Learning Experience
4. Step 1: Logging into Your LinkedIn Account
Now that you’re prepared, let’s get started with the first step: logging into your LinkedIn account. This is a straightforward process, but let’s break it down to ensure you don't miss anything.
To log into your LinkedIn account, follow these steps:
- Open a Web Browser or App: You can either use a web browser on your computer or the LinkedIn app on your mobile device. Launch your preferred method of accessing LinkedIn.
- Go to the LinkedIn Login Page: If you're using a browser, type in www.linkedin.com in the address bar and press Enter. If you're on the app, simply tap on its icon to open it.
- Enter Your Credentials: Input your existing email address and password associated with your LinkedIn account. Make sure that there are no typos. Pay special attention to cases and special characters in your password.
- Click on the Log In Button: Once you’ve entered your login information, click the "Log In" button. If you’re using a browser, you can also choose to stay logged in, which can save you time for future logins.
- Two-Factor Authentication (if enabled): If you have two-factor authentication enabled, you’ll need to enter the code sent to your mobile device or email. This adds an extra layer of security to ensure that only you can access your account.
And there you have it! After successfully logging in, you’re ready to begin the process of changing your email ID. Stay tuned for the next steps, where we’ll guide you through updating your email address in your LinkedIn account!
Also Read This: How Can You Tell If Someone Has LinkedIn Premium? Features and Indicators
5. Step 2: Navigating to Your Account Settings
Alright, now that we've got our old email ID securely tucked away, let’s dive into the next step! Navigating to your account settings on LinkedIn is fairly straightforward, but I’ll guide you through it just in case you need a little help.
First, you’ll want to make sure you’re logged into your LinkedIn account. Once you’re in, look at the top right corner of your LinkedIn homepage. That’s where you’ll see your profile picture or, if you haven’t uploaded one yet, your initials in a circle. Click on that!
Once you click your profile picture, a dropdown menu will appear. Here’s a little tip: if you're using the mobile app, just tap on your profile picture at the top left corner. It’s all about convenience!
- Desktop: Click your profile picture > Select “Settings & Privacy” from the dropdown.
- Mobile: Tap your profile picture > Tap on the “Settings” icon.
After selecting “Settings & Privacy,” you’ll find yourself on a new page that presents a variety of options related to your account. Don’t be overwhelmed! All you need to do is locate the “Login and security” section in the sidebar of the settings menu. This is your gateway to making changes to your email settings.
Once you’re in the “Login and security” section, you should see an option labeled “Email addresses.” Click on that! This is where the magic happens, and it’s where you can add, edit, or remove email addresses linked to your account.
Look at you, navigating through LinkedIn like a pro! Seriously, it's a piece of cake with just a few clicks. If you’re feeling lost at any point, remember you can always take a breather and find that trusty help section LinkedIn has for additional guidance. Now, let’s get you to the next step!
Also Read This: Can You Edit a Post on LinkedIn After Publishing? What You Need to Know
6. Step 3: Adding a New Email ID
Finally, we’re here! You’ve made it to the crucial part of changing your email ID on LinkedIn—adding your new one. It’s almost as if we’re unlocking a treasure chest! Are you ready? Let’s do this!
Once you've clicked on “Email addresses” in the “Login and security” section, you'll see a list of any existing email IDs associated with your profile. You’ll also see an option that says “Add email address.” Click on that shiny button!
A pop-up window will appear, inviting you to enter your new email address. Go ahead and type it in, making sure it’s the correct one. Here's a little trick: double-check for typos or errors. It’s easy to make a mistake, and we wouldn’t want that to happen at this stage!
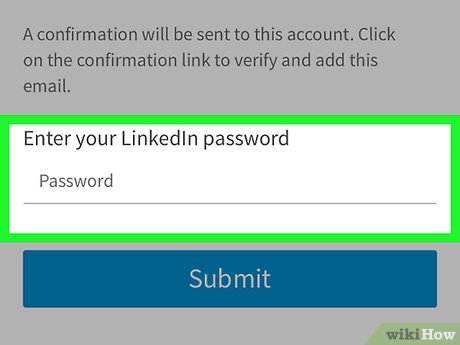
After entering your new email ID, hit “Send verification.” This is a crucial step! LinkedIn will send a verification email to your new address to confirm it’s really you. Go ahead and check your inbox (and don’t forget to give your spam folder a glance just in case). You should see an email from LinkedIn with a verification link.
Here’s what to do next:
- Click the verification link in the email.
- You’ll be redirected back to LinkedIn, and your new email ID will be confirmed!
Now, LinkedIn will typically make your new email the primary one, but you can always adjust this in your settings later if that’s what you prefer. It’s like changing the lead singer in a band; sometimes you want the spotlight on a different performer!
And just like that, you’ve successfully added a new email ID to your LinkedIn profile! Keep an eye on your inbox for any communications from LinkedIn regarding updates or changes. You're officially one step closer to staying connected professionally!
Also Read This: How to Make a Work Anniversary Post on LinkedIn That Stands Out
7. Step 4: Verifying Your New Email ID
Now that you’ve added your new email ID, it’s time to verify it. Verification is crucial because it ensures that the email address you provided is accurate and that you really own it. This step can sometimes feel a bit tedious, but don’t worry! It’s fairly straightforward.
Here’s how to verify your new email ID on LinkedIn:
- Check Your Inbox: After you added your new email, LinkedIn should have sent a verification email to that address. Grab your device and check your inbox. If you don’t see it immediately, be sure to check your spam or junk folder.
- Open the Email: Once you find the email, open it and look for a button or link that says something like "Verify Your Email" or "Confirm Email Address." This is what you need to click to kick off the verification process.
- Return to LinkedIn: After you click the verification link, you’ll typically be redirected back to LinkedIn and see a confirmation message saying that your email ID has been successfully verified. Hooray!
But what if you don’t receive the email? It can happen! Here are some quick tips:
- Wait a bit: Sometimes, emails can take a few minutes to arrive, so patience can be your best friend.
- Resend the Verification Email: If it’s been a while and there’s still no email, head back to your LinkedIn account. You could try to resend the verification email through the settings where you added your new address.
- Double-check the Email: Make sure there weren’t any typos in the email address you entered. A tiny mistake can lead to big issues!
Once you’ve verified your new email ID, you’re one step closer to fully updating your LinkedIn profile. Congratulations! But we’re not quite done yet. Let’s move on to removing your old email ID to complete this transition.
Also Read This: How to Know if Someone Has LinkedIn Premium Identifying Premium Profiles
8. Step 5: Removing Your Old Email ID
With your new email ID verified, it’s time to tidy up by removing the old email address. This step is crucial for maintaining your LinkedIn account's security and ensuring that you receive communications at the correct address.
Here’s how to remove that old email ID:
- Navigate to Settings: Log in to your LinkedIn account and click on the “Me” icon at the top of your page. From there, select “Settings & Privacy.” This will take you to a page where you manage all of your account settings.
- Go to Email Addresses: In the “Settings” section, look for a tab related to “Login and Security” or directly find the “Email addresses” section. Click on it to see a list of all the email addresses linked to your account.
- Select the Old Email: Locate your old email ID from the list and click on the option to remove or delete it. LinkedIn might ask you to confirm this action—make sure you are certain about the removal, as this cannot be undone!
And just like that, your old email is gone! But hold on, let’s ensure everything is running smoothly:
- Confirmation Message: After you’ve removed the old email, LinkedIn should display a success message letting you know that the old email address has been successfully deleted.
- Check your Email Settings: It’s always a good idea to double-check your email settings to confirm that your new email is now your primary email for communications.
That’s it! You’ve successfully changed your email ID on LinkedIn. Updating your contact information is an important aspect of managing your professional presence online, and you’ve done it seamlessly. Now, you're ready to network, apply for jobs, or simply stay connected with your professional community!
Also Read This: Adding LinkedIn to Your Email Signature: A Simple Tutorial
9. Troubleshooting Common Issues
Changing your email ID on LinkedIn is designed to be a straightforward process, but like any tech task, you might run into a few hiccups along the way. Don’t worry; we’ve got you covered with some common issues and their solutions!
Issue 1: Access Denied
If you find yourself locked out while trying to change your email, it’s often due to not being able to access your current email. In this case, try to recover your original email account first. Most email providers have a recovery process that might just save the day. If that doesn’t work, reach out to LinkedIn support for help.
Issue 2: Verification Email Not Received
After entering your new email, LinkedIn sends a verification email. If you don’t see it, check your spam or junk mail folders. It’s more common than you think for legitimate emails to end up there! If it’s still missing, double-check you entered the right address, then try resending the verification email.
Issue 3: Unable to Delete Old Email
Sometimes, LinkedIn might not allow you to delete an old email address if it’s still associated with an active LinkedIn feature, like two-factor authentication. To resolve this, you can first disable the 2FA feature temporarily, delete the old address, and then reactivate two-factor authentication with your new email.
Issue 4: Confusion Over Multiple Email Accounts
If you manage multiple email accounts and are confused about which one is associated with your LinkedIn, it’s a good idea to double-check that you’re logged into the right LinkedIn account. You can also look for email notifications from LinkedIn in your inbox or check the settings on your LinkedIn profile to see which email is currently active.
Additional Tips:
- Keep your login credentials secure to avoid any unauthorized access.
- Sometimes, logging out and back in can refresh your account settings and show changes.
- If you’re using a mobile device, make sure the LinkedIn app is updated to the latest version, as outdated apps can lead to glitches.
If you encounter any issue not covered here, LinkedIn has a robust help center where you can find additional resources and guidance tailored to specific concerns. Remember, sometimes digging through the FAQs can provide the insight you need!
10. Conclusion
Congratulations! You’ve made it through our step-by-step guide on changing your email ID on LinkedIn. By now, you should feel confident navigating LinkedIn’s settings, verifying your new email, and troubleshooting any bumps along the way.
Keeping your contact information up to date is essential for maintaining your professional network. Not only does it ensure you can be reached for job opportunities and networking events, but it also helps keep your LinkedIn profile secure. Remember, an easy-to-reach email can open doors you didn’t even know existed!
If you’ve followed along with our guide, you can now:
- Change your email effortlessly whenever needed.
- Safely troubleshoot issues if and when they arise.
- Feel empowered to maintain your online professional presence.
LinkedIn is all about connections, and ensuring you have a reliable email linked to your account can make a world of difference. If you found this guide helpful or have more tips to share, feel free to drop your comments below. Happy networking!
 admin
admin