Changing your Facebook profile name can feel like a daunting task, but it doesn’t have to be! Whether you’re looking to reflect a new chapter in your life or simply want a fresh start, updating your name is a straightforward process. In this guide, we’ll walk you through the steps to make the change and discuss some reasons why you might consider doing it. Let’s dive in!
Why You Might Want to Change Your Facebook Profile Name
There are many reasons why someone might want to change their Facebook profile name. Here are a few common motivations:
- Life Changes: Events such as marriage, divorce, or a significant career move can prompt a name change. For instance, if you’ve recently tied the knot, you might want to switch to your married name.
- Identity Reflection: Your name is a crucial part of your identity. If you’ve transitioned or feel that your current name doesn’t resonate with who you are, it’s perfectly valid to make a change.
- Professionalism: If you use Facebook for networking, a name that aligns with your professional brand can enhance your credibility. For example, switching from a nickname to your full name might help you make more professional connections.
- Privacy Concerns: In some cases, individuals may want to adjust their names for privacy reasons, especially if they’ve experienced harassment or unwanted attention. Adopting a less recognizable name can offer a sense of safety.
Beyond these reasons, changing your name can simply be a way to freshen up your online persona. Just remember that Facebook has specific guidelines for name changes, and frequent changes may raise red flags. So, consider your reasons carefully before making the leap!
Also Read This: Exploring Fun and Lighthearted Animated Content for Family Time on Dailymotion
3. Prerequisites for Changing Your Profile Name
Before diving into the name-changing process on Facebook, it’s important to be aware of a few prerequisites. This ensures that you meet the necessary criteria and helps you avoid any hiccups along the way. Here are some key points to consider:
- Account Verification: Make sure your Facebook account is verified. If you haven’t completed the account verification process, you might encounter restrictions when trying to change your name.
- Name Change Frequency: Facebook allows you to change your name once every 60 days. So, it's wise to think carefully about the name you want to use. If you're considering multiple changes, plan ahead!
- Compliance with Facebook's Guidelines: Your new profile name must adhere to Facebook’s name standards. For instance, you can’t use special characters, numbers, or titles (like Dr. or Prof.) in your name. It should reflect your real name as it appears on official documents.
- Consider Your Privacy: Changing your name can affect your privacy settings and how others perceive you online. Think about whether this change could impact your connections or how you're found.
- Prepare Supporting Documents: In some cases, especially if your name change is significant (like a marriage or legal name change), Facebook might ask for documentation. Be ready to provide these if necessary!
By keeping these prerequisites in mind, you set yourself up for a smooth name change experience. So, take a moment to ensure you’re fully prepared before proceeding!
Also Read This: Don’t Look Under the Bed Disney Version Available on Dailymotion
4. Step 1: Access Your Facebook Settings
Now that you're aware of the prerequisites, let’s get into the nitty-gritty of changing your Facebook profile name. The first step is to access your Facebook settings. Here’s how you do it:
1. *Log into Your Facebook Account: Open your favorite web browser or the Facebook app on your device. Enter your login credentials (email/phone and password) to access your account.
2. Navigate to Your Profile: Once logged in, click on your profile picture or name located at the top left of your homepage. This takes you directly to your profile.
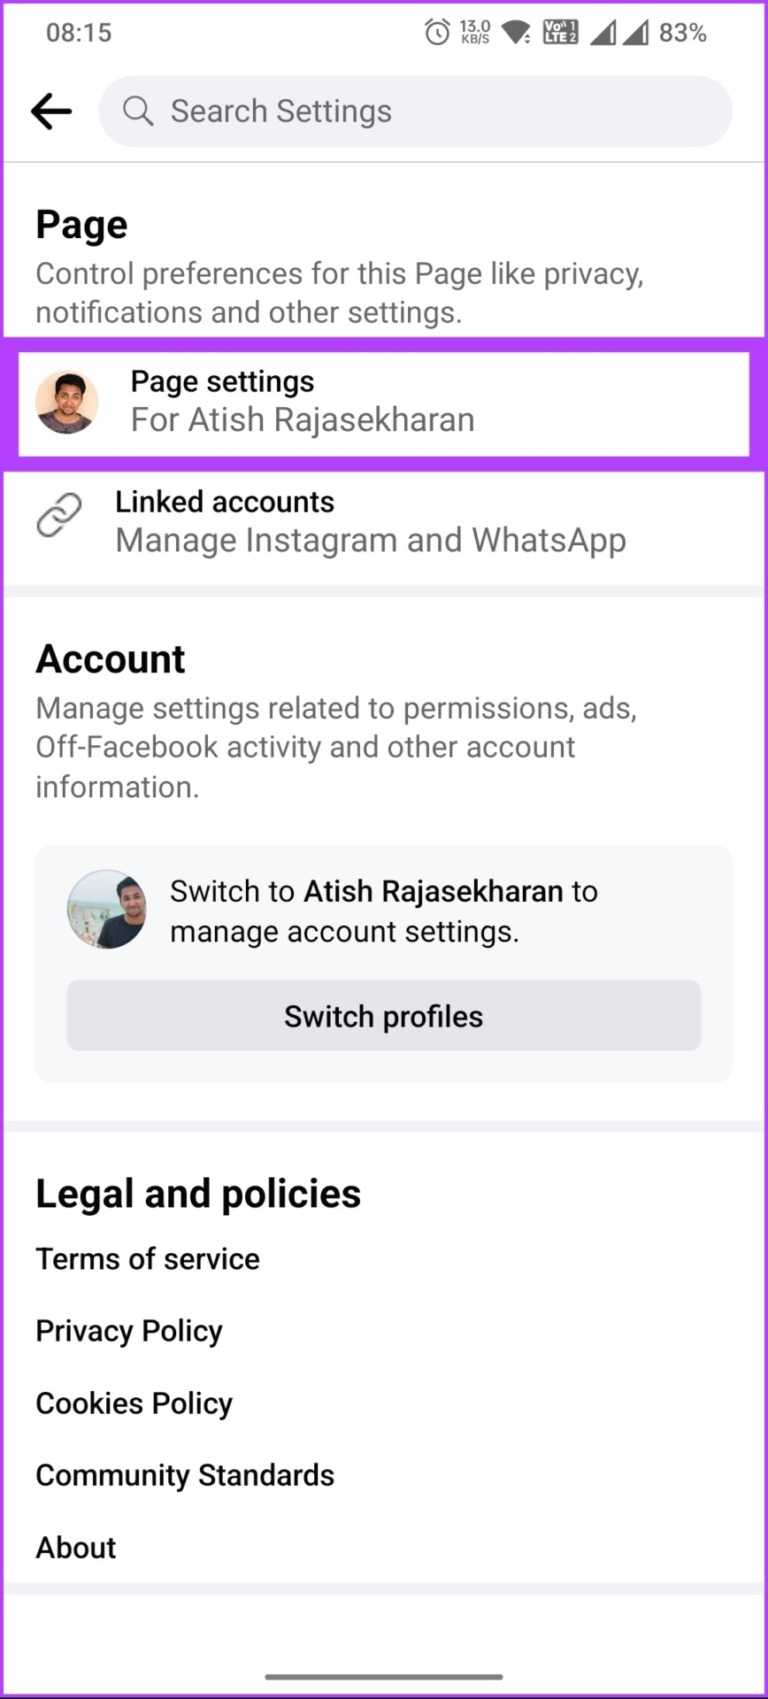
3. Find the Settings Option: On your profile page, look for the three-dot menu (⋮) next to the "Edit Profile" button. Click on it to reveal a dropdown menu.
4. Select 'Settings & Privacy': From the dropdown, select “Settings & Privacy.” This will expand the menu, giving you more options to choose from.
5. Click on 'Settings': Now, click on “Settings,” which will take you to a new page where you can manage all aspects of your account.
6. Go to 'General Account Settings'*: On the left sidebar, you’ll see various categories. Click on “General” to access your general account settings, where your name information is stored.
Once you’ve reached this point, you’re just a few clicks away from changing your name! Stay tuned for the next steps, where we’ll dive into the actual name-changing process. Remember, patience is key, and soon you’ll be sporting a new name on your Facebook profile!
Also Read This: Building Connections on Twitter Through Dailymotion
5. Step 2: Navigate to the Name Change Section
Alright, you’re doing great so far! Now that you’re logged into your Facebook account, it’s time to find the name change section. Don’t worry; it’s easier than it sounds! Here’s how you can get there:
- Click on the downward arrow: Look towards the top right corner of your Facebook page. You’ll see a small downward-facing arrow next to the notifications bell. Give that arrow a click!
- Select "Settings & Privacy": In the dropdown menu that appears, hover over or click on “Settings & Privacy.” This will expand another menu.
- Choose “Settings”: Now, click on “Settings.” This will take you to a new page filled with various account settings.
- Find the “General” tab: Once you’re in the settings menu, you should land on the “General” section by default. If not, simply click on it from the left-hand side menu.
- Look for “Name”: In the General Account Settings, you’ll see your current profile name listed. There should be an option titled “Name” right next to it. Click on “Edit” next to that.
And just like that, you’re in the name change section! This area will allow you to modify your profile name to whatever you choose (within Facebook's guidelines, of course). Remember, it’s important to use a name that reflects your identity and feels comfortable for you!
Also Read This: Mastering the Art of Posting Ads on OLX with Dailymotion Tutorials
6. Step 3: Enter Your New Profile Name
Fantastic! Now that you’re in the name change section, it’s time for the fun part—entering your new profile name. Let’s break down the steps to make this process as smooth as possible:
- Think it through: Before typing in your new name, take a second to think about what you want. Are you looking for a simple change, or do you want to go for something totally different? Keep in mind that Facebook has some rules about names, so steer clear of nicknames or symbols that don’t reflect your real name.
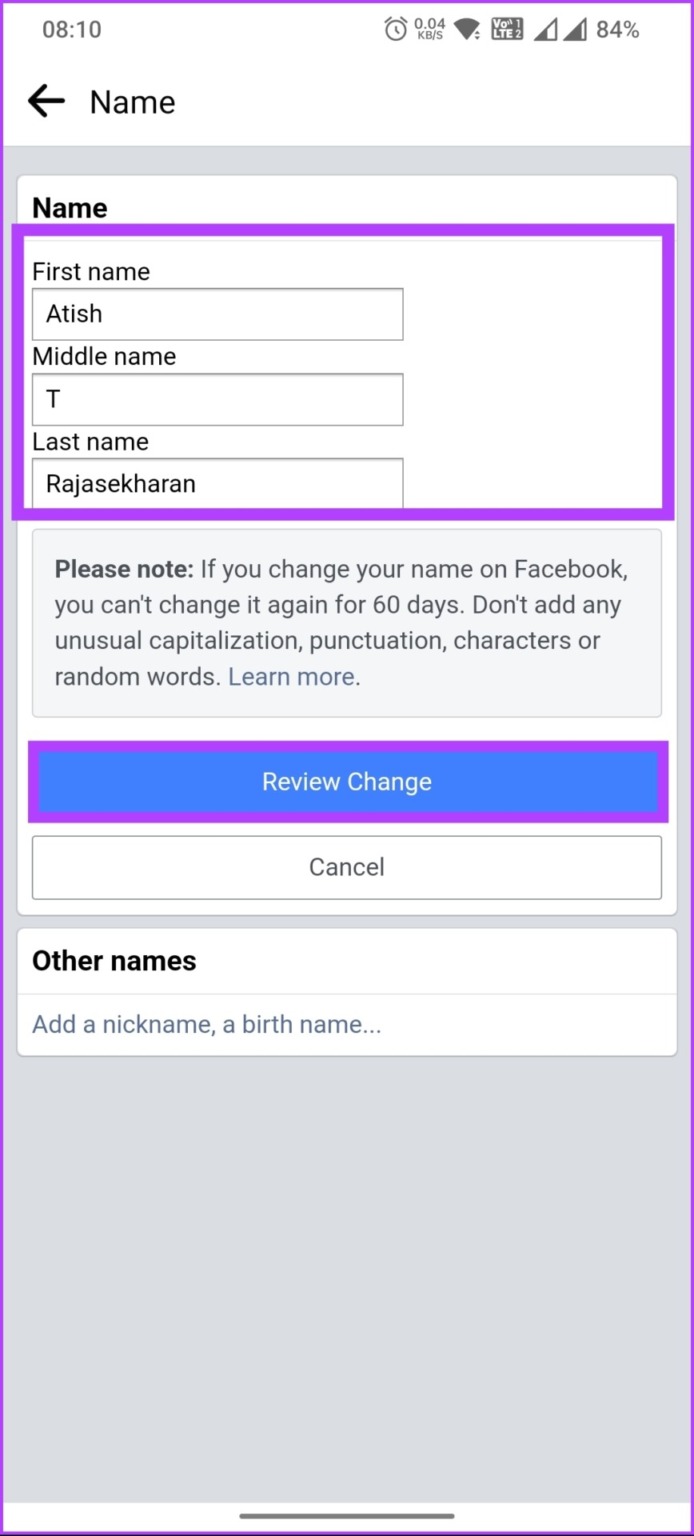
- Fill in the fields: You’ll see fields for your first name, middle name (if you want to include it), and last name. Go ahead and enter your new information! If you plan on using a variation of your name, make sure it still feels authentic. For example, if your name is “William,” but you go by “Will,” you might choose to enter “Will Smith” as your new name.
- Preview your name: Facebook provides a preview of how your name will look after you make the change. Double-check it to ensure everything is spelled correctly and appears as you want it to.
- Consider your audience: Think about how your new name might be perceived by friends, family, or colleagues. Choosing a name that resonates with who you are can help maintain your connections on the platform.
Once you’ve reviewed everything and are happy with your new profile name, it’s time to hit that save button! Just remember that Facebook has a limit on how often you can change your name, so be confident in your choice.
After saving, you’ll see a confirmation that your name has been updated. It might take a few moments to reflect across the platform, but soon enough, you’ll be rocking your new name! 🎉
Also Read This: How to Clean Your Face at Home with Best Skincare Practices Featured on Dailymotion
7. Step 4: Review Facebook's Name Policy
Before you hit that submit button on your name change request, it's crucial to understand Facebook's Name Policy. This policy is designed to ensure that users are identifiable and that the platform remains a safe space for everyone. Here are some key points to consider:
- Real Names: Facebook requires users to provide their real names. This means no pseudonyms, nicknames, or variations that don’t resemble your actual name. For example, if your name is Jonathan Smith, using “J-Smith” or “Johnny” wouldn’t be compliant.
- Names in Common Use: If you have a common name that you go by, like “Mike” for “Michael,” you can submit that name. Just make sure it’s how your friends and family recognize you!
- Special Characters: Facebook has restrictions on the use of special characters. So, avoid random symbols or excessive punctuation in your name. For instance, “John@Doe” wouldn’t be allowed.
- Marriage and Other Name Changes: If you’re changing your name due to marriage, divorce, or any other legal reason, you may need to provide documentation to support your request.
By understanding and adhering to these guidelines, you not only ensure a smoother name change process but also avoid the risk of having your request denied. So, take a moment to reflect on your new name and see if it aligns with these policies. If you’re unsure, it might be helpful to check out Facebook's official resources on their Name Standards.
Also Read This: How to Download Dailymotion Videos Online Free and Easily
8. Step 5: Submit Your Name Change Request
Now that you’ve chosen a new name and reviewed Facebook’s policies, it’s time for the exciting part: submitting your name change request! Here’s how to do it:
- Go to Your Profile Settings: Log into your Facebook account and navigate to your profile. Click on the small arrow in the upper right corner and select “Settings & Privacy.” From the drop-down menu, choose “Settings.”
- Find the Name Section: In the settings menu on the left, click on “General.” You’ll see your current name listed here. Click on “Edit” next to your name.
- Enter Your New Name: Carefully type in your new name as per Facebook’s guidelines. Double-check for any typos. Remember, this name will represent you online, so make sure it’s exactly how you want it to appear.
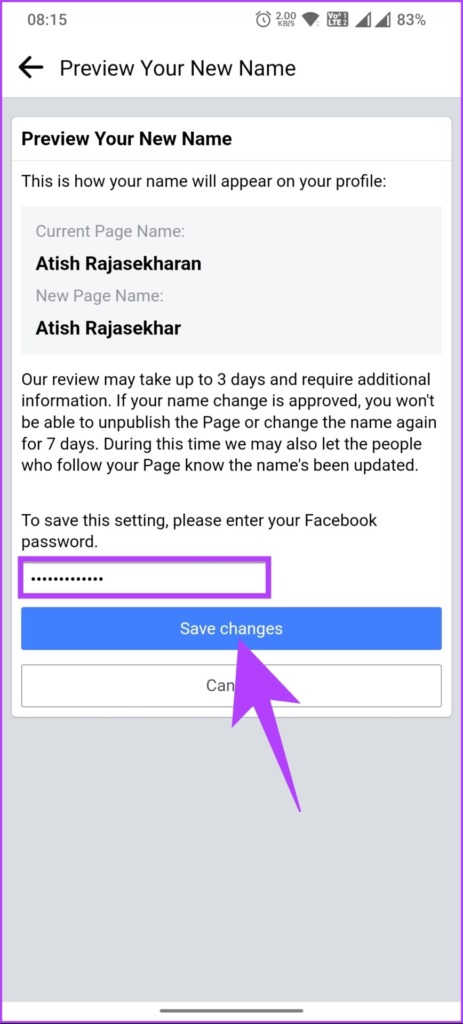
- Review Your Change: Facebook will prompt you to review your name change. Take a moment to ensure everything looks good. If you’re ready, go ahead and click “Review Change.”
- Choose Your Display Option: You might be asked how you want your name to appear. Select your preferred option (usually, your first name and surname) and then click “Save Changes.”
After submitting your request, you’ll see a confirmation that your name change is being processed. Facebook usually reviews requests within a few days, but it can take longer during peak times. Keep an eye on your notifications for any updates!
If your request is approved, congratulations! You’ll see your new name live on your profile. If it’s denied, don't worry; you'll receive a notification explaining why. Often, it can be fixed by simply adjusting your name to fit their guidelines better. Happy renaming!
Also Read This: Step-by-Step Guide to Princess Hairstyles
9. What to Do After Submitting Your Request
Congratulations! You've taken the important step of submitting a request to change your Facebook profile name. Now, you might be wondering what happens next. Well, here’s the scoop:
After hitting that submit button, Facebook processes your request. Typically, this takes anywhere from a few minutes to a couple of days. During this waiting period, it’s essential to do the following:
- Check Your Email: Keep an eye on the email associated with your Facebook account. Facebook may send you a confirmation email or request additional information.
- Stay Informed: Occasionally, Facebook will notify you directly in the app. Make sure to check your notifications for any messages from them.
- Be Patient: If you've submitted a name change request during peak times, like major events or holidays, it may take a bit longer than usual. Don’t panic!
If your name change is approved, you’ll see the new name reflected on your profile. However, if Facebook requires more information or denies your request, they’ll inform you through the email or notification.
In case your request is denied, don't hesitate to review their name policy to understand why. Facebook has specific guidelines regarding acceptable names. For instance, your name should reflect your real name as it appears on your ID, and it shouldn’t contain symbols, numbers, or unnecessary capitalization.
Once you get the green light, celebrate your new identity online! Update your friends and family about your new name, and maybe even share a fun post about it. This is a fresh start for your online persona!
10. Troubleshooting Common Issues
Changing your Facebook profile name can sometimes come with a few hiccups. But don’t worry; most issues can be resolved with a bit of patience and understanding. Here are some common problems you might encounter:
- Name Change Denied: If your request gets denied, it could be due to not meeting Facebook’s naming criteria. Double-check their name policy for guidance. If you believe your name meets the standards, you may need to appeal the decision.
- Long Processing Time: If it’s taking longer than expected, ensure there aren't any technical glitches. Try logging out and back in, or clear your browser's cache. Sometimes, a simple refresh can do wonders!
- Limited Changes: Remember, Facebook has restrictions on how often you can change your name. If you’ve recently made changes, you may need to wait some time before trying again. Typically, you can only change your name every 60 days.
If you continue to experience issues, consider reaching out to Facebook support. You can do this by visiting the Facebook Help Center. They’ll guide you through any specific problems you’re facing.
Lastly, don’t forget to update your friends about your new name. You can create a fun post or story to announce it. Engage your followers and let them know that you’ve made a change—after all, it’s a part of your digital identity!
 admin
admin


