Changing your email address on LinkedIn may seem like a minor task, but it's essential for maintaining your professional connections and ensuring you receive important updates. Whether you’re switching to a new email for personal reasons or consolidating to one address, the process is straightforward. In this guide, we’ll walk you through the reasons why you might need to make this change and how to do it quickly and efficiently.
Why You Might Need to Change Your Email Address on LinkedIn
There are several reasons you might find yourself needing to change your email address on LinkedIn. Let’s explore some of the most common ones:
- Switching Jobs or Careers: If you’ve recently changed jobs or your career path, you might want to update your email to reflect your new professional brand. Using a work email can also imply that you’re actively engaged with your current organization.
- Merging Accounts: Perhaps you’ve been managing multiple LinkedIn profiles or accounts and want to consolidate your connections. Changing your email to one that you frequently check can make it easier to keep track of everything.
- Security Concerns: If your email has been compromised or you’re simply concerned about security, updating your email address can protect your LinkedIn account from unauthorized access.
- Personal Preference: You may simply prefer to use an email address that’s more memorable or professional. Maybe you’ve moved to a new provider, or you want to switch to a domain that better represents you.
- Communication Efficiency: Having a single, monitored email address can help you streamline communications. This ensures you don’t miss any important messages related to your job hunt or professional networking.
Regardless of the reason, it’s important to keep your LinkedIn profile updated with the most relevant and accessible contact information. By doing so, you can ensure your network maintains its integrity and that you remain reachable to potential employers, clients, and colleagues. Changing your email address isn’t just about replacing one piece of information; it’s about enhancing your professional presence online.
In the next section, we will cover how to make this change on LinkedIn in just a few simple steps, so stay tuned!
Also Read This: How to Add Links in LinkedIn Messages: Making Your Conversations Interactive
3. Steps to Change Your Email Address on LinkedIn
Changing your email address on LinkedIn is a quick and straightforward process. Just follow these simple steps to ensure that your LinkedIn account remains secure and up to date with your current email. Here’s how to do it:
- Log into Your LinkedIn Account:
Start by signing into your LinkedIn account using your current email address and password. This will take you directly to your LinkedIn homepage. - Access Your Settings:
Once you're logged in, navigate to the top right corner where your profile picture is located. Click on your profile picture or the “Me” icon to open the dropdown menu. From there, select “Settings & Privacy.” - Go to the Email Addresses Section:
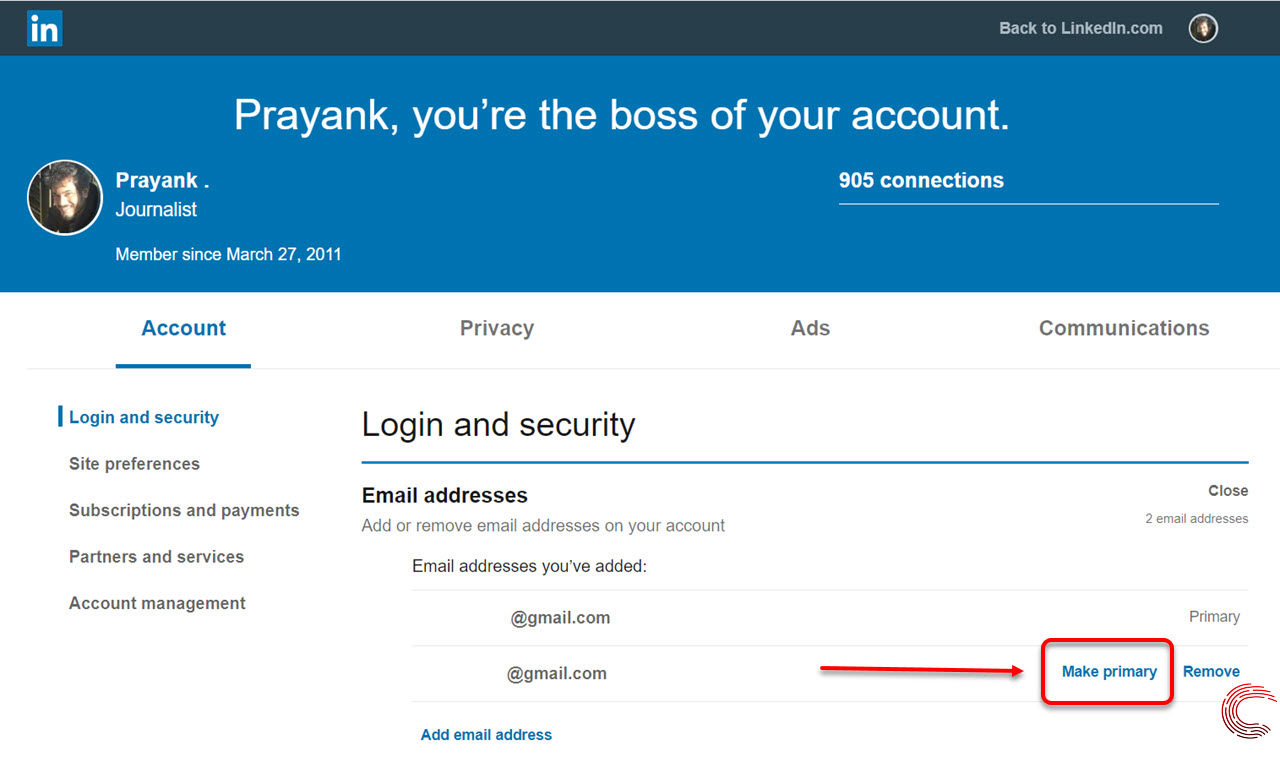
In the settings menu, look for the “Account” tab. Under this tab, you'll find an option that says “Email addresses.” Click on it to view your current email addresses linked to your account. - Add Your New Email Address:
In the email addresses section, you should see an option to “Add email address.” Click this button and enter your new email address in the provided field. Remember, LinkedIn only allows one primary email address at a time. If you want to make this new address your primary one, you'll need to confirm that. - Save Your Changes:
After entering your new email address, hit the “Send verification” button. LinkedIn will send a verification link to your new email. Make sure to check your inbox! - Remove the Old Email (if necessary):
If you want to delete your old email address, once you've verified the new one, go back to the email addresses section and you should see the option to remove it. This helps keep your account tidy and secure.
And voila! You've successfully changed your email address on LinkedIn. Easy peasy, right? Just make sure you remember both your current and new email addresses during this process to avoid any hiccups!
Also Read This: How Does LinkedIn Pay for Your Content and Profile Engagement?
4. Verifying Your New Email Address
After you've added your new email address on LinkedIn, it's crucial to verify it. Verification not only ensures that you can receive important updates from LinkedIn but also enhances the security of your account. Here’s how to easily verify your new email address:
- Check Your Inbox:
Open the email account that you just linked to LinkedIn. Look for an email from LinkedIn with the subject line featuring “Verify your email address.” Sometimes, this email can end up in your spam or junk folder, so be sure to check there if you don’t see it in your inbox. - Open the Verification Email:
Once you find the email, click on it to open it. Inside, you'll see a message asking you to confirm that this is your email address. - Click on the Verification Link:
Within that email, there will be a button or link that says “Confirm your email address” or something similar. Click on that link! This step is essential as it completes the verification process. - Return to LinkedIn:
After clicking the verification link, you may be redirected back to LinkedIn automatically, or you might be required to log in again. Either way, once you're back on your LinkedIn profile, you should see a confirmation message that your new email address has been verified.
By completing these steps, you not only secure your account but also ensure that you won’t miss any important messages or updates from your network. If you encounter any issues, don't hesitate to check LinkedIn's help section for troubleshooting tips. Happy networking!
Also Read This: Adding Freelance Work to LinkedIn: A Step-by-Step Guide
5. Common Issues When Changing Your LinkedIn Email Address
Changing your email address on LinkedIn should be a straightforward process, but sometimes users encounter a few hiccups along the way. Here are some of the common issues you might face:
- Email Verification Problems: After you add a new email, LinkedIn typically sends a verification link to that address. If you don't receive it, check your spam folder or ensure you're using the correct email address. Sometimes, email providers may have delays.
- Login Difficulties: If you decide to change your primary email but forget to remove your old one, you might struggle logging in. Always keep at least one active email linked to your account for recovery purposes.
- Old Connections: Occasionally, some connections may still see the old email linked to your profile. This usually resolves itself in a few days, but if you're concerned, double-check your visibility settings.
- Notifications: After changing your email, you may miss out on important LinkedIn notifications initially. Be sure to check your settings to customize how you receive updates from LinkedIn following the change.
- Settings Conflicts: Sometimes, there may be a minor lag between when you change your email and when it syncs across LinkedIn’s various features. Be patient! Usually, everything updates within a few hours.
To ensure a smooth experience when changing your LinkedIn email, it's good practice to double-check everything and keep an eye on any notifications that may come your way. If issues persist, don't hesitate to reach out to LinkedIn’s customer support for assistance.
Also Read This: Best Practices for Displaying Your LinkedIn Profile on Your Resume
6. How to Keep Your LinkedIn Account Secure After Changing Your Email
Transitioning to a new email address is a crucial step in managing your LinkedIn account, but it’s equally important to ensure your account remains secure afterward. Here are several proactive steps you can take:
- Enable Two-Step Verification: Adding an extra layer of security is always a good idea. By enabling two-step verification, you’ll receive a text or app notification whenever there's an attempt to log into your account. This helps prevent unauthorized access.
- Update Your Password: If you change your email, consider changing your password as well. Choose a strong, unique password that combines letters, numbers, and symbols. The more complex, the harder it is for someone to guess.
- Check Account Activity: Keep an eye on your account activity after changing your email. Search for any unfamiliar login attempts or unusual behavior. LinkedIn allows you to review recent activity, so take advantage of this feature to stay vigilant.
- Review Privacy Settings: After making changes, review your privacy settings to ensure you're comfortable with who can see your information. It’s a great time to fine-tune your profile visibility and connection preferences.
- Be Wary of Phishing Scams: Changing your email can sometimes attract phishing scams. Be cautious about emails claiming to be from LinkedIn asking for personal information or requiring you to click links. Always navigate to LinkedIn through your browser rather than clicking links in emails.
By proactively managing your LinkedIn account's security after changing your email address, you can help protect your professional identity and ensure a seamless experience on the platform. Remember, your online safety is in your hands!
Conclusion
Changing your email address on LinkedIn is a straightforward process that can enhance your account security and ensure you receive important notifications. By following the simple steps outlined above, you can quickly update your email and keep your professional connections intact. Remember to verify the new email address to complete the process successfully.
Key Takeaways:
- Access your LinkedIn account settings.
- Add and verify your new email address.
- Set your new email as the primary contact.
- Remove any old email addresses if necessary.
Always make sure your contact information is up-to-date to maintain seamless communication with your network.
 admin
admin


