Notion is an incredibly versatile tool, but getting the perfect presentation often requires adjusting the layout. One of the simplest ways to enhance the look of your pages is by resizing images. Whether you're creating a personal dashboard, a project tracker, or a digital workspace, the size of your images can make a significant difference. Too large, and they can overwhelm the page; too small, and they might lose their visual impact. In this section, we'll explore why image size matters in Notion and how you can easily adjust it to suit your needs.
Steps to Resize Images in Notion

Resizing images in Notion is a straightforward process, and there are a few ways to do it. Here’s a simple guide to help you get the size just right for any project.
- Click on the Image: Start by selecting the image you want to resize. Once clicked, you’ll notice a few options appear.
- Drag to Resize: Hover over one of the corners of the image. When the cursor changes to a diagonal arrow, simply click and drag to resize the image to your liking.
- Use the Handle: You can also use the image handle (the small dot in the middle) to resize. This helps maintain the image’s proportions, ensuring it doesn’t get stretched or compressed unevenly.
- Adjust via Settings: In some cases, you can also adjust image sizes via the block settings. This gives you more control over the size options and layout.
By using these simple steps, you can easily modify the image size to fit your Notion page and make sure it looks visually appealing while maintaining functionality.
Using the Image Block for Resizing

The Image Block in Notion is the most common method for adding and resizing images. When you use this block, resizing becomes even easier. Here’s how you can take advantage of it.
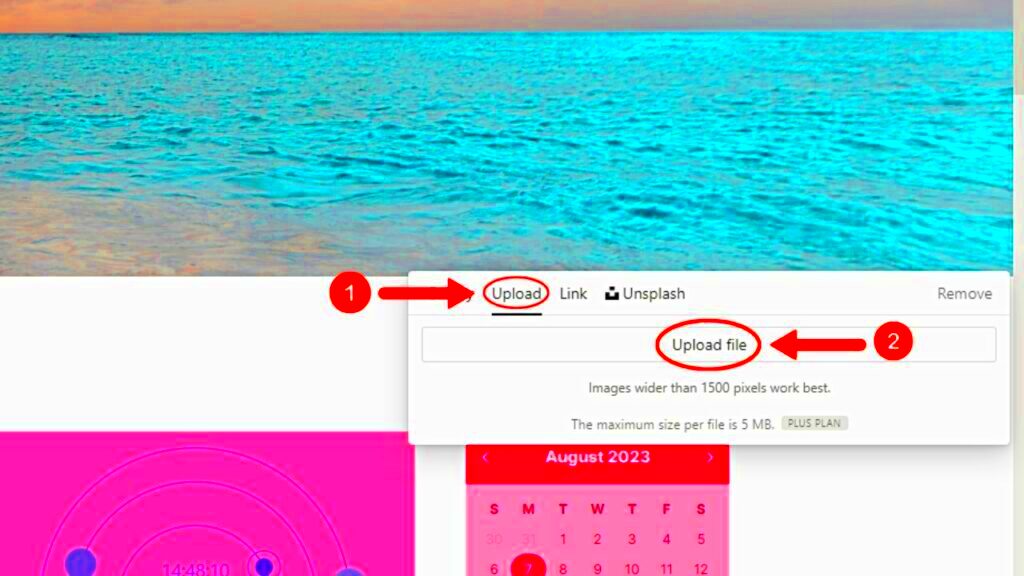
- Adding the Image Block: To add an image block, type “/image” and select it from the list. You can then upload an image or embed one from an external link.
- Resize Using the Block: Once your image is uploaded, click on it. A toolbar will appear, and from here, you can drag the corners to resize.
- Customize the Layout: Notion allows you to change the image’s alignment within the block. This can be useful for creating a neat layout with other elements, such as text or databases.
- Consider Aspect Ratios: While resizing, make sure to keep the aspect ratio intact if you don’t want the image to become distorted. The Image Block helps you maintain that, so you don’t have to worry about stretching or pixelation.
By using the Image Block, you get a simple yet flexible way to resize images without losing quality. It’s perfect for keeping your workspace organized and visually balanced.
How to Adjust Image Size in Gallery View

Gallery view in Notion is a great way to organize visual content in a clean and aesthetically pleasing manner. If you have a collection of images, adjusting their size in this view helps create a more structured and uniform layout. The gallery view automatically adjusts image size based on your settings, but you can manually tweak it to achieve the perfect look for your project. In this section, we’ll guide you through the steps to resize images in gallery view and discuss some tips for achieving the best result.
- Access Gallery View: First, ensure you’re working in a gallery view. If you’re not already in this view, simply click on the three dots in the upper right corner of your database and select “Gallery.”
- Click the Image: To resize any image in the gallery, click on the image thumbnail. This will open it in a preview window.
- Resize the Image: Once the image is open, you can resize it by clicking and dragging the corners of the image, just like resizing in the regular Notion pages.
- Adjust Thumbnail Size: You can also adjust how images appear in the gallery view itself. Go to the gallery’s settings, and under the "Properties" section, adjust the size options to control how large or small the thumbnails appear within the gallery grid.
By resizing images in the gallery view, you can create a cleaner, more professional-looking presentation for all your visual content. Whether it’s for a portfolio, project, or personal collection, this customization helps improve the overall organization of your Notion workspace.
Using Markdown for Image Size Customization
If you prefer using Markdown, Notion has a neat feature that allows you to customize image sizes through this simple syntax. Markdown is great for users who like to work with code and need precise control over how images are displayed. In this section, we’ll explain how to use Markdown to resize images in Notion and why this method might be ideal for certain tasks.
- Markdown Syntax for Images: To add an image using Markdown, type the following syntax:
. This embeds the image into your page. - Resize with HTML Attributes: After embedding the image, you can apply inline HTML to adjust the image size. For example, use
<img src="image URL" width="500" height="300">to set specific dimensions for the image. - Maintain Aspect Ratio: If you want to maintain the aspect ratio when resizing, only specify either width or height. This will automatically adjust the other dimension.
- Experiment with Sizing: If you need precise control, try playing around with different pixel values for width and height. This allows you to fine-tune the image size to match the content around it.
Markdown gives you more flexibility in resizing images, especially if you’re familiar with coding. Whether you're writing a blog post, taking notes, or building a knowledge base in Notion, using Markdown for image sizing can help you maintain consistency and precision in your visual content.
Best Practices for Image Sizing in Notion
When working with images in Notion, finding the right balance in image size is crucial. Too large, and it might slow down your page; too small, and the image could lose its impact. Following best practices for image sizing ensures that your pages look clean, professional, and load smoothly. In this section, we’ll discuss some useful tips for sizing images effectively in Notion.
- Optimize Image Resolution: Always try to use high-resolution images that are not overly large in file size. Notion handles images well, but very large image files can slow down your page. Aim for a resolution that’s clear but doesn’t unnecessarily bloat your file size.
- Use Appropriate Image Dimensions: If you're using images for different purposes (e.g., profile pictures, banners, thumbnails), tailor the image size to fit its intended role. For example, profile pictures should be square, while banners might look better as wide, landscape images.
- Resize Images to Fit the Layout: When inserting images into a page, ensure they align well with the rest of your content. Adjust the size so that it complements the text and doesn’t overpower the page’s layout. If an image feels too large, try resizing it to fit more comfortably within the flow of the content.
- Maintain Consistency: If you're using multiple images on the same page, try to keep the sizing consistent. This creates a more organized, visually appealing layout that’s easy to navigate.
- Test Mobile Viewing: Notion is also used on mobile devices, so make sure your images look good on smaller screens. Resize images if necessary, to make sure they display properly and maintain a good user experience across devices.
By following these best practices, you’ll be able to optimize image sizes in Notion for better performance and presentation. Whether you're creating a dashboard, managing a project, or building a portfolio, the right image size can elevate the quality and functionality of your Notion pages.
Why Image Size Matters for Notion Pages
Images play a crucial role in Notion pages, whether they’re used for project management, personal notes, or creative workspaces. However, choosing the right image size isn’t just about looks—it also impacts performance and user experience. In this section, we’ll explore why getting the image size right in Notion is so important and how it can affect the overall effectiveness of your pages.
- Improved Page Load Speed: Large images can significantly slow down your Notion page’s load time. This can be particularly problematic when you're working with a large database or a page filled with high-resolution photos. By resizing images, you ensure that your page remains responsive and loads quickly.
- Better User Experience: A well-sized image enhances the overall layout and readability of your Notion page. If images are too large, they can overwhelm the text, while images that are too small may not deliver the visual impact you're aiming for. Finding the right balance makes the content more engaging and easy to navigate.
- More Efficient Use of Space: Notion’s flexible workspace allows you to organize content in a variety of ways. By adjusting image sizes, you can make the most of your available space without overcrowding your page. Properly sized images fit seamlessly with the layout, creating a more polished and professional look.
- Mobile Optimization: Many users access Notion from mobile devices, where screen space is limited. Resizing images to fit smaller screens ensures they look good and maintain their intended impact, no matter what device you're using.
Overall, the size of your images in Notion isn’t just about aesthetics—it’s also about functionality. By adjusting your images to the right dimensions, you ensure that your pages look great, load quickly, and provide a seamless user experience across devices.
Common Issues When Resizing Images and How to Fix Them
While resizing images in Notion is fairly simple, it’s not always smooth sailing. Users can run into a few common issues when resizing, whether it’s images that don’t maintain their aspect ratio or a page that suddenly slows down due to heavy files. In this section, we’ll highlight some of these problems and offer solutions to help you fix them quickly.
- Image Aspect Ratio Distortion: One of the most common problems when resizing images is distortion, especially if you stretch an image to fit a specific size. This can make the image appear stretched or squished. Fix: To avoid distortion, always resize images proportionally by dragging from the corners of the image block, or by maintaining either width or height when using Markdown.
- Images Are Too Large: If the image file size is too large, it could slow down the page load time or take up too much space on the page. Fix: Before uploading an image, try compressing the file using an image editor or online compression tool. This will reduce the file size while maintaining the image quality.
- Images Not Aligned Properly: Sometimes, after resizing, images might not align well with the text or other elements. Fix: Use Notion’s alignment tools to adjust the image positioning. You can center the image, align it to the left, or place it in line with the text as needed.
- Images Not Displaying Correctly: In some cases, resized images may not display properly in certain views (like gallery view). Fix: Check the gallery settings and adjust the display settings for the image block to ensure that the images are properly scaled and shown within the view.
By knowing these common resizing issues and their fixes, you can avoid frustration and get your images looking perfect in no time. With a little attention to detail, resizing images in Notion can be a smooth and easy process.
FAQ
Here are some frequently asked questions about resizing images in Notion, along with their answers. This section will help clarify any doubts you may have and provide additional tips for using images effectively within your workspace.
- How can I resize multiple images at once in Notion?
Currently, Notion doesn’t allow resizing multiple images at the same time. You’ll need to adjust them individually. However, you can streamline this by keeping consistent image dimensions across your content. - Can I resize images to a specific pixel size in Notion?
Notion doesn’t offer pixel-specific resizing for images directly. However, you can use Markdown and HTML to specify width and height, allowing you to set a more precise size for each image. - What’s the best image size for Notion pages?
The ideal size depends on the content and layout, but a good general guideline is to use images that are between 500px and 800px in width. This ensures they are large enough for clarity but not so large that they impact page load times. - Why is my image blurry after resizing?
Blurriness typically happens when an image is resized to a larger size than its original resolution. Always resize images down, rather than up, to avoid quality loss. - Can I resize images in Notion on mobile?
Yes, you can resize images on mobile by tapping on the image and using the pinch-to-zoom feature to adjust the size. However, the resizing options are more limited than on desktop.
We hope these FAQs have cleared up some of your questions. If you run into any other issues, don't hesitate to check Notion’s help documentation or experiment with different methods to achieve the look you want.
Conclusion
In conclusion, resizing images in Notion is an essential skill for anyone looking to create visually appealing and efficient pages. By adjusting the size of images, you not only improve the page’s layout but also enhance the overall user experience. Whether you’re working on a personal project or managing a team’s workspace, knowing how to resize and optimize images ensures that your Notion pages look great and function smoothly. Remember to keep images well-sized to avoid performance issues, and always aim for consistency across your content. With these tips and best practices, you can make the most out of your Notion workspace and improve the presentation of your images in just a few simple steps.


