Are you ready to transform your look with just a few clicks? Changing hairstyles in Photoshop is not just for professional editors; it’s a fun way for everyone to explore new styles! Whether you want to experiment with color, length, or even a completely different style, Photoshop offers powerful tools to help visualize your dream hairstyle. In this step-by-step guide, we’ll walk you through everything from your workspace setup to the actual editing process, making it easy and enjoyable!
Preparing Your Workspace and Images
Before diving into hairstyle editing, you need to set up your workspace and prepare your images. A clutter-free and organized space makes a world of difference in achieving great results. Here’s how to get started:
1. *Choose the Right Version of Photoshop: Ensure you have a compatible version of Photoshop; the latest updates come with enhanced features that may make your editing process smoother.
2. Select High-Quality Images: Start with a high-resolution image of yourself or the person whose hairstyle you’d like to edit. Good lighting and clarity will make it easier to apply and blend new hairstyles. A well-lit image can come from:
- Natural sunlight
- Use of a ring light or softboxes
- A high-quality camera or smartphone with a good lens
3. Open Photoshop: Fire up Photoshop and create a new project. You can simply drag and drop your image into the workspace or navigate to File > Open and select your image from your folders.
4. Set Up Your Workspace: Organize your panels for easy access. You might want to make sure the Layers, Tools, and History panels are visible. To do this, go to Window in the top menu and make sure these options are checked. Here’s a quick layout you might consider:
| Panel | Suggested Location |
|---|---|
| Tools | Left Side |
| Layers | Right Side |
| History | Bottom Right |
5. Gather Hairstyle Resources: Next, you’ll need some styles to choose from! You can search for hairstyle images online, look through fashion magazines, or create a mood board with styles that inspire you. Make sure these images are also high quality for the best results. Consider downloading a sample set of popular hairstyles to have ready for later.
6. Familiarize Yourself with Photoshop Tools*: Familiarizing yourself with the basic tools that you’ll use in this process is essential. These tools include:
- Brush Tool – for painting hair and blending colors.
- Lasso Tool – for selecting areas of hair.
- Clone Stamp Tool – for duplicating and editing hair strands.
- Adjustment Layers – for modifying color and brightness.
By preparing your workspace and images, you’ll be well-equipped to start changing hairstyles in Photoshop! The next sections will dive into the actual editing process, where the real imagination and creativity happen.
Also Read This: How to Make Puff Pastry at Home: Learn on Dailymotion
3. Selecting the Right Tools for Hairstyle Modification
When it comes to changing hairstyles in Photoshop, having the right tools at your disposal can make all the difference. Let’s dive into some essential tools that will help you master this makeover with ease!
1. The Lasso Tool
The Lasso Tool is your best friend when it comes to selecting specific areas of hair. It allows you to draw freehand around the hair you want to modify. Here’s how to use it:
- Select the Lasso Tool from the toolbar or simply press the keyboard shortcut L.
- Carefully trace around the hair you want to change, ensuring you don’t cut into the skin or background.
- Once selected, you can copy, move, or modify this selection without affecting the rest of the image.
2. The Brush Tool
The Brush Tool is vital for adding texture and coloring to your new hairstyle. To make it as effective as possible:
- Select the Brush Tool either from the toolbar or use the shortcut B.
- Adjust the brush size and hardness to fit the detail of the hair you're working on. A smaller size is great for fine details, while a larger brush works well for overall coloring.
- Choose an appropriate color for the new hair and explore blending options.
3. The Clone Stamp Tool
The Clone Stamp Tool lets you replicate certain areas of the image, which is particularly useful for filling in patches where the hair change has caused gaps. Here’s a quick guide:
- Select the Clone Stamp Tool from the toolbar or press S.
- Hold the Alt key (Option on Mac) and click on a part of the hair you want to clone.
- Then, click and drag over the area you want to cover or modify.
4. Adjustment Layers
Using adjustment layers allows for non-destructive editing, meaning you can modify the hairstyle without permanently altering the original image. The common adjustments for hair include:
- Hue/Saturation: Adjust the color tone of the hair.
- Brightness/Contrast: Enhance or soften the hair’s overall appearance.
By using these tools effectively, you'll be well on your way to creating stunning new hairstyles in Photoshop that look natural and professional!
Also Read This: How to Make Crochet Baby Frocks with a Fun DIY Tutorial
4. Gathering Reference Images for Inspiration
Whenever you're thinking about changing hairstyles in Photoshop, gathering reference images can be an enjoyable and crucial step in the process. Inspiration helps you visualize what you want to achieve. Here’s how to gather and utilize reference images effectively!
1. Use Pinterest
Pinterest is a treasure trove of hairstyle inspiration. You can search for specific styles or trends, such as “wavy hairstyles” or “short bobs.” Here’s your action plan:
- Create a board dedicated to hairstyle ideas.
- Pin images that catch your eye, paying attention to colors, textures, and styles that appeal to you.
- Consider the images that match your overall look or color scheme.
2. Explore Instagram
Instagram is another fantastic platform to source hairstyle trends. Try searching for hashtags like #HairInspiration or #HairstyleTrends. You might stumble upon:
- Celebrity styles that are trending.
- Stylist accounts that showcase unique cuts and colors.
- Before and after transformation images that can spark ideas!
3. Hair Magazines
If you prefer the tangible touch, hair magazines can be fantastic resources. They often provide a mix of professional styles and practical techniques. When looking through magazines:
- Cut out or photocopy your favorite styles.
- Make notes on what you like about each hairstyle to guide you in Photoshop.
4. Create a Mood Board
Once you’ve gathered your images, consider creating a mood board, either digitally in Photoshop or physically. This board should include:
- Your top hairstyle choices.
- Color palettes that resonate with you.
- Textures or design elements that inspire your overall look.
Having a collection of references will keep you focused and inspired as you start your hairstyle transformation in Photoshop. It’s all about mixing creativity and guidance, so don’t hesitate to express your style and personality through these visual aids!
Also Read This: How to Download Dailymotion Video with aTube Catcher: Simple Steps for Beginners
5. Step-by-Step Process to Change Hairstyles
Changing hairstyles in Photoshop can feel like a daunting task, especially if you're new to the program. But don’t worry! With a little guidance, you'll be able to transform your images with ease. Here’s a straightforward, step-by-step process to get you started:
Step 1: Choose Your Image
Start by opening the image of the person whose hairstyle you want to change. Make sure the photo is high quality for the best results. If you’re working on someone else's image, always get permission, or use stock photos!
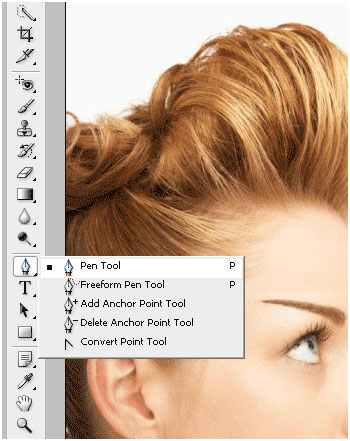
Step 2: Select the Hair Area
Using the Quick Selection Tool or the Pen Tool, carefully select the hair you want to change. Zoom in to make precise selections, and don’t worry if it takes a little time to get it right. You can always refine your selection later!
Step 3: Mask the Selection
After making your selection, click on the Layer Mask icon at the bottom of the Layers panel. This will allow you to keep the hair in your image while setting up to add your new hairstyle. If you make any mistakes, just switch to the brush tool and refine your mask.
Step 4: Add the New Hairstyle
Now, it’s time to bring in your new hair! You can either draw freehand using the brush tool, or you can find a new hairstyle image that you want to use. Make sure it's on a transparent background for the best look.
- If using a new hair image, import it into your project using File > Place Embedded.
- Once placed, use the Transform Tool (Ctrl+T or Command+T) to resize and position the new hairstyle, making adjustments until it fits perfectly over the old one.
Step 5: Blend and Adjust
After positioning your new hairstyle, you want it to look like it belongs to the person in the photo. Use the Opacity settings and blending modes to merge the new hair seamlessly with the original image. Play around with this to find the combination that makes the hair feel like a part of the overall photo.
Step 6: Final Touches
Finally, adjust the lighting and shadows to match the natural light of the photo. You can use tools like the Burn and Dodge tools to add depth and realism. Voila! You’ve successfully changed the hairstyle!
Also Read This: How to Watch Videos Offline on Dailymotion Enjoy Videos Without Internet
6. Adjusting Color and Texture for a Natural Look
Getting the right color and texture for the new hairstyle is essential to achieving a natural look. If your new hair doesn’t blend in well with the existing photo, it can stand out awkwardly. Let’s dive into how you can adjust these factors effectively!
Step 1: Color Matching
Start by selecting the layer of your new hair. To adjust the color, navigate to Image > Adjustments > Hue/Saturation. Play around with the sliders until you find a hue that aligns with the natural color palette of the original photo.
- Hue: Changes the color completely.
- Saturation: Alters the intensity of the color.
- Lightness: Adjusts how light or dark the color appears.
Another great tool is Color Balance, which allows you to make fine adjustments to the shadows, midtones, and highlights of your new hairstyle.
Step 2: Texture Adjustment
For a more realistic look, consider adding texture to the hair. Use the Filter > Noise option to add grain or texture to your hair layer. Make sure it isn’t too overpowering; you want it to complement the hair, not distract from it.
Step 3: Use Blending Modes
Explore different blending modes in the Layers panel. “Soft Light” or “Overlay” can create a more natural integration of the new hair with the overall image. Adjust the opacity until the effect looks just right.
Step 4: Final Adjustments
Finally, don’t forget to zoom out and review your changes from a distance. This can help you see areas that might still need tweaks. If you're feeling adventurous, consider using gradient maps or clipping masks for more intricate effects!
Remember, the key is to take your time and experiment. There’s no right or wrong way to create a new hairstyle in Photoshop, so have fun with it and let your creativity shine!
Also Read This: How to Cook Pasta at Home with a Quick and Easy Tutorial Featured on Dailymotion
7. Adding Final Touches for Realism
Alright, you've transformed your hairstyle, but it's time to make those changes look as realistic as possible. This step is crucial, as it can often be the difference between a good edit and a great one. Let’s dive into some essential techniques to add those final touches.
First things first, look at the lighting. For a natural look, you need to match the lighting of the new hairstyle to the lighting in the original image. Use the Brush Tool with a soft edge to make adjustments. Choose a color that’s slightly lighter or darker than the hair's base color for highlights and shadows. Apply these in the areas where the light naturally hits, like the top of the head or around the face.
Next, consider the texture. Hairstyle edits can often look flat or too uniform. To overcome this, you can use the Blending Options. Right-click on the hairstyle layer and go to Layer Style. Experiment with adding a Drop Shadow to give depth, and adjust the Opacity and Distance sliders to create a subtle, realistic shadow.
Now, don't forget about the edges. The hair should blend smoothly into the scalp. Use the Smudge Tool to feather the edges of the hair slightly, making sure they don’t appear too sharp or cut-off. This will help create a seamless transition between the hair and the background.
Lastly, play around with Color Balance. Navigate to Image > Adjustments > Color Balance and make subtle adjustments to ensure the hue of the hair feels consistent with the rest of the image. Maybe you want to warm it up a bit for a sun-kissed look or cool it down for a more dramatic effect.
After these adjustments, take a step back and compare the edited hairstyle with the original photo. This will give you a fresh perspective and help you identify any areas that may need further tweaking to ensure everything looks just right.
Also Read This: Don Omar "Canción de Amor" Music Video on Dailymotion: Watch and Enjoy
8. Saving and Exporting Your Final Hairstyle Edits
You’ve worked hard on your hairstyle modifications; now it’s time to save and export your masterpiece! And believe me, this step is just as important as the editing itself. Follow these guidelines to keep your edits intact and ready for sharing.
First, save your work in Photoshop’s native format (.PSD). This allows you to keep all your layers intact, enabling you to make adjustments in the future if necessary. To do this, simply go to File > Save As, and select the .PSD format. Choose a descriptive name that reflects your project for easy retrieval later.
Next, let’s talk export options. If you're planning to share your edits on social media or send them to someone, you'll want to convert your image into a widely accepted format like .JPG or .PNG. To do this, go to File > Export > Export As. You’ll see options for format selection—choose JPG for high-quality images suitable for web use, or PNG if you need a transparent background.
- For JPG: Adjust the quality slider to find the perfect balance between quality and file size.
- For PNG: Opt for this format if you want to maintain transparency or if the image has text that you want to remain sharp.
Before finalizing your export, remember to check the dimensions of the file. Ensure the size fits your needs, whether it's for online use or printing. You can scale down the dimensions if necessary—just be mindful not to lose quality.
Finally, save your project with these adjustments, and voilà! Your hairstyle edit is now saved and ready to be showcased. Don't forget to back up your files in a secure cloud storage solution to ensure they are safe and accessible whenever you need them.
Conclusion and Tips for Future Hairstyle Edits
Changing hairstyles in Photoshop can be a fun and creative process that allows you to experiment with different looks without any commitment. By following the step-by-step guide provided, you should now have a solid understanding of the techniques involved. Here are some final tips to enhance your future hairstyle edits:
- Experiment: Don’t be afraid to try out unconventional colors or styles. Use different blending modes to see how they affect the overall look.
- Use Reference Images: Look for inspiration from fashion magazines or social media. Having a reference can guide your editing process effectively.
- Layering: Always work with layers. This technique allows you to make adjustments quickly without affecting the original image.
- Adjust Lighting: Pay attention to the light source in your photo. Adjusting the brightness and shadows of your new hairstyle will create a more realistic effect.
Additionally, practice makes perfect. The more you work with hair editing tools, the more proficient you will become. Regularly revisiting your techniques and trying new approaches can significantly enhance your Photoshop skills.
In conclusion, mastering hairstyle changes in Photoshop not only helps you achieve the look you desire but also allows for creative self-expression. Keep experimenting and refining your techniques, and you will see impressive results in your editing endeavors!
 admin
admin


