Changing backgrounds in Adobe Photoshop CS6 can seem daunting, but it’s a lot easier than you might think! Whether you want to remove a distracting background from a portrait or replace it with something more dynamic, Photoshop provides powerful tools to help you achieve stunning results. In this post, we’ll walk through easy steps to get you started, making your images pop in no time!
Preparing Your Workspace for Background Changes
Before diving into the creative process, it’s essential to set up your workspace properly. A well-organized workspace allows you to work efficiently and access the tools you need without hassle. Here’s how to get started:
- Open Adobe Photoshop CS6: Launch the application and wait for the welcome screen to load.
- Create a New Project: Go to File > New to open a blank canvas. Choose the dimensions you want for your project based on your intended use.
- Import Your Image: To change the background, you first need an image. Go to File > Open and select the photo you want to edit. The image will appear in a new tab.
- Set Up Your Layers Panel: If the Layers panel isn’t visible, go to Window > Layers. This panel is crucial for managing different elements of your project, like your image and the background.
Now that your workspace is prepared, it’s time to familiarize yourself with some key tools:
| Tool Name | Function |
|---|---|
| Magic Wand Tool | Selects areas of similar color for quick background removal. |
| Lasso Tool | Allows freehand selection of specific areas for more control. |
| Quick Selection Tool | Helps you brush over the area you want to select, making it ideal for complex backgrounds. |
Remember, practice makes perfect! The more you experiment with these tools, the more comfortable you’ll become. Now that you’re ready, let’s jump into the exciting part—changing those backgrounds!
Also Read This: How to Hack a WiFi Password: A Guide to Gaining Access on Dailymotion
3. Step-by-Step Guide to Changing Backgrounds
Changing the background in Adobe Photoshop CS6 is a straightforward process once you get the hang of it. Let’s break it down into easy-to-follow steps, so you can transform your images with confidence!
Step 1: Open Your Image
Start by launching Photoshop and opening the image you want to edit. Go to File > Open, and select your image file. Once it’s loaded, you’ll see it in the workspace.
Step 2: Duplicate Your Layer
To keep your original image intact, make a duplicate of the layer. Right-click on the Background layer in the Layers panel and select Duplicate Layer. This way, you can always revert back to the original if needed.
Step 3: Select the Background
Now it’s time to select the background you want to change. You can use various selection tools, but we’ll cover that more in detail later. For now, let’s use the Quick Selection Tool. Choose it from the toolbar, and click and drag over the area you want to select.
Step 4: Refine Your Selection
Once you’ve made your selection, you might need to refine it to get clean edges. Go to Select > Refine Edge. Here, you can adjust the feathering and smoothing options to ensure your selection looks natural.
Step 5: Delete the Background
After refining your selection, hit the Delete key. This will remove the selected background, leaving you with a transparent area where you can place a new background.
Step 6: Add a New Background
Now it’s time to add a new background! You can either create a solid color layer, use a gradient, or import another image. To do this, go to File > Place Embedded and select the background image you want to use. Adjust it to fit your image as needed.
Step 7: Final Touches
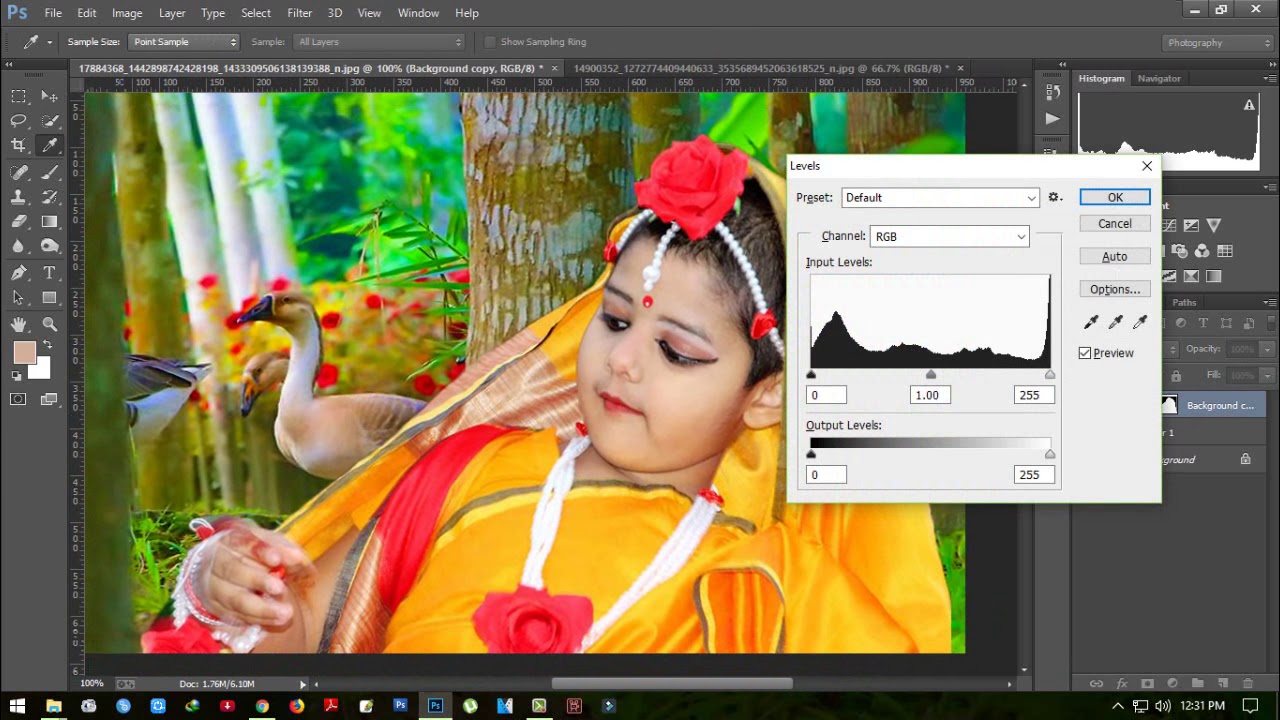
Don’t forget to make final adjustments! You might need to tweak the colors, brightness, or contrast to make sure your subject and new background blend well together. Use adjustment layers like Brightness/Contrast or Color Balance to achieve the desired effect.
And there you have it! A complete guide to changing backgrounds in Photoshop CS6. With a bit of practice, you’ll be creating stunning images in no time!
Also Read This: Can You Access Dailymotion in China
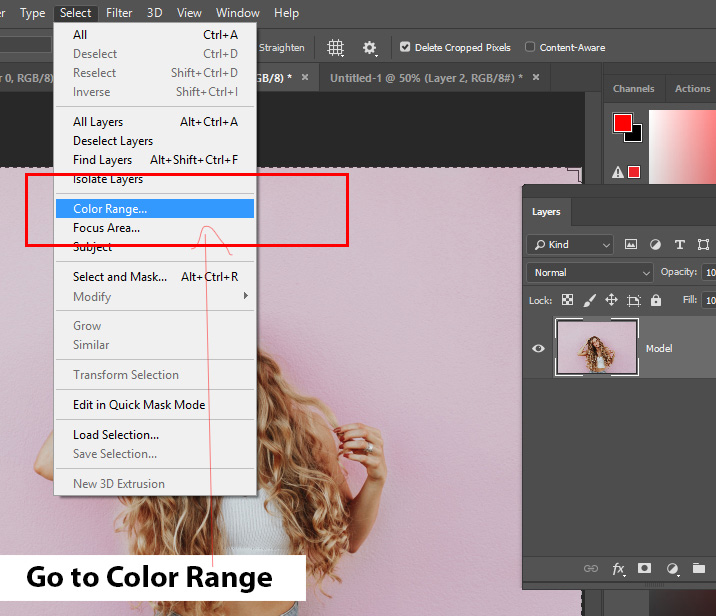
4. Using the Magic Wand Tool for Quick Selections
The Magic Wand Tool is one of the simplest ways to make selections in Photoshop CS6, especially when it comes to changing backgrounds. It’s perfect for selecting areas with similar colors or tones. Here’s how to use it effectively:
Step 1: Select the Magic Wand Tool
Find the Magic Wand Tool in the toolbar (it looks like a wand with a star). If you don’t see it, it might be nested under the Quick Selection Tool—just click and hold on the Quick Selection Tool icon to reveal it.
Step 2: Adjust the Tolerance
Before you start clicking, check the Tolerance setting in the options bar at the top. A lower tolerance (like 10-20) selects colors very similar to the one you click, while a higher tolerance (30-50) will select a broader range of colors. Start around 30 for decent results, and adjust as necessary.
Step 3: Click to Select
Now, click on the area of the background you want to remove. The Magic Wand Tool will select all contiguous areas of similar color. If some areas are left out, hold down the Shift key and click on those areas to add them to your selection.
Step 4: Refine Your Selection
After your initial selection, you might see some jagged edges or unwanted areas included. Use the Select > Modify options to smooth, expand, or contract your selection as needed. This is crucial for getting clean, professional-looking edges!
Step 5: Delete and Replace
Once you’re satisfied with your selection, hit the Delete key to remove the background. Then, follow the earlier steps to add your new background layer. You can use the same process of placing or creating a background as we discussed.
And voilà! You’ve successfully used the Magic Wand Tool to quickly change backgrounds. This tool is a lifesaver, especially for images with high contrast between the subject and background.
Also Read This: How to Lose Face Fat Quickly with Expert Techniques
5. Fine-Tuning Selections with the Lasso Tool
Once you've made your initial selection in Adobe Photoshop CS6, you might find that it needs a bit of refinement. This is where the Lasso Tool comes in handy. It allows you to draw freehand selections, giving you more control over the edges of your selection. Here’s how to make the most of it:
- Select the Lasso Tool: You can find it in the toolbar on the left. It's usually the third tool down and looks like a small lasso.
- Choose Your Mode: The Lasso Tool has three modes: Regular Lasso, Polygonal Lasso, and Magnetic Lasso. The Regular Lasso is perfect for freehand selections, while the Polygonal Lasso is great for straight edges. The Magnetic Lasso automatically clings to the edges of your subject.
- Zoom In: For precise adjustments, it’s often helpful to zoom in on your image. Use Ctrl + Plus (Cmd + Plus on Mac) to zoom in and Ctrl + Minus (Cmd + Minus) to zoom out.
- Make Adjustments: With the Lasso Tool selected, carefully trace along the edges of your selection. If you find a part of the selection isn’t quite right, simply click and drag to adjust it. If you need to add to your selection, hold down the Shift key while selecting additional areas. To remove parts of your selection, hold down the Alt key (Option key on Mac).
Fine-tuning your selection can be a process of trial and error, but with patience, you'll achieve a clean and accurate outline of your subject. Take your time and don't hesitate to use the zoom feature to get those edges just right!
Also Read This: Is Dailymotion Safe from Viruses in 2018 What You Should Know
6. Removing the Existing Background
Now that you've made a precise selection using the Lasso Tool, it’s time to remove the existing background. This is a crucial step in changing the background of your image and can be done smoothly in a few simple steps. Here’s how:
- Inverse the Selection: If you've selected your subject, you need to inverse the selection to focus on the background. Go to Select in the top menu and choose Inverse, or simply press Shift + Ctrl + I (Shift + Cmd + I on Mac).
- Delete the Background: Once the background is selected, it’s time to remove it. Hit the Delete key on your keyboard. This will remove the background, leaving a transparent area where the background used to be.
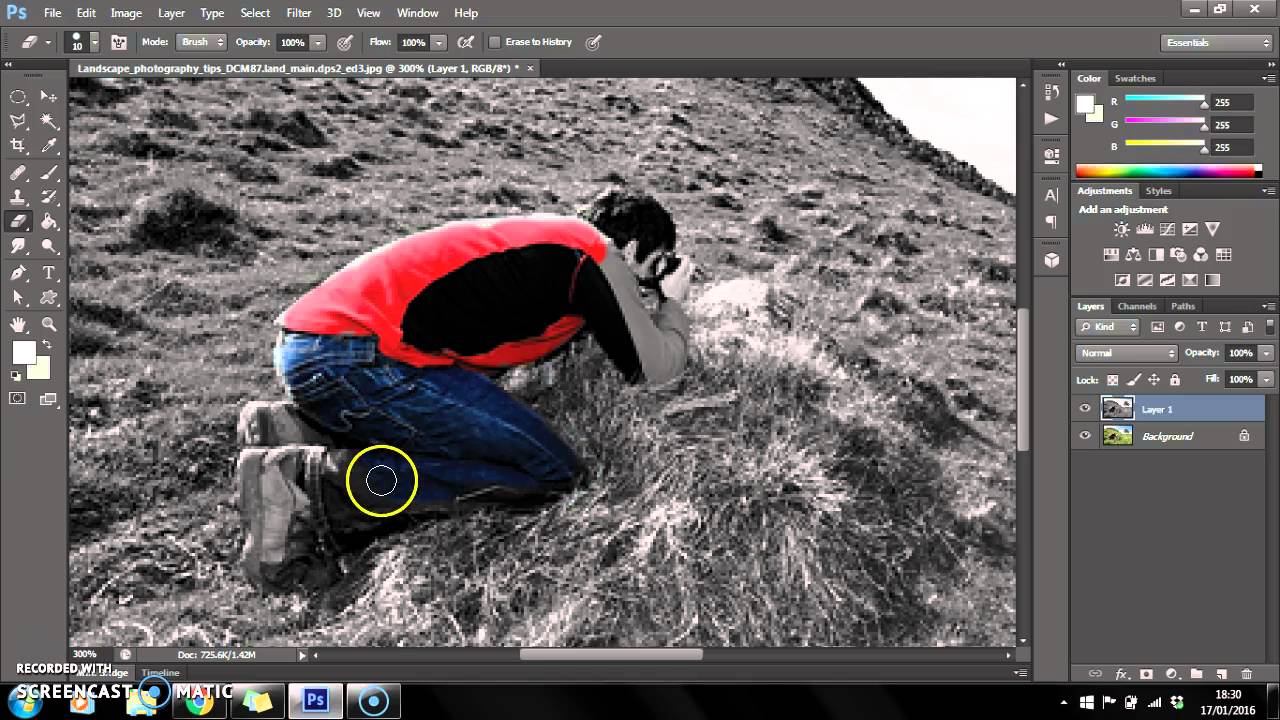
- Check the Edges: After deleting, take a moment to inspect the edges of your subject. Sometimes, remnants of the background might linger. Use the Erase Tool or go back with the Lasso Tool to refine any areas that need it.
- Save Your Work: After you’re satisfied with the background removal, make sure to save your work. Choose File > Save As and select a file format that supports transparency, like PNG, if you want to retain that transparent background.
And there you have it! With these simple steps, you can effectively remove the existing background from your image, paving the way for a stunning new backdrop. Stay tuned for the next steps where we’ll explore how to add your new background!
Also Read This: Simple Guide to Passing an NG Tube with Dailymotion Video Instructions
7. Adding a New Background
So, you’ve got your subject all cut out and ready to shine! Now it’s time to bring in the new background. This is where the fun really begins. Here’s how you can do it step by step:
- Open Your Background Image: Go to File > Open and choose the image you want to use as your new background. This could be anything from a beautiful landscape to a simple solid color.
- Drag the Background into Your Main Document: Use the Move Tool (the icon that looks like a cross with arrows) to simply drag your new background into the document where your cut-out subject is located. You can also copy (Ctrl+C) and paste (Ctrl+V) it if you prefer.
- Layer Order: Make sure your new background layer is below the layer of your subject. You can check this in the Layers Panel. If your subject layer is above the new background, just click and drag the background layer below it.
- Resize the Background: If your background image doesn’t cover the entire canvas, select it and press Ctrl+T for the Free Transform tool. You can then drag the corners to resize it to fit perfectly. Hold down the Shift key while dragging to maintain the aspect ratio.
And just like that, you’ve added a new background! But remember, we’re not done yet. To really make your subject pop, we need to ensure the background complements it seamlessly.
Also Read This: How to Make a Skype ID – Dailymotion’s Simple Account Setup Tutorial
8. Adjusting the New Background for a Natural Look
Now that you have your background in place, let’s make sure it looks natural with your subject. Here are some easy adjustments to enhance the overall composition:
- Adjust Brightness and Contrast: Sometimes, the background might be too bright or too dark compared to your subject. Go to Image > Adjustments > Brightness/Contrast. Play with the sliders until the background and subject feel cohesive.
- Color Matching: Use the Hue/Saturation adjustment (found under Image > Adjustments) to tweak the background colors. This will help match the colors of your subject to the background, creating a harmonious look.
- Blur for Depth: To add a bit of depth, consider applying a slight Gaussian Blur to the background. Select the background layer, then go to Filter > Blur > Gaussian Blur. A subtle blur can give a nice depth-of-field effect, making your subject stand out more.
- Shadow Effects: If your subject casts a shadow, you might want to add a similar effect to the background. Create a new layer, use a soft brush, and paint a shadow where necessary. You can then adjust the opacity to make it realistic.
After making these adjustments, take a moment to step back and evaluate your work. Zoom out and see how everything blends together. Sometimes, a fresh perspective can help you spot areas that need more tweaking. Remember, the goal is to create a cohesive image where your subject and background feel like they belong together. Happy editing!
Also Read This: How to Do Water Painting on Dailymotion
Troubleshooting Common Issues
Changing backgrounds in Adobe Photoshop CS6 is usually a smooth process, but sometimes you might run into a few hiccups. Don’t worry! Here are some common issues you might face and easy solutions to get you back on track.
1. Background Layer is Locked
- If you notice that you can’t make changes to your background layer, it’s likely locked. Double-click the background layer in the Layers panel to unlock it. This will convert it to a regular layer and allow you to edit it.
2. Selection Issues
- If your selection isn’t working correctly, ensure that you’re using the right tool. The Quick Selection Tool or the Magic Wand Tool are great for capturing the edges. Remember, zoom in and refine your selection to avoid jagged lines!
3. Background Color Isn’t Changing
- If you’ve added a new background but it doesn’t appear, check the layers. Make sure the new background layer is positioned below your subject layer in the Layers panel. Sometimes it’s just a matter of stacking them correctly!
4. Blurry Edges
- If the edges of your subject appear blurry or harsh against the new background, try feathering the selection slightly before deleting the background. This softens the edges and makes the transition appear smoother.
5. Color Mismatch
- Sometimes, the new background color may clash with your subject. Use the Color Adjustment tools like Hue/Saturation or Color Balance to make your subject blend better with the new background.
By keeping these troubleshooting tips in mind, you’ll be better equipped to handle any bumps along the way while changing backgrounds in Photoshop CS6. Remember, patience is key, and practice makes perfect!
Conclusion and Final Tips for Background Changes
Congratulations! You’ve successfully navigated the ins and outs of changing backgrounds in Adobe Photoshop CS6. Remember, the key to mastering this skill lies in practice and experimentation. Here are some final tips to enhance your background-changing experience:
1. Always Work with Copies
- Before making significant changes, duplicate your original image layer. This way, you can always revert back if something doesn’t look right.
2. Explore Different Blending Modes
- Experiment with different blending modes in the Layers panel to see how they affect the appearance of your background. This can lead to creative and unexpected results!
3. Use High-Quality Images
- For the best results, always use high-resolution images for both your subject and background. This ensures clarity and sharpness in your final composition.
4. Take Advantage of Tutorials
- There are countless online tutorials and resources dedicated to Photoshop. Don’t hesitate to seek out specific techniques that can enhance your skills even further!
In conclusion, changing backgrounds in Adobe Photoshop CS6 is not just about swapping one image for another; it’s about creating a cohesive and visually appealing final product. Keep practicing, and soon you’ll be able to create stunning images with ease. Happy editing!
 admin
admin