Centering images in Google Docs can elevate the overall appearance of your document, making it more visually appealing and organized. Whether you're working on a presentation, a report, or a personal project, knowing how to effectively center images can save you time and enhance readability. In this blog post, we’ll guide you through the process of centering images and discuss why it’s an important aspect of document design.
Why Centering Images is Important

Centering images in your documents isn’t just about aesthetics; it serves several crucial purposes that can significantly improve the way your information is presented. Here’s why centering images matters:
- Enhanced Visual Appeal: Centered images create a balanced look on the page, drawing attention without overwhelming other content. This balance can make reading more pleasant.
- Improved Readability: When images are centered, they tend to complement the text better, allowing readers to process the information without distractions. An image positioned to the side can lead to an uneven flow of text.
- Professional Presentation: In business or academic environments, well-aligned images signal professionalism and attention to detail. This is particularly important in documents like presentations, reports, or proposals.
- Guiding Viewer Focus: Centering an image can help direct the viewer’s attention to the most important aspects of your document. It leads the eye naturally to the focal point of the content.
- Cohesive Design: If all your images are centered, it adds to a cohesive overall design. This consistency makes your document look well-formatted and polished.
So, whether you're adding a personal touch to a project or presenting data in a professional setting, centering your images can make a significant difference in how your document is received. Let’s dive deeper into how to actually implement this in Google Docs!
Steps to Center Images in Google Docs

Centering images in Google Docs might seem tricky at first, but trust me, it’s as easy as pie! Just follow these straightforward steps, and you'll have your images beautifully centered in no time.
Here's how you can do it:
- Open Your Document: Start by launching Google Docs and opening the document where you want to center your image.
- Insert the Image: Navigate to the menu at the top, click on Insert, then select Image. You can choose to upload from your computer, take a snapshot, or select images from Google Drive or the web.
- Select the Image: Once your image is inserted, click on it. You’ll notice a blue selection box appears around the image, indicating it’s ready for adjustments.
- Choose the Alignment Option: Look for the alignment options in the toolbar. You can see icons that will help you center your image. Alternatively, right-click on the image and choose Center from the options.
- Adjust the Text Wrapping: Centering a floating image can sometimes be tricky. Click on the image, and a toolbar will pop up just below. Choose Wrap Text or Break Text, then select the center alignment once more. This ensures your image is centered within the text flow.
- Final Check: Finally, take a step back and review your document. If the image isn’t quite centered, feel free to adjust it slightly by dragging it into the desired position.
And that’s it! You’re now equipped to center images in your Google Docs like a pro.
Using the Toolbar for Centering
Google Docs provides a handy toolbar that makes centering images a smooth sailing experience. Let’s take a closer look at how you can utilize this feature effectively.
Once you’ve inserted your image, here’s how to center it using the toolbar:
- Image Selection: Click on the image you want to center. This will activate the image features on the toolbar.
- Alignment Icons: On the toolbar, you’ll see multiple alignment options represented by icons—left, center, and right. Click on the Center Align icon, which looks like several lines stacked neatly in the middle.
- Text Wrapping Features: If your image is still not centered to your liking, check the text wrapping options! Using Wrap Text keeps your image centered relative to the surrounding text, while Break Text can offer a more standalone look.
- Adjusting Margins: If you need even more control, click on the image and drag the little blue squares (handles) around it. This resizing can help perfect the centered placement.
And remember, the toolbar is your friend! By exploring the options at your disposal, centered images will become a breeze in your Google Docs projects. So don’t hesitate to experiment a little!
5. Adjusting Image Placement with Text Wrapping
When you insert an image into your Google Docs document, one of the first things you'll notice is how it interacts with the surrounding text. To achieve that perfect centered look, you'll want to learn about text wrapping options. These settings allow you to control how your image behaves in relation to the text, giving you flexibility in design.
Here’s how to adjust the image placement using text wrapping:
- Click on the Image: After inserting your image, click on it to reveal a toolbar that features various options.
- Select the Text Wrapping Icon: This is usually represented by a square or a curvy line icon. Clicking on it will give you different options to choose from.
- Choose a Wrapping Style:
- In line with text: This option aligns the image with the text, making it part of the text flow.
- Wrap text: Here, text will flow around your image, allowing for a more integrated look in your document.
- Break text: This option places the image on its own line, with text appearing above and below it, creating a clear separation.
- Behind text: Your image will lay behind the text, which can create interesting effects but may make the text harder to read.
- In front of text: The image overlays the text; use this sparingly to maintain readability.
By adjusting these settings, you can position your images more effectively, achieving a centered effect. Don't forget to click and drag your image to find the perfect spot!
6. Tips for Perfectly Centered Images
Getting that image exactly centered in Google Docs is a bit of an art form, but don't worry—I've got some tried and true tips to help you out! Here’s how to make sure your images stay where you want them:
- Use the Alignment Toolbar: After selecting your image, go to the toolbar and click on the 'Align' button. Choose 'Center' to quickly align your image in the middle of the page or the section where it’s placed.
- Check Margins: If your image is still not quite centered, it might be worth checking your document's margins. Navigate to File > Page setup to see if they might be affecting your layout.
- Be Mindful of Text Wrap: As we discussed earlier, the text wrapping option plays a crucial role in positioning your image. Experiment with different styles to see which keeps your image in the center best.
- Resize Wisely: Sometimes, resizing your image can help with centering, especially if the image is larger than the text area. Drag the corners evenly to maintain the proportions.
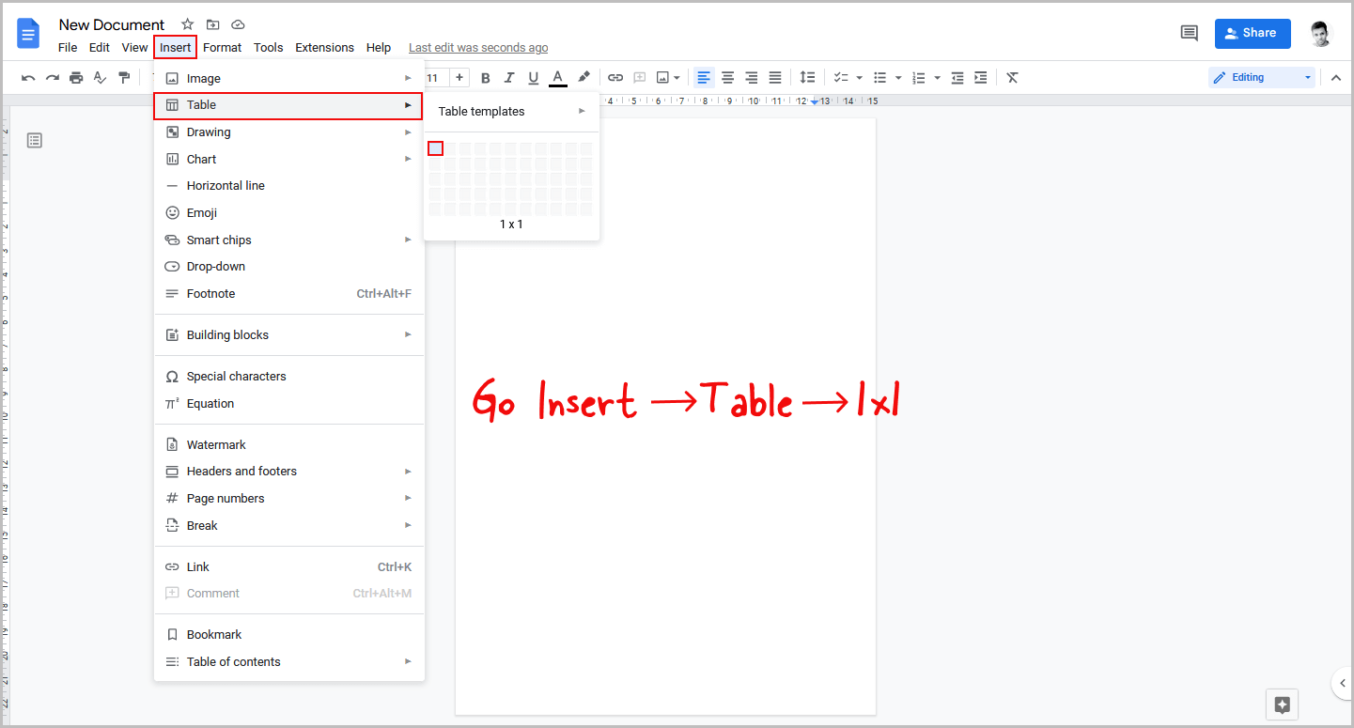
- Use Tables for Precision: If you're still struggling, consider inserting a 1x1 table. Place your image in the cell and then center it. It provides more control over placement.
With these tips, you’ll be able to master the art of centering images in Google Docs like a pro!
Troubleshooting Common Issues
Centering images in Google Docs is usually a straightforward process, but sometimes things don’t go as planned. If you’re facing issues, here are some common problems and their solutions:
- Image Not Centering: If your image isn’t centering, ensure that it’s selected. Click on the image to see the bounding box with blue squares. Once selected, click on the “Align” option and select “Center.”
- Image Moves After Centering: This can happen if the image is set to "inline". Right-click on the image, go to “Image options,” and change it to “Wrap text” or “Break text.” Then try centering it again.
- Text Overlapping the Image: If text is overlapping with your image, it might be due to your text wrapping settings. Again, right-click the image, select “Image options,” and adjust the wrapping settings to prevent overlap.
- Image Is Cropped: Sometimes, images may appear cropped or cut off. Click on the image, look for cropping handles, and adjust them to showcase the full image.
- Document Display Issues: If everything looks fine on your end, but when you share it with others, things appear misaligned, encourage your collaborators to refresh the document or check their browser settings.
If you still can't resolve the centering issue, you might want to reload your Google Docs or try it in a different browser. Sometimes a quick refresh can solve the problem. Moreover, updating your browser can drastically improve functionality!
Conclusion
Centering images in Google Docs can greatly enhance the visual appeal of your document, making it more engaging for readers. With a few easy steps, you can ensure your images are perfectly aligned and complement your text, providing clarity and aesthetic value.
Whether you’re creating a report, a project presentation, or a creative writing piece, taking the time to align your images correctly goes a long way in making your document look polished. Remember:
- Always check your image settings.
- Experiment with different text wrapping options.
- Don’t shy away from using the “Align” tool for precision.
In case you encounter any hiccups, our troubleshooting tips are here to help guide you back on track. Google Docs is designed to be user-friendly, so with a little practice, you’ll become adept at centering images in no time!
So go ahead, give your documents that professional touch, and make your work stand out! Happy centering!


