Are you looking to capture high-quality audio from YouTube videos on your Mac? Whether it's for creating podcasts, downloading music, or extracting sound bites for your projects, having the right approach is crucial. In this post, we'll guide you through the essential tools and techniques needed to ensure you're getting the best audio quality possible. Let’s dive into the world of YouTube audio recording and unlock all the potential it holds!
Essential Tools for Capturing YouTube Audio
To start capturing YouTube audio on your Mac, a few tools can significantly enhance your experience. Here’s a rundown of the essentials:
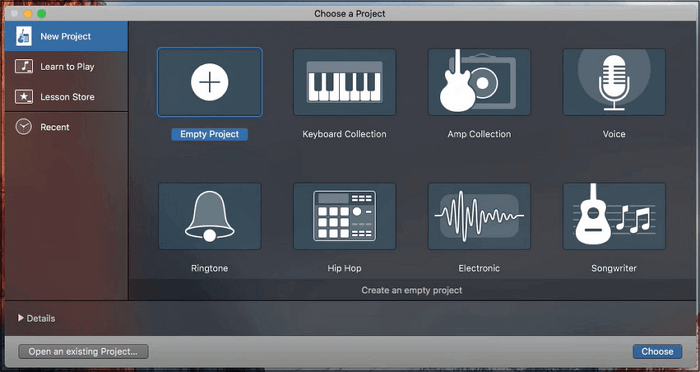
- Audio Capture Software: Software such as Audacity and GarageBand allows you to record audio directly from your system. These applications are user-friendly and come with various features to tweak your sound quality.
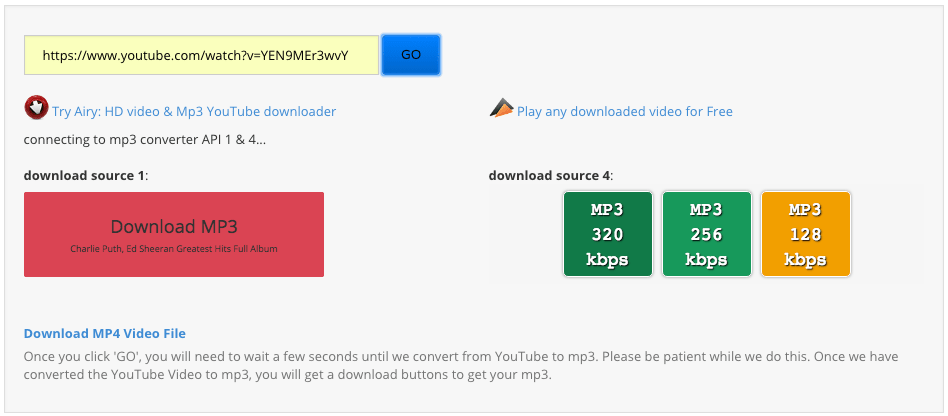
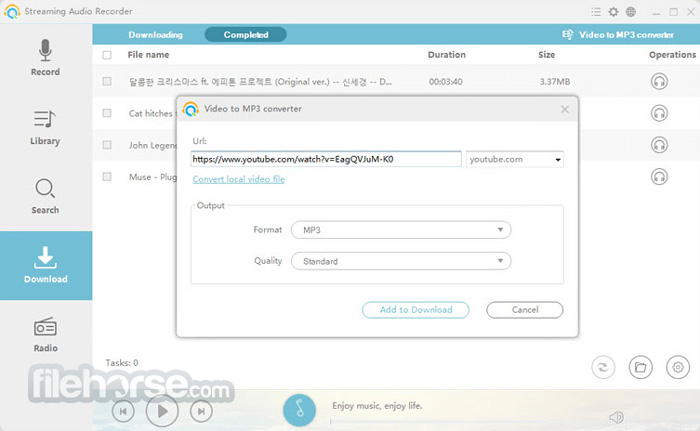
- YouTube to MP3 Converters: Tools like 4K Video Downloader and YTMP3 make it easy to convert YouTube videos into MP3 files. This is especially useful if you want to save songs or speeches for offline listening.
- Audio Interfaces: If you’re serious about audio quality, investing in an audio interface like the Focusrite Scarlett can enhance the sound capture significantly. This allows you to connect professional microphones and instruments for superior recordings.
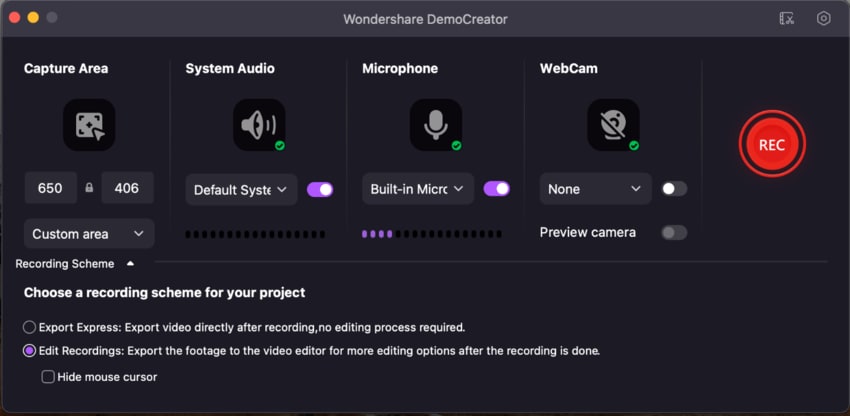
- Screen Recording Tools: For those who want to capture audio alongside video, tools like OBS Studio or Camtasia are fantastic options. They allow you to record your screen and audio simultaneously.
When selecting the right tool, consider your specific needs. If you’re just starting, a simple YouTube to MP3 converter may suffice. However, if you're looking to produce high-quality content or incorporate voiceovers, investing in more sophisticated audio capture software is worthwhile.
Understanding Formats
It’s also worth noting the audio formats you might encounter. Most YouTube videos provide audio in formats like MP3 or AAC, both of which are widely used and supported. If you’re converting audio, aim for a bitrate of at least 192 kbps for decent quality—this ensures your recordings are clear and enjoyable.
Legal Considerations
Before you start capturing audio, it’s essential to keep in mind the legal aspects. Always check the copyright status of the videos you're recording. Fair use can apply in some scenarios, like for educational purposes, but always err on the side of caution.
With the right tools and knowledge, capturing high-quality YouTube audio on your Mac can be a straightforward process. In the next sections, we’ll explore more advanced techniques and tips to refine your audio capturing skills even further!
Also Read This: Where to Watch How to Train an Alpha Full Movie on YouTube
3. Step-by-Step Guide to Recording Audio from YouTube
Recording audio from YouTube can seem tricky, but with the right tools and techniques, it's a breeze! Here’s a simple step-by-step guide to help you capture that perfect sound:
- Choose Your Tool: First, decide on the software you want to use. Popular options for Mac include Audacity, Soundflower, and QuickTime Player. Each has its strengths, so pick the one that suits your needs.
- Install the Software: If you choose Audacity, download it from the official website and install it. For Soundflower, you may need to follow specific installation instructions, as it can require permission settings on macOS.
- Configure Your Audio Settings:
- In Audacity, go to Preferences and select Devices. Make sure to set the playback device to your Mac’s speakers and the recording device to Soundflower (2ch).
- If using QuickTime Player, just open the app and select New Audio Recording from the File menu.
- Prepare Your YouTube Video: Open your YouTube video in your preferred browser and get it ready to play. Make sure the volume is set at a reasonable level—too loud can distort the recording, while too soft may result in a weak audio capture.
- Start Recording:
- In Audacity, click the Record button and then immediately play the YouTube video.
- For QuickTime, hit the Record button and do the same with the video.
- Stop Recording: After your video finishes, stop the recording in your audio software. In Audacity, just click Stop, and in QuickTime, hit Stop as well.
- Save Your Audio: Don’t forget to save your recording! In Audacity, go to File > Export to choose your preferred format (like MP3 or WAV). In QuickTime, select File > Save.
And there you have it! Simple and effective ways to record audio from YouTube directly on your Mac.
Also Read This: How to Upload Video to YouTube from iPhone: Step-by-Step Tutorial
4. Techniques for Ensuring High Audio Quality
Now that you know how to record audio from YouTube, let’s talk about ensuring that the quality is top-notch. Here are some techniques to enhance your audio recordings:
- Use Headphones: Listening through headphones while recording can prevent audio bleed, ensuring you capture the sound without interference. Over-ear headphones work best as they block out more external noise.
- Adjust Your Settings:
- Check the volume levels on both your YouTube playback and recording software. Aim for a balance that keeps peaks below 0 dB to avoid clipping.
- Experiment with sample rates. A common setting would be 44.1 kHz, but higher rates like 48 kHz can yield better results.
- Clean Your Environment:
A quiet space is your best friend. Close windows, turn off fans, and eliminate background noise to focus solely on the audio from the video.
- Post-Processing: After recording, use tools like Audacity to edit your audio. You can remove unwanted noise, adjust EQ settings, and add compression to create a polished sound.
- Export Options: When saving your audio, choose formats that preserve quality. WAV files are excellent for high fidelity, while MP3 files can be more manageable for sharing.
Remember, capturing high-quality audio is about preparation and the right tools. With these techniques, you’ll ensure your recordings sound crisp and professional!
Also Read This: Have YouTube Ads Gotten Worse?
5. Editing and Enhancing Your Recorded Audio
So, you've captured some fantastic audio for your YouTube videos! But before you hit that upload button, it's time to polish your recordings. Editing and enhancing your audio can take your content from good to great, ensuring your audience enjoys a professional sound. Here are some key techniques you can use:
- Noise Reduction: Use software like Audacity or Adobe Audition to eliminate background noise. Most audio editing tools have a noise reduction feature that analyzes the silence in your recording and removes unwanted sounds.
- Equalization (EQ): Adjust the frequencies of your audio to enhance clarity. For instance, boosting the mid-range frequencies (around 1kHz to 3kHz) can make your voice more prominent, while cutting low frequencies can reduce muddiness.
- Compression: This technique evens out your audio levels, making quiet sounds louder and loud sounds quieter. It helps to maintain a consistent volume throughout your recording, which is essential for listener engagement.
- Reverb and Effects: While not always necessary, adding a touch of reverb can give your audio a sense of space. Just be careful not to overdo it; too much reverb can muddy the sound.
- Editing for Flow: Cut out any awkward pauses, stutters, or mistakes. This can make your content feel more polished and keep viewers engaged. Remember, less is often more!
After editing, always listen to your audio through quality headphones or speakers. This will help you catch any nuances you might have missed. And don't forget to save your work regularly, creating multiple versions if necessary. This way, you can always revert to an earlier edit if something doesn't sound right!
6. Legal Considerations When Recording YouTube Audio
When creating content for YouTube, ensuring that your audio is legally compliant is crucial. Ignoring copyright laws can lead to your videos being taken down or even legal actions. Here are some important legal considerations to keep in mind:
- Copyrighted Material: Avoid using music or sounds that you don’t have the rights to. Websites like Epidemic Sound and Bensound offer royalty-free music that you can use in your videos legally.
- Creative Commons Licenses: Some audio files are available under Creative Commons licenses. Make sure to read the terms; some may require attribution, while others may not allow modifications.
- Public Domain Sounds: Audio that is in the public domain is free to use without restrictions. You can find these on sites like Freesound or Internet Archive.
- Original Content: The safest route is to create your own music or hire a composer. This way, you own the rights and can use it freely in your videos.
- Document Everything: Keep records of licenses or permissions for any audio you use. This documentation can be crucial if you ever face copyright claims.
In summary, being aware of and adhering to legal considerations regarding YouTube audio not only protects you but also contributes to a fairer creative community. It’s worth the effort to ensure that your content remains safe and compliant!
 admin
admin


