- Extensive Library: Adobe Stock boasts a vast and diverse library of over 200 million high-quality assets, including photos, videos, illustrations, templates, and 3D assets. This expansive collection ensures you'll find the perfect content for your needs.
- Integration with Adobe Creative Cloud: One of the standout features of Adobe Stock is its seamless integration with Adobe Creative Cloud applications such as Photoshop, Illustrator, and InDesign. This integration allows you to license and use assets directly within your preferred Adobe software, streamlining your workflow.
- High-Quality Content: Adobe Stock is known for its commitment to quality. All assets are curated to meet the highest standards, ensuring that you receive professional-grade visuals for your projects. Say goodbye to low-resolution and unprofessional images.
- Global Contributor Community: Adobe Stock benefits from a vast community of talented contributors from around the world. This means you have access to a wide range of creative styles, genres, and cultural perspectives, catering to diverse project requirements.
- Flexible Licensing Options: Adobe Stock offers various licensing options to suit your specific needs. Whether you require assets for personal use, commercial projects, or extended licenses, you can find the right licensing model, making it both convenient and cost-effective.
- Advanced Search and Filters: Finding the perfect asset is made easy with Adobe Stock's advanced search and filtering options. You can refine your searches by keywords, image orientation, color, and more, saving you valuable time.
- Preview Watermarked Images: Adobe Stock allows you to preview watermarked versions of images and videos before making a purchase. This ensures you can evaluate the asset's suitability for your project without committing to a purchase upfront.
Step 1: Creating an Adobe ID
 Before you can start exploring and purchasing assets on Adobe Stock, you'll need to create an Adobe ID. This ID serves as your key to accessing Adobe's vast ecosystem of creative tools and resources. Follow these steps to create your Adobe ID:
- Visit the Adobe Sign-Up Page: Open your web browser and go to the Adobe sign-up page. You can find this page on the official Adobe website.
- Choose Your Plan: Adobe offers various plans, including free and paid options. Select the plan that best suits your needs. If you're new to Adobe, consider starting with a free plan to get a feel for the platform.
- Enter Your Information: Fill out the required information, including your name, email address, and password. Make sure to choose a strong password that combines letters, numbers, and special characters for security.
- Verify Your Email: After submitting your information, Adobe will send a verification email to the address you provided. Check your inbox and click on the verification link to confirm your email.
- Complete Your Profile: Once your email is verified, you can complete your profile by adding additional details such as your location, job title, and company information. This step is optional but can help tailor your Adobe experience.
- Agree to Terms and Conditions: Read and accept Adobe's terms and conditions. Make sure to review their privacy policy as well to understand how your data will be used.
- Confirmation and Access: After completing the registration process, you'll receive confirmation that your Adobe ID has been created. You can now use this ID to log in to Adobe Stock and other Adobe services.
Also Read This: Top 5 Reverse Image Search Tools of 2025
Step 2: Browsing Adobe Stock
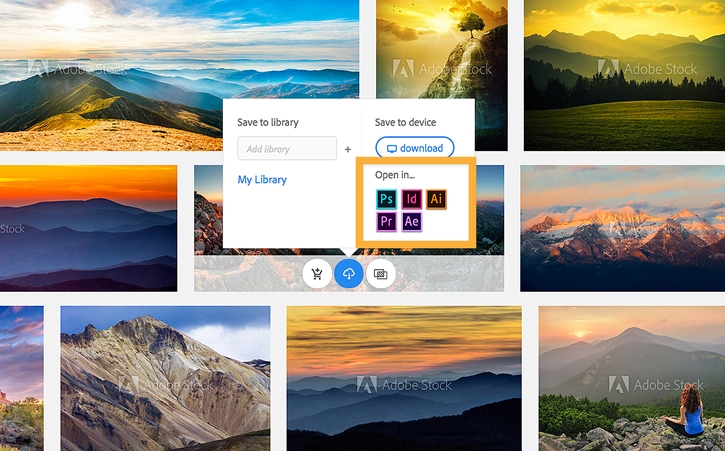
Now that you have your Adobe ID set up, it's time to dive into the vast world of Adobe Stock and start exploring the impressive collection of visual assets. Here's how to browse Adobe Stock effectively:- Access Adobe Stock: Log in to your Adobe account, and from the Adobe Stock website's homepage, you can begin your search. You can also access Adobe Stock directly from Adobe Creative Cloud applications, making it even more convenient for creative professionals.
- Explore Categories: Adobe Stock organizes its assets into various categories, such as Photography, Illustrations, Videos, and 3D. Click on the category that aligns with your project to narrow down your search.
- Use Keywords: In the search bar, enter relevant keywords related to the type of asset you're looking for. Be specific with your keywords to refine your search results. For example, if you need a "sunset beach photo," type in those exact words.
- Apply Filters: Refine your search further by using filters. You can filter results by orientation, color, and more to find assets that best fit your project's requirements. Filters help you save time by eliminating irrelevant options.
- View Asset Previews: Browse through the search results and click on an asset to view a larger preview. This allows you to inspect the asset closely before making a decision. Keep in mind that watermarked previews are used for non-licensed assets.
- Check Asset Details: Click on an asset's preview to access its details page. Here, you can find information about the asset's resolution, licensing options, and pricing. Review these details to ensure the asset meets your project's specifications.
- Save Favorites: If you find assets that you might want to use in the future, consider adding them to your favorites or collections. This feature makes it easy to keep track of potential choices for your projects.
- Download or License: Once you've found the perfect asset, you have two options: you can either purchase a license for it or download a watermarked preview to test it in your project. To license an asset, click on the "License" button and follow the prompts.
Also Read This: illustrator how to embed images
Step 3: Selecting and Customizing Assets
Now that you've explored the extensive offerings on Adobe Stock, it's time to narrow down your choices and customize selected assets to fit your project perfectly. Follow these steps to efficiently select and customize assets:- Click on Your Desired Asset: From the search results or your favorites, click on the asset you want to use. This will take you to the asset's details page.
- Review Licensing Options: On the details page, carefully review the licensing options available for the asset. Adobe Stock offers various licensing models, including standard and extended licenses. Choose the one that aligns with your intended use of the asset.
- Customize Size and Resolution: Select the size and resolution that best suits your project. Adobe Stock provides options for different sizes, ensuring you get the level of detail required for your specific application.
- Choose Licensing Type: Determine whether you need a standard license for regular use or an extended license for more extensive applications, such as merchandise or large print runs. The licensing type affects the ways in which you can use the asset.
- Add to Cart: After customizing the asset to your specifications, click on the "Add to Cart" button. This action adds the selected asset to your shopping cart, and you can continue browsing for more assets if needed.
- Review Your Cart: Once you've added all desired assets to your cart, review its contents. Ensure that the selected assets, sizes, and licensing options are correct before proceeding to the checkout stage.
- Continue to Checkout: Click on the "Checkout" button to proceed with the payment process. You may be prompted to log in again for security purposes if you haven't done so recently.
- Provide Payment Information: Enter your payment details securely. Adobe Stock accepts various payment methods, making it convenient for users around the world. Review your order total before finalizing the payment.
Also Read This: Discover How to Vectorize an Image on Shutterstock
Step 4: Adding to Cart
After selecting and customizing the assets you need for your project, the next step is to add them to your shopping cart on Adobe Stock. This step is crucial before proceeding with the checkout process. Here's how to add assets to your cart:- Review Your Selection: Before adding an asset to your cart, take a moment to review your choices. Make sure you have the correct licensing type, size, and any customizations you've applied.
- Click "Add to Cart": Once you are confident in your selection, click the "Add to Cart" button located on the asset's details page. This action will place the asset in your shopping cart.
- Continue Shopping: If you need more assets, you can continue browsing Adobe Stock and adding them to your cart following the same process. Adobe Stock makes it easy to build a collection of visuals for your project.
- Access Your Cart: To view and manage your cart, click on the shopping cart icon typically found in the upper-right corner of the Adobe Stock website. This will take you to your cart page.
- Review Your Cart: On the cart page, you will see a summary of all the assets you've added. Double-check that everything is correct, including licensing types and quantities.
- Proceed to Checkout: When you are ready to purchase the assets in your cart, click the "Proceed to Checkout" or similar button. This will initiate the payment process.
Quantity and Licensing
Keep in mind that you can adjust the quantity of each asset in your cart if you need multiple licenses of the same asset. Ensure that you've selected the appropriate licensing type for each asset to comply with usage rights and restrictions.Adobe Stock offers a straightforward and user-friendly cart management system, allowing you to make last-minute adjustments and confirm your selections before proceeding with the purchase.Adding Promo Codes or Credits
If you have a promo code or Adobe Stock credits, you can apply them during the checkout process to receive discounts or cover the cost of your purchase. Look for the option to enter promo codes or apply credits when reviewing your cart.Once you've successfully added the desired assets to your cart, reviewed your selections, and made any necessary adjustments, you're ready to proceed with the final step of the process: Step 5, Payment and Checkout. Completing this step ensures you can access and use your selected Adobe Stock assets for your creative projects.10 Proven Ways to Make Money Online:1. Freelancing: 2. Affiliate Marketing: 3. Blogging and Content Creation: 4. Courses & Ebooks: 5. E-commerce & Dropshipping: 6. Stock Photography and Art: 7. Virtual Assistance: 8. Online Surveys : 9. Investing: 10. Social Media Influencing: pic.twitter.com/YK5zY60pYR
— Adii Digital Marketing (@adii_digital) September 26, 2023
Also Read This: How to Make Your YouTube Videos Longer and Increase Viewer Engagement
Step 5: Payment and Checkout
Once you've added your desired assets to your cart, the final step in acquiring Adobe Stock assets is the payment and checkout process. This step ensures you can legally use the selected assets in your projects. Here's how to complete payment and checkout:- Review Your Cart: Before proceeding, take a moment to review the contents of your cart. Ensure that you've selected the correct assets, licensing types, and quantities. Make any necessary adjustments if needed.
- Proceed to Checkout: Once you are satisfied with your cart, click the "Proceed to Checkout" or similar button to initiate the checkout process. This will take you to the payment page.
- Choose Payment Method: Adobe Stock offers various payment methods, including credit or debit cards and PayPal. Select your preferred payment method from the available options.
- Enter Payment Details: Provide the required payment details, including card information or PayPal credentials. Adobe ensures secure payment processing to protect your financial data.
- Review and Confirm: Before finalizing your payment, review the summary of your order, including the total cost. Verify that all information is accurate, and if you have a promo code or credits, ensure they are applied.
- Complete the Purchase: Once you've reviewed and confirmed your order details, click the "Complete Purchase" or similar button to proceed. Adobe Stock will process your payment and provide you with a confirmation of your purchase.
Invoice and Receipt
After completing the payment, Adobe Stock will generate an invoice and provide you with a receipt for your purchase. These documents serve as proof of licensing and can be helpful for accounting or legal purposes.Accessing Your Licensed Assets
Upon successful payment, you will gain immediate access to the licensed assets. You can download the high-resolution, non-watermarked versions directly from your Adobe Stock account. These assets are now ready for use in your creative projects.License Agreement
It's important to note that when you purchase assets from Adobe Stock, you are bound by the Adobe Stock license agreement. Be sure to review and understand the terms and conditions of use to ensure compliance with licensing restrictions and permissions.With the completion of the payment and checkout process, you've successfully licensed and acquired Adobe Stock assets for your creative endeavors. Whether you're designing a website, crafting marketing materials, or working on other projects, these assets will enhance your visual content and help you achieve your creative goals.2. How do I access Adobe Stock?You can access Adobe Stock by visiting the Adobe Stock website directly or by using the integrated features within Adobe Creative Cloud applications. If you have an Adobe ID, you're ready to start browsing and licensing assets.3. What are the licensing options?Adobe Stock offers two main licensing options: Standard License and Extended License. The Standard License is suitable for most projects, including websites, blogs, and social media. The Extended License is required for certain commercial uses, such as merchandise for resale and larger distribution.4. Can I customize Adobe Stock assets?Yes, you can customize many Adobe Stock assets to fit your project's needs. You can use Adobe's built-in editing tools to crop images, adjust colors, and add text overlays, among other modifications.5. How do I make payments?Adobe Stock accepts various payment methods, including credit cards, debit cards, and PayPal. You can choose your preferred payment method during the checkout process.6. Do I need an Adobe ID to use Adobe Stock?Yes, you'll need to create an Adobe ID to access Adobe Stock and license assets. It's a straightforward process and allows you to manage your purchases and access other Adobe services.7. Can I use Adobe Stock assets in commercial projects?Yes, you can use Adobe Stock assets in commercial projects, provided you have the appropriate licensing, such as an Extended License for certain commercial uses. Always review the licensing terms for each asset to ensure compliance.8. What happens if I need to use an asset after my license has expired?If your license for an asset has expired, you will need to renew it to continue using the asset legally. Ensure that your licenses are up to date to avoid any legal issues.9. Can I download watermarked previews of assets before purchasing?Yes, you can download watermarked previews of assets to test them in your projects before making a purchase. This allows you to ensure the asset fits your needs before committing.10. How can I contact Adobe Stock support?You can reach Adobe Stock support through the Adobe Stock website, where you'll find contact options such as email and live chat support. They are available to assist with any questions or issues you may encounter while using the platform.Conclusion
Congratulations! You've reached the end of our step-by-step guide on how to buy Adobe Stock assets. We've covered everything you need to know to navigate the platform with confidence, from creating your Adobe ID to selecting, customizing, and purchasing high-quality visual assets for your creative projects.Here's a recap of the key points we've covered:- You've learned how to create an Adobe ID, which is your gateway to Adobe Stock and other Adobe services.
- We've explored the process of browsing Adobe Stock effectively, including using keywords, filters, and categories to find the perfect assets.
- You now know how to select and customize assets to align with your project's requirements, including choosing the right licensing type and size.
- We've covered the crucial step of adding selected assets to your cart, ensuring you have all your desired visuals in one place.
- Finally, you've completed the payment and checkout process, allowing you to legally use the licensed assets in your creative endeavors.
 admin
admin