Burning a CD in Windows 8 is a straightforward process that allows you to create your own music mixes, store important files, or backup data. Whether you're a tech-savvy individual or a complete beginner, you'll find that Windows 8 has made it relatively easy to handle this task. With just a few clicks, you can transfer files and audio onto a CD, making it a practical way to share or archive your favorite content. Let’s dive into the essentials you need to get started!
Requirements for Burning a CD
Before you can burn a CD, there are some essential requirements and preparations to ensure a smooth experience. Here’s what you’ll need:
- A Computer with Windows 8: Make sure you have a functioning PC running Windows 8. This is crucial because the instructions below are specific to this operating system.
- CD/DVD Drive: Your computer must have a drive that is capable of burning CDs. Most laptops and desktops come equipped with this, but it's good to double-check!
- Blank CD: Purchase a blank CD-R or CD-RW. CD-Rs are for one-time writing, while CD-RWs can be erased and reused. Decide which one suits your needs best!
- Files or Music to Burn: Have the specific files, music, or data you want to burn accessible on your computer. This could be your favorite songs, photos, or important documents.
- Windows Media Player or Similar Software: Windows 8 comes with Windows Media Player, which is a handy tool for burning audio CDs. If you prefer other software, make sure it’s installed on your system.
Once you've gathered everything listed above, you're ready to get started with the burning process. Remember, the quality of the CD also depends on the type of files and their formats, so it’s worth keeping that in mind as you prepare your content.
Everything set? Great! In the next section, we’ll walk through the step-by-step instructions to get your CD burning in no time! Stay tuned!
Also Read This: How to Download Videos from Dailymotion with Subtitles
3. Preparing Your Files for CD Burning
Before you start the burning process, it’s essential to have everything set up correctly. You don’t want to find out halfway through that you forgot a song or that your files are in the wrong format. Here’s how to get your files ready:
1. Choose Your Files: Decide what you want to include on your CD. This could be music tracks, audio files, or even data files if you’re burning a data CD. If you're making a music CD, here are some popular formats that will work:
- MP3
- WAV
- WMA
2. Organize Your Music: It’s helpful to keep your music organized. Create a dedicated folder on your computer where you’ll gather all your tracks. This makes it easier to select them later.
3. Check File Sizes: CDs typically hold up to 700 MB of data or about 80 minutes of audio. If you have a lot of files, you'll need to check their total size. You can do this by right-clicking on the folder you've created and selecting 'Properties'.
4. Ensure Compatibility: If you're burning a music CD that will be played in traditional CD players, ensure your formats are compatible. Stick to formats like MP3 or WAV for wider compatibility.
Once you have everything in one folder and you've checked the compatibility and size, you’re ready to move forward to the next step. This preparation will save you time and effort when you start burning your CD!
Also Read This: How to Download Dailymotion Videos into iPad: A Step-by-Step Guide
4. Using Windows Media Player to Burn a CD

Now that you’ve prepared your files, it’s time to turn your attention to Windows Media Player (WMP) — the built-in tool that makes CD burning a breeze. Here’s a step-by-step guide on how to use it:
1. Open Windows Media Player: You can find it by searching for "Windows Media Player" in the Start menu. Double-click to open the application.
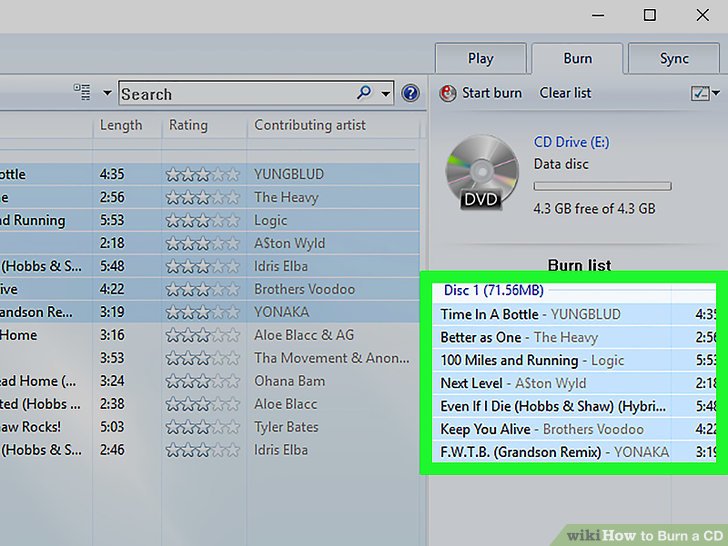
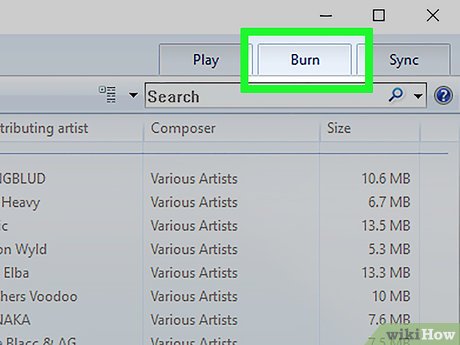
2. Switch to the Burn Tab: Once WMP is open, look for the ‘Burn’ tab on the right side of the window. Click on it to switch from the Library view to the Burn view.
3. Drag and Drop Your Files: Locate the folder with your prepared files in WMP’s Library section. Select the files you wish to burn, and simply drag them into the Burn List pane on the right. You can adjust the order of tracks here by clicking and dragging them up or down the list.
4. Choose Burn Settings: Before you start burning, it’s important to configure the burn settings:
- Click on the “Burn Options” dropdown (this looks like a small arrow next to the 'Start Burn' button).
- Select Audio CD if you want to play it in a CD player or Data CD if you want to store files.
5. Start Burning: Once you're happy with your selection and settings, click on the Start Burn button. Depending on the number and size of the files, this can take anywhere from a few minutes to half an hour.
6. Eject and Enjoy: When Windows Media Player finishes burning your CD, it'll notify you. You can then safely eject your CD and enjoy your new compilation!
And that's it! You’ve successfully burned a CD using Windows Media Player. With a little practice, you’ll find this process quick and straightforward, allowing you to create personalized music collections or backup important data in no time!
Also Read This: How to Install Universal Drivers in Windows XP for Better Performance
5. Alternative Methods for Burning a CD in Windows 8
If the built-in options in Windows 8 aren’t meeting your needs, there are several alternative methods for burning a CD that can give you more flexibility and control over the process. Here are a couple of popular options to consider:
- Third-Party Software: There are many reliable third-party applications designed for CD burning. Some of the most popular ones include:
- Nero Burning ROM: A long-standing favorite among users, it offers a wide range of features for files and audio CDs.
- CDBurnerXP: A free option that’s easy to use and great for both data and audio CDs.
- ImgBurn: This powerful tool is perfect if you need to create image files or burn them directly to CDs.
- Using Windows Media Player: This familiar tool is handy for burning audio CDs. Just follow these simple steps:
- Open Windows Media Player from your start menu.
- Select the "Burn" tab on the right side.
- Drag and drop your songs into the burn list.
- Insert a blank CD and click on "Start Burn" to begin.
Regardless of the method you choose, ensure your CD drive is functioning correctly and that you've inserted a blank CD capable of being burned. The choice of software or method comes down to your specific needs — whether you're creating music CDs, data backups, or ISO image files.
Also Read This: Ways to Prevent Ads on Dailymotion Expert Tips
6. Troubleshooting Common CD Burning Issues
Even with the best intentions, you might run into some common issues while trying to burn CDs in Windows 8. The good news is that most of these problems can be resolved with a little patience and troubleshooting. Here are some tips to help you tackle these challenges:
- Blank CDs Not Recognized: If your computer doesn’t recognize the blank CD, try the following:
- Check if the CD is damaged — scratches or dirt can prevent it from being read.
- Ensure that the CD drive is connected correctly and functioning. You can test it with another CD.
- Burn Process Fails: If the burn process abruptly stops or fails, consider these steps:
- Make sure you are not using overly full CDs. Regular CDs can typically hold about 700MB; if you're trying to exceed this, the process will fail.
- Check if your software is up to date or consider uninstalling and reinstalling it.
- Burned CD Won’t Play: If your CD burns successfully but doesn’t play in your CD player, check:
- Ensure you are using the correct format. For audio CDs, ensure you are burning in a format compatible with standard CD players.
- Try it on a different CD player to determine if the issue lies with the CD or the player.
In most cases, a little troubleshooting will go a long way. If these solutions don’t solve your problems, it might be worth consulting the help resources for your specific burning software or contact technical support. Burning a CD should be a smooth process, and with the right tools and knowledge, you'll be able to create your compilations with ease!
Conclusion and Final Tips for CD Burning in Windows 8
Burning a CD in Windows 8 can be a straightforward process if you follow the appropriate steps. Here are some final tips to ensure your CD burning experience is smooth and successful:
- Verify Data Before Burning: Always double-check the files you intend to burn. Make sure that you are including all necessary items and that they are in the correct format.
- Use High-Quality Discs: Invest in good-quality blank CDs to avoid issues such as skipping or data loss.
- Close Unused Applications: To ensure that your computer has enough resources, close any unnecessary applications while burning.
- Take Your Time: Do not rush the burning process. Allow the software to complete the task without interrupting it.
- Test Your CD: After burning, test the CD in multiple players to confirm that it works as expected.
If you run into any difficulties, consider checking the manufacturer's website for your CD-burning software or visiting relevant forums for troubleshooting advice. By following these guidelines, you can enhance your likelihood of creating a successful CD that meets your needs. Happy burning!
 admin
admin


