Your presentations can greatly benefit from blurry images. Thus, focus is on the content while distractions are minimized. If your message is cluttered with busy backgrounds or intricate details, then the best option to opt for would be a blurred image. In presentations where clarity and impact matter most this technique can be especially effective. If you master the art of blurring pictures effectively then you will improve the quality of your overall presentation as well as engage more with the audience.
Exploring the Benefits of Blurring Images in Presentations
Several advantages come when using blurry images in presentations:
- Improved Focus: Blurring backgrounds or secondary elements allows your audience to concentrate on key points.
- Visual Appeal: A soft blur can create a more aesthetically pleasing look, making your slides more attractive.
- Professional Look: Blurred images can give your presentation a polished and sophisticated appearance.
- Enhanced Clarity: Blurring helps reduce visual clutter, which can lead to better comprehension of your message.
On the whole, adding in fuzzy pictures could enhance your slides’ quality and make them more enduring to the listeners.
Steps to Blur Images in PowerPoint
Blurring visuals in PowerPoint is really easy to do. To obtain the desired effect, you should follow these steps:
- Open Your Presentation: Launch PowerPoint and open the presentation where you want to blur an image.
- Select the Image: Click on the image you wish to blur to highlight it.
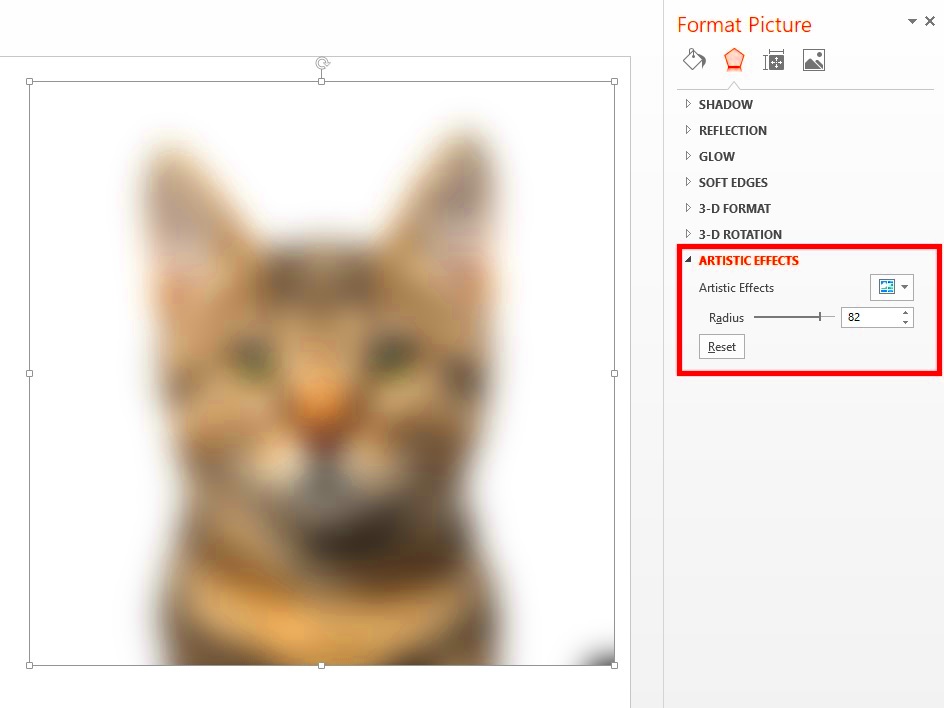
- Access the Format Picture Option: Right-click on the image and select “Format Picture” from the context menu.
- Navigate to Artistic Effects: In the Format Picture pane, find the “Artistic Effects” section.
- Choose Blur: Look for the blur effect and click on it. You can adjust the intensity using the slider.
- Apply Changes: Once satisfied with the blur effect, click “Close” to apply the changes.
A blurred image, now its focus and appeal are heightened towards your presentation!
Using the Format Picture Option to Blur Images
In PowerPoint, the Format Picture option is an amazing tool that can help you easily edit and enhance images. Blurring of pictures is one of its remarkable features and it helps in making high-quality presentations. With just a few simple steps, you can swiftly change a regular image to match your ideas better. Here’s how you can effectively use the Format Picture option:
- Select the Image: Click on the image you want to blur in your PowerPoint slide.
- Right-Click: Right-click on the selected image to bring up the context menu.
- Choose Format Picture: From the menu, select “Format Picture.” This will open a pane on the right side of your screen.
- Explore Options: In the Format Picture pane, you’ll find various editing tools. Look for the “Artistic Effects” section.
- Adjust the Blur: Click on “Blur” to apply the effect. You can tweak the blur intensity to suit your design needs.
- Finalize Changes: Once you’re happy with the blur effect, simply click anywhere outside the pane to close it.
The Format Picture option allows various modifications to be done which include, but are not limited to blurring, making your pictures integrate perfectly in the style of your presentation.
Applying Artistic Effects for Blurring Images
Blurring is one of the most effective techniques that you can use to enhance your images creatively with artistic effects in PowerPoint. With these effects, you can add depth and interest to your slides, thus making it easier for people to understand what you are saying. To apply artistic effects for blurring, follow these steps:
- Insert Your Image: Start by adding an image to your slide if you haven’t already.
- Select the Image: Click on the image to highlight it.
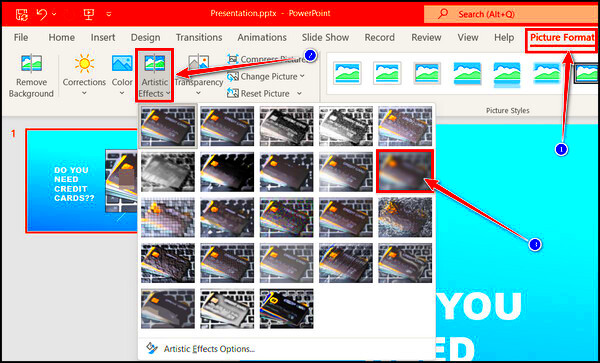
- Access Artistic Effects: Go to the “Picture Format” tab in the ribbon at the top of the window.
- Choose Artistic Effects: Click on the “Artistic Effects” dropdown to see various options.
- Apply Blur: Select the “Blur” effect from the list. You can adjust the level of blur to match your preferences.
By applying creative touch; you may shape screws of emotions in your presentation hence making whatever you want to talk about so more appealing and knife-edge than ever.
Tips for Achieving the Best Blur Effects
As you've ever imagined how to make your presentation better, there's always an option of blurring images. It just that achieving the right blur effect calls for some skills. So how do you do it? Here are tips for getting the best blur effects:
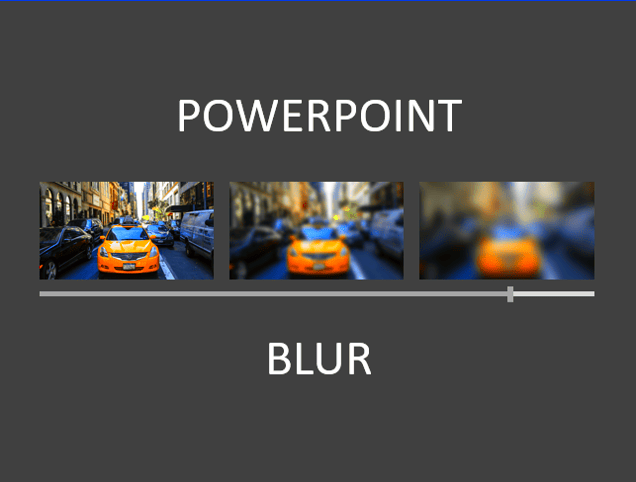
- Use Subtle Blurs: A slight blur often works better than an extreme one. Aim for subtlety to keep the focus on your main content.
- Consider Image Context: Ensure that the blurred image still relates to the overall theme of your presentation. It should enhance, not confuse.
- Experiment with Different Levels: Don’t hesitate to play with the blur intensity. Sometimes a softer blur works wonders, while other times a stronger blur is needed.
- Preview Your Slide: Always preview your slide after applying the blur. This helps you see how the image fits with the text and other elements on the slide.
- Keep a Consistent Style: If you blur images in one part of your presentation, try to maintain that style throughout for a cohesive look.
Using these guidelines, you can utilize blur effects properly hence ensuring that your presentation do not only appear good but also easy to understand and captivating.
Common Mistakes to Avoid When Blurring Images
Doing things wrong when using image blurring features in PowerPoint can lead to a bad presentation despite it enhancing the presentation. By eleminating these mistakes, one can come up with a well-polished slide. Some of them include:
- Over-Blurring: One of the biggest mistakes is applying too much blur. A heavy blur can make your images unrecognizable and distract from your message. Aim for a subtle effect instead.
- Lack of Focus: Blurring images without a clear purpose can lead to confusion. Make sure the blurred areas are intended to minimize distractions from your main content.
- Ignoring Image Quality: Using low-quality images and then blurring them can result in a pixelated mess. Always start with high-resolution images for the best results.
- Inconsistent Styles: Using different levels of blur across slides can create a disjointed presentation. Strive for consistency in your design choices.
- Neglecting Text Readability: Ensure that any text over a blurred image is still readable. Adjust the image blur or text color to maintain clarity.
Focusing on these typical blunders can guard against the negative impact of blurred pictures on your presentation instead of helping to improve it.
FAQs about Blurring Images in PowerPoint
Do you have inquiries about image blur in Microsoft PowerPoint? You aren’t the only one! Here are frequently asked questions that might simplify your understanding of the process:
- Can I blur multiple images at once? No, PowerPoint requires you to select and blur each image individually.
- Is there a way to revert changes? Yes! You can undo changes by pressing Ctrl + Z immediately after applying the blur.
- Can I adjust the blur intensity after applying it? Absolutely! Just select the image again and go back to the Format Picture options to tweak the blur.
- Does blurring affect image quality? Blurring itself won't lower quality, but using a low-resolution image will still result in poor clarity.
- Are there alternative methods to blur images? Yes, you can also use third-party tools to blur images before inserting them into PowerPoint.
If you want help, go through some common problems here in this FAQ section and more about PowerPoint.
 admin
admin


