When you need to enlarge an image for a poster or print, maintaining its quality is essential. A pixelated or blurry image can ruin the professional look of any print material. Fortunately, there are ways to blow up images without losing too much detail, so they remain sharp and clear, even at larger sizes. In this guide, we'll walk you through the key aspects of
Understanding Image Resolution and Quality
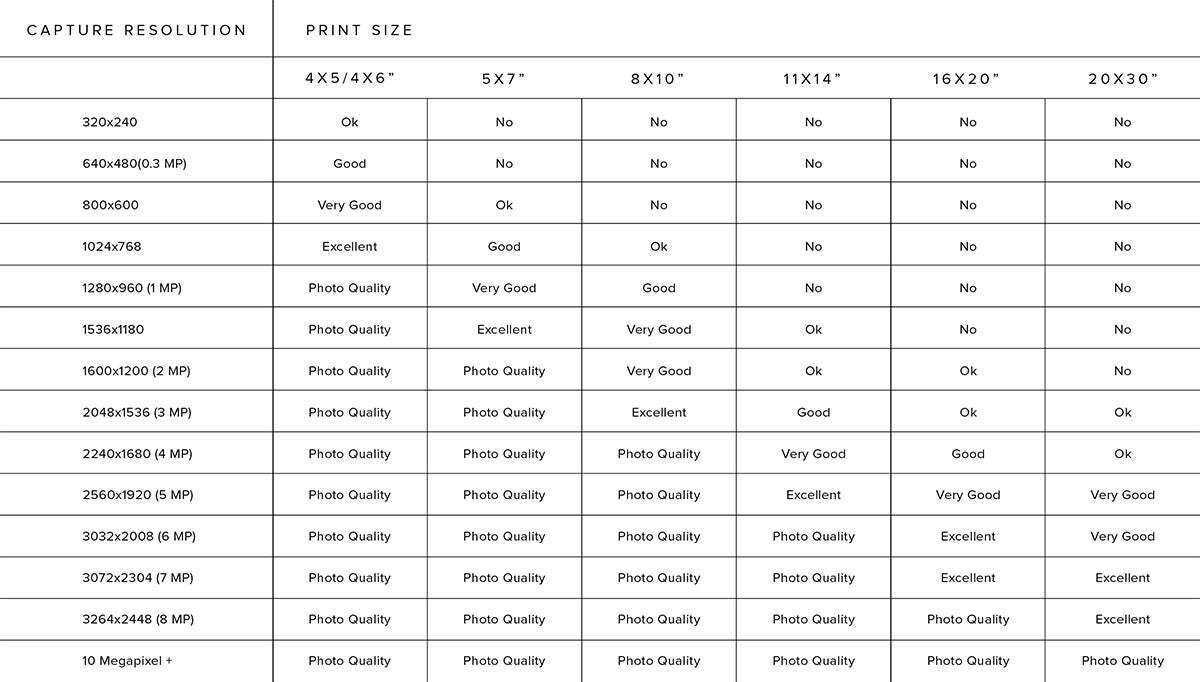
Before you start enlarging an image, it’s important to understand what resolution is and how it affects image quality. Resolution refers to the amount of detail an
Here are some key points to keep in mind:
- Low-resolution images: Often start at 72 PPI, suitable for web use but not ideal for printing.
- High-resolution images: Typically have 300 PPI, which is great for prints and posters.
- Upscaling: Increasing the resolution of an image can sometimes result in a loss of sharpness if not done carefully.
For high-quality prints, aim for an image resolution of at least 300 PPI, especially when you are scaling up for large prints like posters.
Also Read This: Converting 2D Images to 3D: Simple Steps
How Image Resizing Affects Quality
Resizing an image can have a significant impact on its quality, especially when it’s enlarged. When you stretch an image, you’re essentially making each pixel larger, which can cause a loss in detail. This is especially true for images with low initial resolution. The quality of an
Here are some common effects of image resizing:
- Pixelation: Enlarging an image too much can cause it to appear blocky, where individual pixels become visible.
- Loss of sharpness: A larger image may look blurry or soft if it wasn’t resized with care.
- Artifacts: Stretching an image can create unnatural distortions or visual errors, especially if you don’t use the right software.
To avoid these issues, using software or online tools that apply sophisticated algorithms to maintain quality while resizing can help. Advanced tools often employ methods like interpolation to add more pixels to the image, which improves the quality during resizing.
Also Read This: Guide to Accessing Adobe Stock Images
Best Practices for Enlarging Images for Prints
When you're enlarging images for prints, there are some key best practices that can help maintain the image quality. Whether you're preparing artwork for posters, banners, or any large-scale print, following these tips will ensure your image remains sharp, clear, and professional-looking.
Here are some essential tips to keep in mind when enlarging your images:
- Start with a High-Resolution Image: The higher the resolution, the better the quality will be when enlarged. Images with at least 300 PPI (pixels per inch) are ideal for printing. Low-resolution images will likely look pixelated when enlarged.
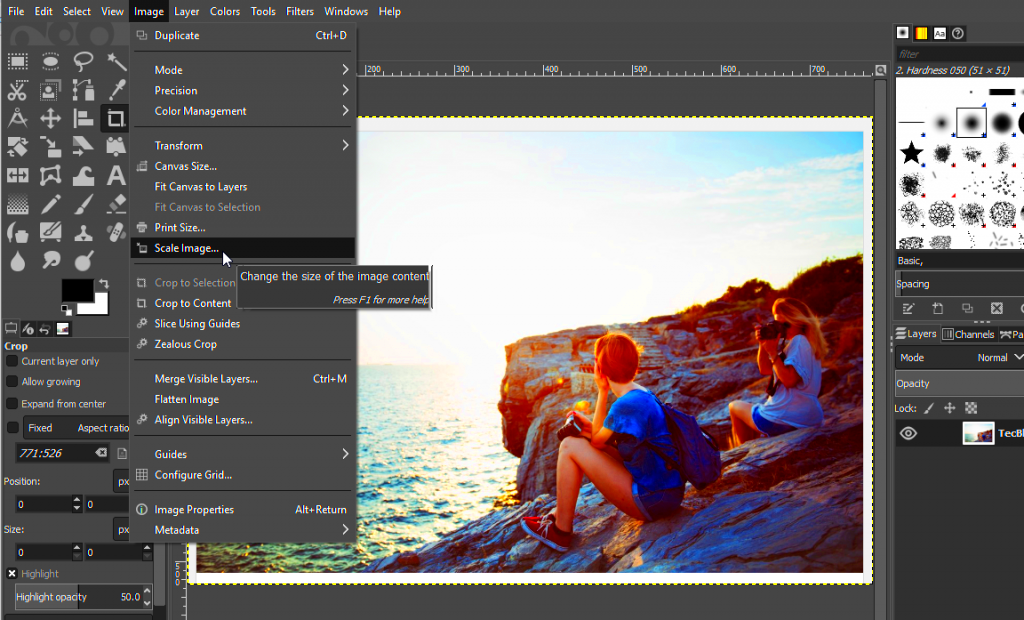
- Use the Right Software: Choose image editing software with advanced resizing tools. Software like Adobe Photoshop or GIMP can help you enlarge images with minimal quality loss by using algorithms that add pixels instead of just stretching the existing ones.
- Preserve the Aspect Ratio: Always maintain the image's original proportions while enlarging it. Stretching it disproportionately can cause distortion, making the image look unnatural.
- Enlarge Gradually: Instead of making one massive size increase, try enlarging your image in smaller steps. This process can help reduce the risk of pixelation and blurriness.
- Test Print: Before printing a large poster or banner, do a test print on a smaller scale to check for any loss in quality.
By following these best practices, you can ensure that your enlarged image remains high quality and looks great in any print format.
Also Read This: how to turn on adobe stock with lightroom
Using Software and Tools to Blow Up an Image
Using the right software and tools to enlarge your image is crucial to maintaining its quality. While there are several programs available, it’s important to choose one that uses advanced algorithms to scale up the image without distorting its detail.
Here are some popular software tools to help you blow up an image effectively:
- Adobe Photoshop: Photoshop is one of the best tools for image resizing. It offers the 'Preserve Details 2.0' option, which helps reduce blur and noise while enlarging the image.
- GIMP: A free, open-source image editing program that can also help resize images without compromising on quality. It offers similar features to Photoshop but with a slightly steeper learning curve.
- Topaz Gigapixel AI: This software uses artificial intelligence to increase the resolution of your images while preserving fine details. It's great for both photography and artwork.
- ON1 Resize: A powerful tool for enlarging images, ON1 Resize uses a patented algorithm called Genuine Fractals to increase image size without losing sharpness or adding visible pixelation.
When using any of these tools, remember to work with high-resolution files and choose the best algorithm for enlarging images. With the right software, you can preserve image quality while enlarging it for large prints.
Also Read This: Finding Your Adobe Stock Images Made Simple
Online Tools for Image Enlargement
If you don't want to install heavy software or pay for expensive programs, online tools can also help you enlarge images. Many of these tools offer basic resizing features for free and are easy to use, making them a great option for those looking to quickly blow up images for prints without losing quality.
Here are some top online tools for enlarging images:
- Let’s Enhance: This online tool uses AI technology to upscale images while preserving details and minimizing quality loss. It’s user-friendly and provides great results for enlarging images for printing.
- Pixlr: Pixlr is an online image editor that includes resizing options. While not as advanced as desktop software, it’s simple to use and can be useful for minor enlargements.
- Fotor: Fotor offers online image editing tools, including resizing. It's free to use and can help you enlarge an image, but be mindful of the file size limit for free accounts.
- Waifu2x: Waifu2x is a great online tool for upscaling images, particularly useful for anime-style or digital art. It uses a deep convolutional neural network to enhance images while reducing noise and preserving details.
These online tools are convenient for quick tasks and can produce good results when enlarging images for prints. However, for larger-scale projects, desktop software may offer more control and advanced features. Regardless of the tool you choose, always ensure that the final image meets the necessary resolution for high-quality prints.
Also Read This: Understanding Vector Images – A Complete Guide to What They Are
Common Mistakes to Avoid When Enlarging Images
Enlarging an image for prints can be tricky, especially if you're new to the process. While resizing, it's easy to make a few common mistakes that can affect the final quality of your image. These errors often result in pixelation, distortion, or blurry prints. Let’s take a look at some of the most frequent mistakes and how to avoid them.
Here are some key mistakes to steer clear of:
- Enlarging Low-Resolution Images: One of the biggest mistakes is enlarging images with low resolution. Images with less than 300 PPI (pixels per inch) will become blurry and pixelated when scaled up, making them unsuitable for high-quality prints.
- Ignoring Aspect Ratio: Stretching an image without maintaining its aspect ratio (the proportional relationship between width and height) can lead to distortion. The image may appear squished or stretched unnaturally.
- Not Using Proper Software: Relying on basic photo editors or resizing tools that don’t use advanced algorithms can result in poor-quality enlargements. Using tools like Adobe Photoshop or Topaz Gigapixel AI will help preserve detail.
- Over-Enlarging: Trying to blow up an image too much can quickly degrade its quality. It’s better to enlarge gradually in smaller steps to prevent pixelation and blurriness.
- Not Checking the Print Size: Always ensure the resolution and file size match the intended print size. A large file that works well on a screen may not print well if its resolution is too low for the desired print dimensions.
By avoiding these common mistakes, you can achieve better results when enlarging images for print purposes, ensuring high-quality, professional-looking prints.
Also Read This: How to Earn Money from Adobe Stock Photos
How to Check the Quality of Enlarged Images
Once you've enlarged an image, it’s essential to check its quality before moving forward with printing. The final quality depends on how well the resizing process was done and whether the image retains enough detail and sharpness. There are a few simple steps to help you evaluate your image’s quality.
Here’s how you can check the quality of an enlarged image:
- Zoom In: Zoom in on the image to examine its details closely. Look for signs of pixelation (visible squares) or blurriness. A high-quality image should remain sharp even when zoomed in.
- Print a Test Image: Print a small section of the image at full size to check for any quality loss. A test print allows you to see if the enlarged image maintains sharpness and clarity when scaled to its full size.
- Check for Artifacts: Artifacts are unwanted visual distortions, such as jagged edges, halo effects, or noise. These may appear if the image was enlarged improperly. Tools like Photoshop’s ‘Smart Sharpen’ can help you correct some of these issues.
- Use a Print Size Calculator: There are online tools available that can help you calculate the ideal resolution for your print size. Make sure your image’s resolution meets the recommended DPI for high-quality prints.
- Seek Expert Feedback: If you're unsure about the image's quality, getting a second opinion from a professional designer or print specialist can help you make a more informed decision.
By performing these checks, you can ensure your enlarged image will look great when printed, with crisp detail and vibrant colors.
Also Read This: Creating Text-Filled Images for a Unique Effect
Frequently Asked Questions
Enlarging images for posters, prints, or other large formats can bring up a lot of questions. Below are some of the most frequently asked questions to help you better understand the image enlargement process and how to achieve the best results.
- What’s the best resolution for a print image?
For high-quality prints, aim for at least 300 PPI (pixels per inch). This ensures your image will appear sharp and clear when printed at larger sizes. For posters and banners, you might get away with slightly lower resolutions (around 150 PPI), but the higher, the better.
- Can I enlarge an image without losing quality?
Yes, you can enlarge an image without losing much quality, but it depends on the software you use and the original resolution of the image. Using advanced tools like Photoshop or AI-based programs like Topaz Gigapixel AI can help preserve quality while enlarging.
- How much can I enlarge an image?
The extent to which you can enlarge an image depends on its original resolution. For example, an image with 300 PPI can typically be enlarged to print posters without significant quality loss. But if the image’s resolution is low, enlarging it too much will result in pixelation.
- Are there any free tools for enlarging images?
Yes, there are several free online tools that can help enlarge images, such as Let’s Enhance, Pixlr, and Fotor. These tools might not have the advanced features of paid software but can still offer decent results for basic enlargements.
- Why does my enlarged image look blurry?
If your enlarged image appears blurry, it may be due to enlarging a low-resolution image or using software that doesn’t use proper algorithms for resizing. To fix this, use software that specializes in image upscaling, such as Photoshop or Topaz Gigapixel AI.
Conclusion: How to Successfully Blow Up Images Without Losing Quality
Enlarging images for prints or posters without sacrificing quality is entirely possible when you follow the right steps. The key is to start with a high-resolution image, use the proper tools, and take care during the resizing process. By avoiding common mistakes like stretching low-resolution images and choosing the best software or online tool for the job, you can maintain the sharpness and clarity of your enlarged images. Additionally, testing your resized image with a print preview can help ensure that it looks great at full size.
Remember to check the quality at different zoom levels and make adjustments as necessary to reduce pixelation or blurriness. Whether you're enlarging images for business, art, or personal projects, applying the techniques and tips shared in this guide will allow you to blow up your images confidently while preserving their quality.
