
An incredible way of creating a larger and seamless image using multiple projectors is by projector blending. Understanding how to blend projectors can take your visuals to the very next level whether you are preparing for an event, art installation or business presentation. It involves meticulous alignment and configuration so that the projected images overlap perfectly without any visible seams.”; Allow us now to focus on the basic elements of projector blending.
Preparing Your Setup for Blending
Proper preparation is compulsory before the blending of projectors, as follows:
- Choose the Right Environment: Select a dark room with minimal ambient light. This helps in achieving better image quality.
- Clear the Projection Surface: Ensure your wall or screen is smooth and clean. Any imperfections can affect the final image.
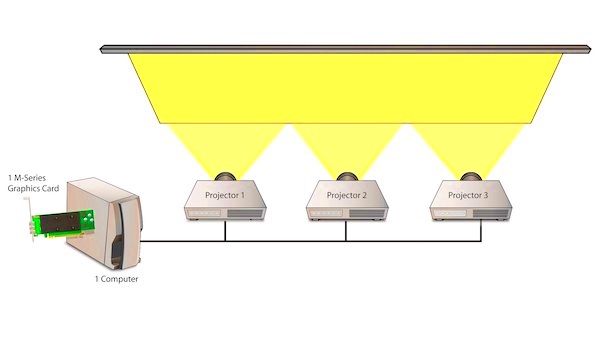
- Set Up Your Projectors: Position the projectors so they can cover the intended area. Use adjustable mounts for precise placement.
- Consider Your Source: Make sure you have a reliable source for your content. This could be a computer or media player connected to all projectors.
Also Read This: How to Search for Keyed Images on Getty Efficient Methods for Finding Photos
Selecting the Right Projectors
Choosing the right projector is one of the major determinants of how well your blending project will perform. Some considerations include:
- Brightness: Look for projectors with a high lumen count, especially if your setup isn’t in complete darkness.
- Resolution: Choose projectors with the same resolution for consistent image quality across the blended area.
- Lens Options: Consider projectors with interchangeable lenses. This gives you more flexibility in how you set them up.
- Edge Blending Features: Some projectors come with built-in edge blending capabilities, making the process easier.
It's good to test your projectors before choosing them. Set up the projectors in your intended space to see how they interact. Such a practical step will help you decide on your equipment wisely.
Also Read This: The Best Camera Gear for Travel Photography
Configuring Projector Settings for Seamless Blending
Having set up your projectors, the subsequent step will be to adjust their settings in order to create a smooth transition. This is very important as no matter how good the projectors are it is possible for them to fail if they are not properly adjusted. Below is a guide on ways you can start up your projector configurations:
- Adjust Brightness and Contrast: Start by matching the brightness and contrast levels of all your projectors. This will help eliminate any noticeable differences in lighting across the blended image.
- Set the Same Color Profile: Ensure that each projector uses the same color settings. This includes adjustments for hue, saturation, and gamma. Consistency in color is vital for a natural-looking blend.
- Align the Edges: Use the projector’s lens shift and keystone correction features to align the images accurately. The goal is to create a uniform edge where the images meet.
- Test with Test Patterns: Use test patterns to help with alignment. These patterns often have lines or grids that can highlight misalignment.
Carefully setting up each projector will greatly improve the overall blending quality. This may require several attempts to achieve perfection but remain calm during the task!
Also Read This: What is the Use of ShareChat App? All You Need to Know
Using Software to Enhance Blending
Blending projectors could be changed forever with the introduction of software. It also assists with projector configuration and doing other adjustments that can improve output quality. You can make use of this software in the following ways:
- Calibration Tools: Use software like Resolume, MadMapper, or LightJams to calibrate your projectors. These tools offer advanced features for edge blending and warping.
- Live Adjustments: Software allows for live adjustments during presentations. This means you can tweak settings on the fly based on the audience’s feedback.
- Content Management: Many software options enable you to manage content across multiple projectors. You can synchronize playback, ensuring everything runs smoothly.
- Built-in Effects: Some programs come with built-in effects and transitions that can enhance the overall visual experience.
You are equipped with knowledge based until October 2023. Investing in good software can ease the whole blending process besides raising the standard of your presentations. It’s worthwhile trying out a number of options as you search for the right one that suits you.
Also Read This: Cropping an Image in Photoshop Without Affecting the Background
Testing and Adjusting the Blended Image
Following the installation of your projectors and the editing of their parameters, it is now time for the blended image testing and adjustment. It is crucial to ensure that everything appears flawless before presenting it finally. Here’s a guideline for achieving this:
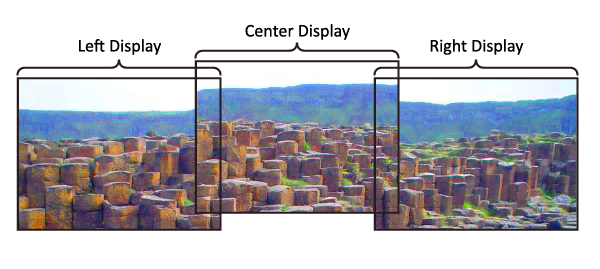
- Initial Test: Start by projecting a test image or video that covers the entire blended area. This will give you an overall view of how well the projectors are blending.
- Check for Seam Visibility: Look closely at the edges where the images meet. If you see any seams, you may need to adjust the settings or reposition the projectors.
- Adjust Color and Brightness: Based on your initial test, make any necessary adjustments to brightness and color settings to achieve a uniform look.
- Gather Feedback: If possible, get input from others. A fresh pair of eyes can catch issues you might overlook.
- Final Adjustments: After testing and gathering feedback, make your final adjustments. This might involve minor tweaks to alignment or color settings.
Calibrating and fine-tuning your hybrid composition can help you achieve good tonal balance and visual coherence. The time and energy spent on it will surely be reflected in the outcome!
Also Read This: Integrating Instagram with Your Behance Portfolio
Common Issues and Troubleshooting Tips
A lot could go wrong with even the most adequately organized projector blending systems. So whether you are a novice or a pro, it is important that you learn how to diagnose frequent problems so as not to waste time and energy. Here is a summary of some usual issues and their solutions:
- Visible Seams: If you notice seams where the images overlap, check the alignment of your projectors. Adjust the lens shift and keystone settings to improve alignment.
- Color Mismatch: When projectors display different colors, revisit your color settings. Ensure each projector uses the same color profile and adjust brightness and contrast to match.
- Image Distortion: Distortion can occur if projectors are not at the same angle. Use lens shift and keystone adjustments to correct any skewed images.
- Flickering Images: If your images flicker, check the connection cables. Loose or damaged cables can disrupt the signal, so make sure everything is secure and in good condition.
- Low Brightness: If the blended image looks dull, consider increasing the brightness on your projectors or using more powerful models.
It’s also important to realize that when problems continue even after applying certain suggestions, they should be looked at again. So take things step by step, and don’t rush through these processes; sometimes it’s helpful to backtrack especially if it seems like there is no hope. And with enough practice and perseverance, soon enough you’ll be mixing just like an expert!
Also Read This: Learn How to Upload Pics to Shutterstock
FAQs About Blending Projectors
For, really, I see multich - projectors causing a lot of enigmas particularly on those who have just come into this kind of art. To follow are the common concerns that people usually ask:
- What is projector blending? Projector blending is the technique of combining images from multiple projectors to create a larger, seamless image.
- Can I blend projectors of different brands? Yes, but it’s important to ensure they have similar specifications, especially in brightness and resolution, to achieve the best results.
- How do I choose the right software for blending? Look for software that supports edge blending and calibration features. Popular options include Resolume, MadMapper, and ArKaos.
- What type of surface is best for projection? A smooth, white surface or a high-quality projection screen works best. Avoid surfaces with textures that can distort the image.
- Can I use this technique for outdoor events? Yes, but ensure you have enough brightness and control over ambient light to maintain image quality.
The blending process can be clarified by these FAQs. Feel free to contact the community or refer to the product manuals if you have additional inquiries!
Conclusion on Blending Projectors Effectively
Presentations are always better with blended projectors that can add an extra show to it and make it more captivating to the audience. Every single process plays a big part in the outcome, ranging from learning how to do the techniques and adjustment of the instruments. Take enough time during setup and testing of the projectors. It won’t take long before you realize that patience and perseverance will result into amazing pictures woven as one which will make all your presentations or events great.
To conclude, here are the key points of effective blending:
- Choosing the right projectors and setup.
- Configuring settings for optimal performance.
- Utilizing software tools to enhance the blending process.
- Regularly testing and adjusting to ensure quality.
You know, as you experience, the projectors will not only enhance your visuals but also make your presentation feel more professional. Have fun projecting!
 admin
admin


