Nail painting is an art form that can elevate your style and boost your confidence. Whether you're prepping for a special occasion or just indulging in some self-care at home, applying nail paint neatly can make all the difference. But let's face it: achieving that flawless finish isn't always easy. With a few handy tips and tricks, you can master the art of nail painting and say goodbye to smudges and messy edges. Ready to dive in? Let’s get started!
Essential Tools for Nail Painting
Before you start painting your nails, gathering the right tools can make a significant difference in achieving that clean, salon-quality finish. Here’s a list of essential tools you should have in your nail painting kit:
- Nail Polish: Choose high-quality nail polishes that are long-lasting and quick-drying. Brands like OPI or Essie are excellent choices.
- Nail File: A good nail file helps shape your nails and smooth out any rough edges. Emory board or glass files are preferred.
- Nail Buffer: Buffing your nails before painting helps the polish adhere better and gives a smooth finish.
- Base Coat: This provides a protective layer between your nails and the polish, preventing stains and extending wear.
- Top Coat: A shiny top coat adds a protective layer and enhances the longevity of your nail art.
- Cotton Balls/Pads: For cleaning up mistakes or removing old polish, cotton pads soaked in nail polish remover are a must.
- Nail Brush: A fine-tip brush can help you tidy up around the cuticles or fix any mistakes.
- Cuticle Oil: Keeping your cuticles moisturized gives a polished look and prevents hangnails.
- Manicure Stick: Also known as an orangewood stick, it helps in pushing back cuticles and cleaning up edges.
By having these tools on hand, you're setting yourself up for success in achieving that neat and tidy nail paint application. Happy painting!
Also Read This: How to Make a French Tail Step by Step on Dailymotion
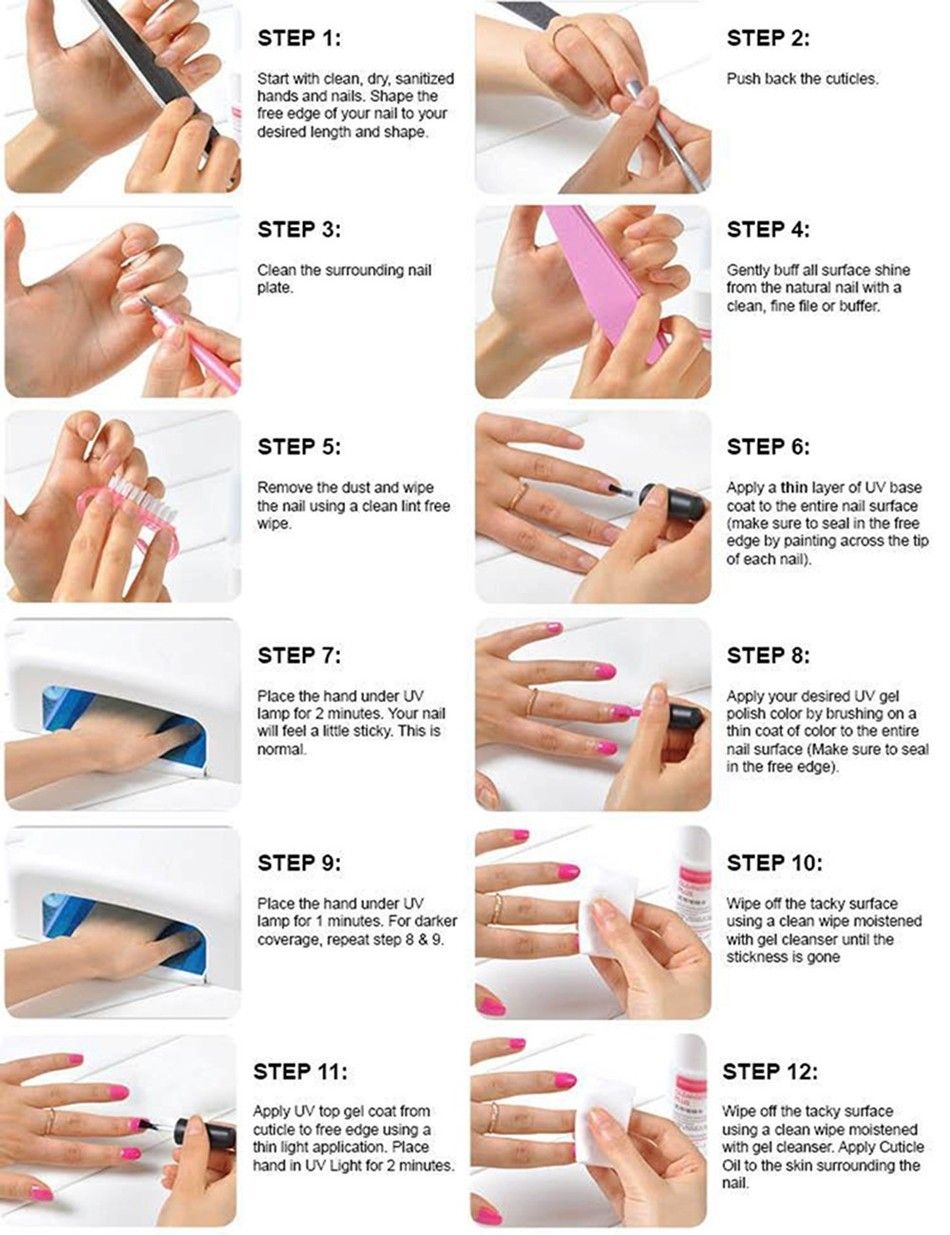
Preparing Your Nails
Before diving into the fun part of applying nail paint, it's essential to prepare your nails properly. This step not only ensures a smoother application but also enhances the longevity of your manicure. Here’s how to get your nails ready:
- Start with Clean Nails: Remove any old nail polish using a gentle remover. Make sure your nails are free from oils and debris.
- Shape and Buff: Use a nail file to shape your nails according to your preference—whether it’s square, oval, or almond-shaped. Remember to buff the surface lightly to create a smooth base.
- Moisturize: Apply a nail and cuticle oil, or even a good moisturizer to keep the skin around your nails hydrated. This prevents dryness and peeling.
- Base Coat: Applying a base coat is crucial. It not only protects your nails from staining but also helps the polish adhere better. Choose a base coat suitable for your nail type.
By following these steps, you set the stage for a flawless nail painting experience. Clean, well-prepared nails are the foundation of a beautiful manicure!
Also Read This: How to Watch Dailymotion Videos with Subtitles: Enable Captions for Better Viewing
Step-by-Step Nail Painting Process
Now that your nails are prepped, it’s time to get artistic! Follow this step-by-step guide to ensure a clean and professional-looking nail paint application:
- Choose Your Color: Pick a nail polish color that suits your mood or occasion. Shake the bottle well to ensure an even consistency.
- Apply the First Coat: Dip your brush into the polish, wiping excess off on the bottle rim. Start at the base of your nail and swipe towards the tip in three strokes—one down the center and one on each side.
- Wait for Drying: Allow the first coat to dry completely. This usually takes about 2-3 minutes, depending on the formula.
- Apply a Second Coat: Repeat the application process for a more vibrant color. Ensure it’s even and smooth.
- Clean Up Mistakes: Using a small brush dipped in nail polish remover, carefully clean up any excess polish around your nails for a professional finish.
- Top Coat: Finish with a clear top coat to seal your design and add shine. This also helps prevent chipping.
Voila! With these steps, you’ll achieve a neat and beautiful nail paint application that’s bound to impress. Happy painting!
Also Read This: How to Make Rings in Sheesha Crafting Tutorial on Dailymotion
Common Mistakes to Avoid
Applying nail paint can be a fun and creative process, but there are several common mistakes that can lead to messy or uneven results. Avoiding these pitfalls can make a significant difference in your nail art game. Here are some frequent errors to look out for:
- Skipping Base Coat: Many people think it's unnecessary, but a base coat protects your nails and helps the polish adhere better.
- Applying Too Thickly: Thick layers can lead to bubbling and uneven drying. Aim for thin, even coats instead.
- Not Waiting for Drying Time: Patience is key! Rushing to apply the next coat before the previous one is dry can ruin your work.
- Using Old or Dried-Out Polish: Check the consistency of your polish. If it's thick or clumpy, it's time to toss it. Fresh polish glides on smoother.
- Neglecting to Clean the Cuticles: Polish on your skin or cuticles makes for a messy look. Use a brush dipped in remover to tidy up before it dries.
By being mindful of these common mistakes, you can ensure a more polished and professional-looking manicure every time!
Also Read This: How to Download and Save Dailymotion Videos Easily
Tips for Long-lasting Nail Paint
If you want your nail paint to last longer and look fabulous, there are several tips and tricks to keep in mind. Here’s how to extend the life of your manicure:
- Invest in Quality Products: Use high-quality nail polish and topcoat. They may cost a bit more, but they often last significantly longer.
- Seal the Tips: When painting your nails, make sure to swipe a little polish across the tips. This helps seal the edges and prevents chipping.
- Keep Nails Dry: Avoid soaking your nails in water for long periods. Consider wearing gloves while doing dishes or cleaning to protect your polish.
- Apply a Topcoat Regularly: Reapply a clear topcoat every few days to maintain shine and add an extra layer of protection.
- Avoid Using Your Nails as Tools: Refrain from using your nails to open packages or perform other tasks that could chip or break them.
By following these tips, you can enjoy your beautifully painted nails for days on end!
How to Apply Nail Paint Neatly: Tips for Clean Application on Dailymotion
Nail painting can be a fun and creative way to express yourself, but achieving a neat and professional look can sometimes be challenging. Here are some essential tips to help you apply nail paint neatly:
- Preparation is Key: Start with clean, dry nails. Remove any old polish and wash your hands thoroughly.
- Use a Base Coat: Applying a base coat helps the polish adhere better and provides a smoother surface.
- Choose the Right Tools: Invest in high-quality brushes and polishes. A good brush makes application easier.
- Apply in Thin Coats: Instead of applying a thick layer, use thin coats for a more even finish. This reduces the chances of bubbling.
- Use the Three-Stroke Method: Start from the base of the nail and use three strokes to cover the entire nail - one in the middle and one on each side.
Common Mistakes to Avoid
| Mistake | Solution |
|---|---|
| Applying polish on oily nails | Always clean your nails with alcohol before application. |
| Skipping the base coat | Always apply a base coat to protect your nails. |
| Not allowing time to dry | Give each coat sufficient time to dry before applying the next. |
Remember, practice makes perfect. Don’t rush the process, and enjoy getting creative with your nail art. With these tips, you’ll be well on your way to achieving a flawless manicure every time!
 admin
admin


