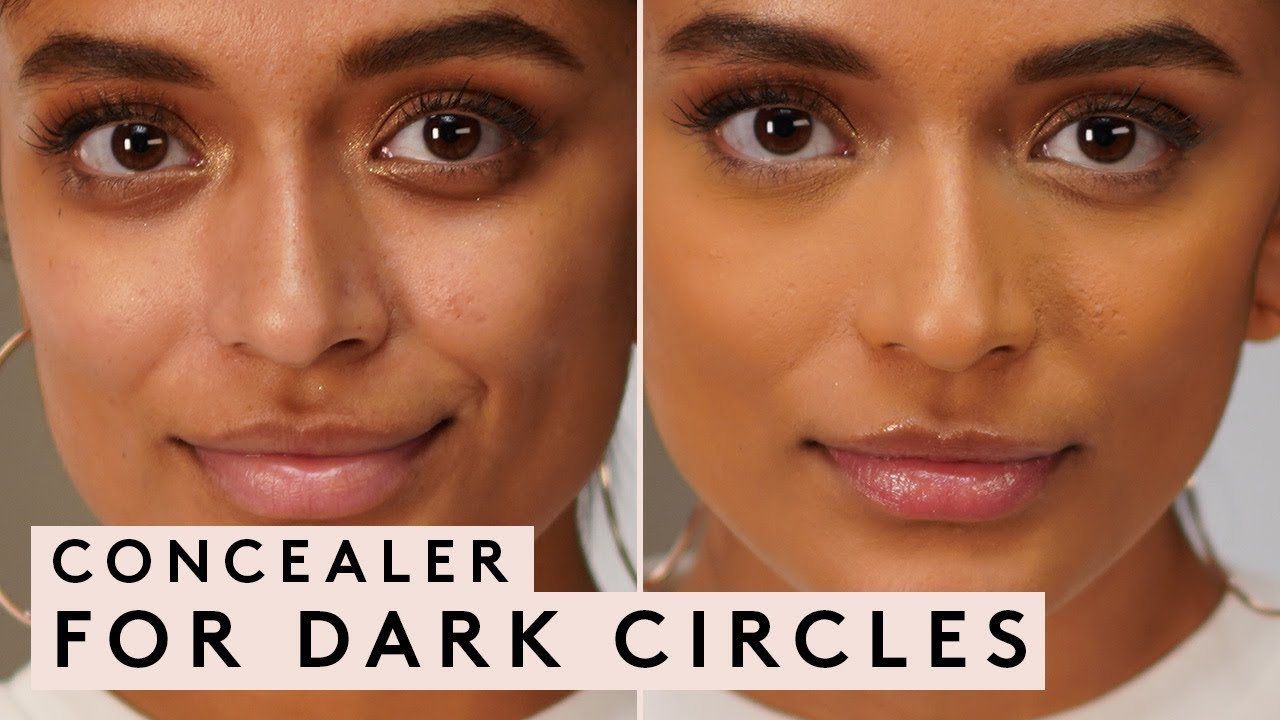
Let’s be honest—dark circles can be a real party crasher when it comes to our beauty routine. Those pesky shadows under our eyes can make us look tired or even older than we are. Thankfully, concealer is here to save the day! In this post, we’ll explore effective techniques for applying concealer specifically to combat dark circles, helping you achieve that bright, refreshed look. Ready to say goodbye to those under-eye shadows? Let's dive in!
Understanding Dark Circles
Before we jump into concealer techniques, it's essential to understand what dark circles are and why they appear. Dark circles can happen for a variety of reasons, and recognizing the cause is the first step to finding the right solution.
Common Causes of Dark Circles:
- Genetics: Sometimes, dark circles are simply inherited. If your parents had them, you might too!
- Age: As we age, our skin loses collagen and fat, making blood vessels under the eyes more visible.
- Fatigue: Lack of sleep or excessive tiredness can cause the skin to become pale, showcasing those dark shadows.
- Dehydration: Not drinking enough water can make your skin look dull and tired.
- Allergies: Seasonal allergies can lead to not just itchy eyes but also darkening of the skin under the eyes.
- Sun Exposure: Increased melanin production due to UV exposure can lead to pigmentation in the under-eye area.
Now that we've identified the likely culprits, let’s talk about how this knowledge can help us choose the right products and techniques for covering those troublesome dark circles.
Skin Types and How They Affect Dark Circles:
Understanding your skin type is crucial because it can influence how you should treat dark circles. Here’s a quick rundown:
| Skin Type | Recommendations |
|---|---|
| Dry Skin | Hydrating concealers are key! Look for cream-based formulas that include moisturizing ingredients. |
| Oily Skin | Opt for oil-free, matte finishes to ensure longevity and avoid creasing or settling into fine lines. |
| Combination Skin | A hybrid approach works well; use a satin finish that provides coverage without emphasizing dryness. |
| Sensitive Skin | Choose hypoallergenic and fragrance-free formulas to avoid irritation. |
Understanding why dark circles occur and knowing your skin type helps you make informed decisions on the products and techniques that can brighten up your eye area. Now that we’ve got that down, stay tuned for our next section, where we’ll discuss the best techniques for applying concealer to really make those dark circles disappear!
Also Read This: How to Make Rings at Home: DIY Tutorial on Dailymotion
3. Choosing the Right Concealer
Picking the perfect concealer is like finding the best pair of jeans; it might take a bit of trial and error, but once you find "the one," it can change your entire look. When it comes to dark circles, you want to consider a few key factors to ensure you're making the right choice.
Type of Concealer: There are different types of concealers available, each designed for specific needs. Here’s a quick breakdown:
- Cream Concealers: Ideal for dry skin and providing higher coverage. They blend beautifully but can get cakey if applied excessively.
- Liquid Concealers: Great for a natural finish and suitable for most skin types. Look for lightweight formulas that are easy to layer.
- Stick Concealers: Perfect for quick touch-ups and can be quite pigmented. However, they may not blend as seamlessly as creams or liquids.
- Color Correcting Concealers: If you have severe darkness, don’t shy away from these! Peach or orange tones can neutralize blue tones in dark circles.
Shade Selection: The color of your concealer makes a huge difference. For under-eye circles, aim to choose a shade that is one to two shades lighter than your natural skin tone. This lift will not only conceal but also brighten the area, giving you that fresh and awake look.
Also, consider the finish of the concealer. A satin or hydrating finish is often recommended for the under-eye area to avoid emphasizing any fine lines. Matte finishes can sometimes be too drying and highlight imperfections.
Ingredients Matter: When browsing the aisles or shopping online, check the ingredients. Opt for concealers that include hydrating elements like hyaluronic acid or glycerin. These ingredients not only help in blending but also keep the skin moisturized, reducing the appearance of those pesky circles.
Lastly, don’t forget to test! Always swatch concealers on your jawline or wrist to see how they work with your skin's undertones. Remember, the lighting in stores can be deceiving, so try to use natural light when possible. Happy concealer hunting!
Also Read This: Essential Tips for Safeguarding Your Facebook Account with Dailymotion Insights
4. Preparation for Application
Applying concealer effectively is just as important as choosing the right one. Preparation plays a crucial role in ensuring your concealer goes on smoothly and stays put throughout the day. Here are some key steps to prepare your skin for the perfect concealer application:
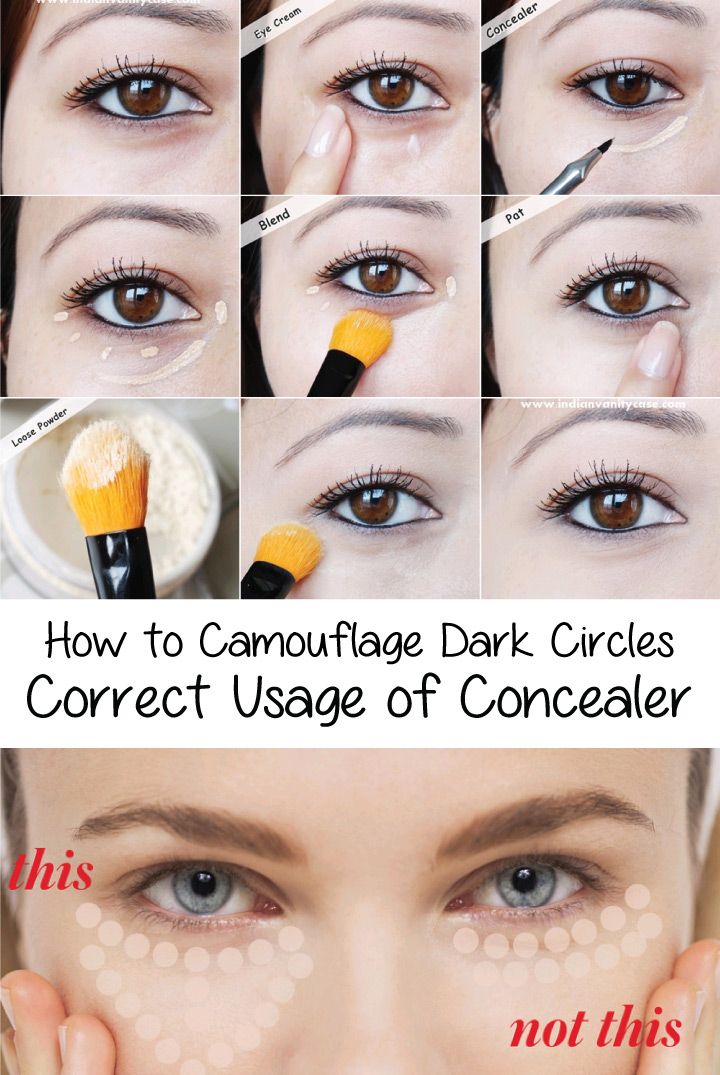
1. Start with a Skincare Routine: A well-prepped face is the first step to a flawless concealer application. Begin with a gentle cleanser to remove any dirt or makeup from your skin. Follow this with a hydrating eye cream designed specifically for the under-eye area. This will help plump the skin and create a smooth canvas for concealer.
2. Use a Primer: Once your eye cream has absorbed (give it a minute or two), apply a lightweight primer around your eyes. This helps to smooth out any fine lines and gives the concealer something to cling to, increasing its staying power.
3. Hydrate Your Skin: If you have dry skin, consider applying your regular moisturizer all over your face—don’t forget your eye area! A hydrated base allows your concealer to blend more easily and prevents it from settling into creases.
4. Make Use of a Reflecting Setting Powder: If you tend to get oily or prefer a matte finish, lightly dusting a translucent setting powder over the under-eye area can create a velvety texture. This helps absorb any excess moisture and prepares the skin for the concealer application.
5. Use a Cooling Treatment: For an extra boost, consider using a cooling eye patch or applying a chilled spoon to your under-eye area for a few minutes. This can reduce puffiness and refresh your eyes, making it easier for concealer to work its magic.
Taking the time to prepare your skin before applying concealer can make a world of difference in your overall look. By ensuring you have a hydrated, smooth canvas, you'll create the perfect base for concealer to work wonders on those dark circles!
Also Read This: Create Unique Nail Polish Designs with Dailymotion Tutorials
5. Step-by-Step Application Techniques
Applying concealer can seem daunting, especially when dealing with dark circles under your eyes. But don’t worry! With the right technique, you can achieve a bright and youthful look in no time. Here’s a simple step-by-step guide to help you master the application of concealer:
Step 1: Prep Your Skin
Before applying any makeup, it’s essential to prep your skin. Start by cleansing your face to remove any residual makeup or oils. Next, apply a nourishing eye cream. This not only hydrates the delicate skin around your eyes but also creates a smooth canvas for your concealer. Allow the cream to absorb for a few minutes before moving on to the next step.
Step 2: Choose the Right Concealer Shade
Select a concealer that’s one or two shades lighter than your foundation to brighten your under-eye area. If your dark circles have a bluish tint, opt for a peachy or orange-toned concealer to neutralize the color. For more severe dark circles, a color-correcting concealer may be beneficial.
Step 3: Apply the Concealer
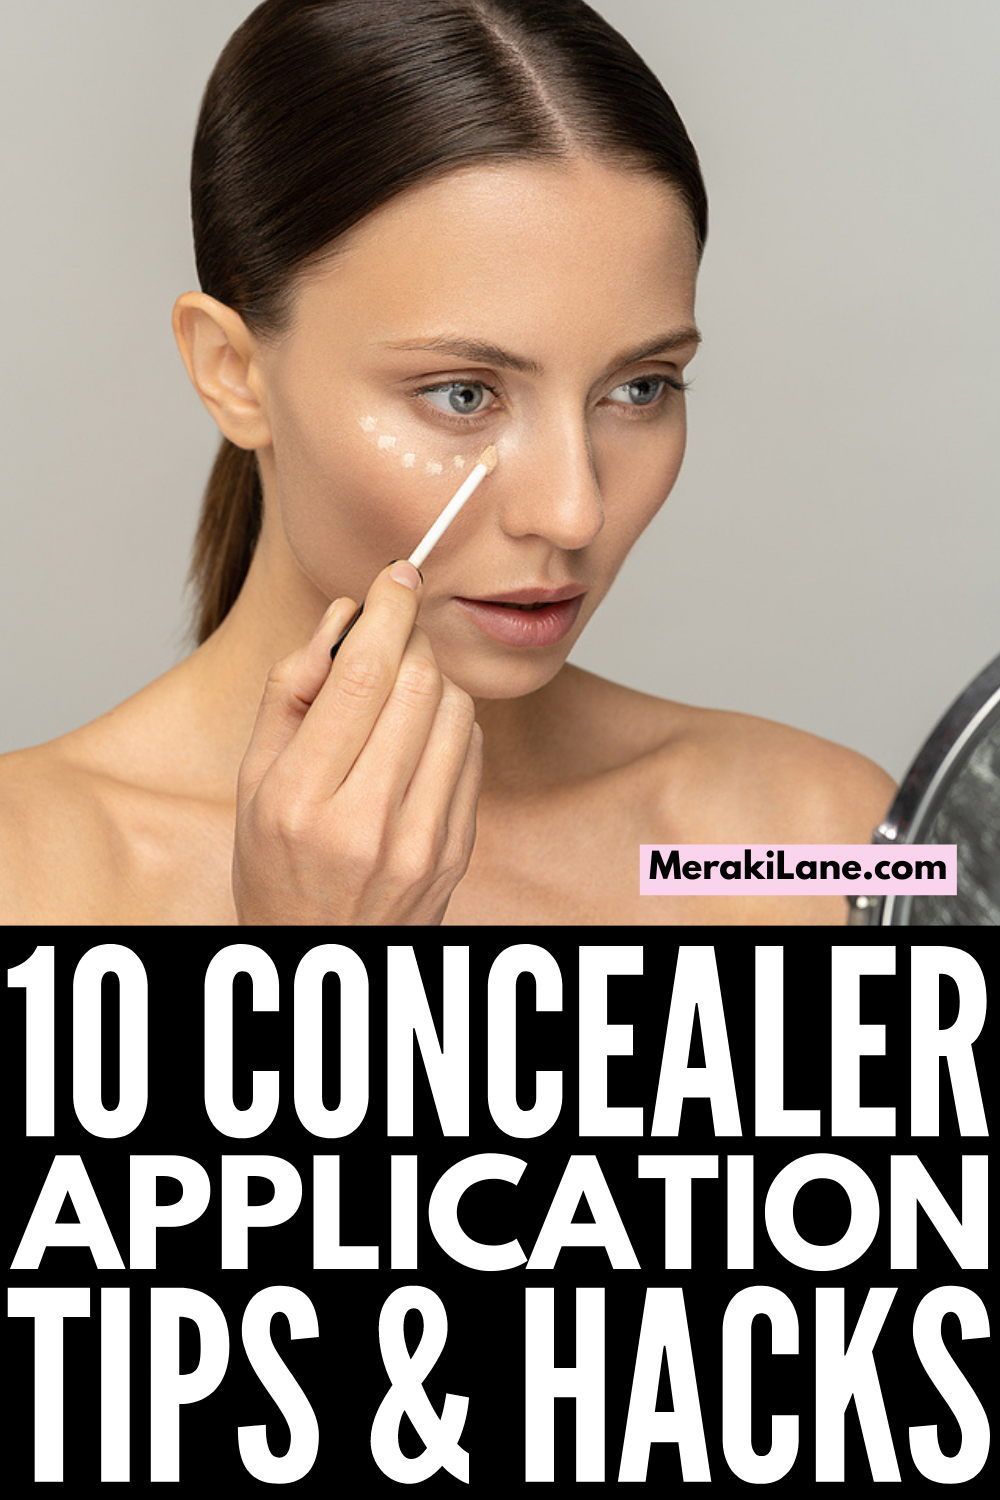
Using a small brush or your ring finger (which applies the least pressure), dab a small amount of concealer onto the inner corner of your eye and blend outward. Here are some application techniques:
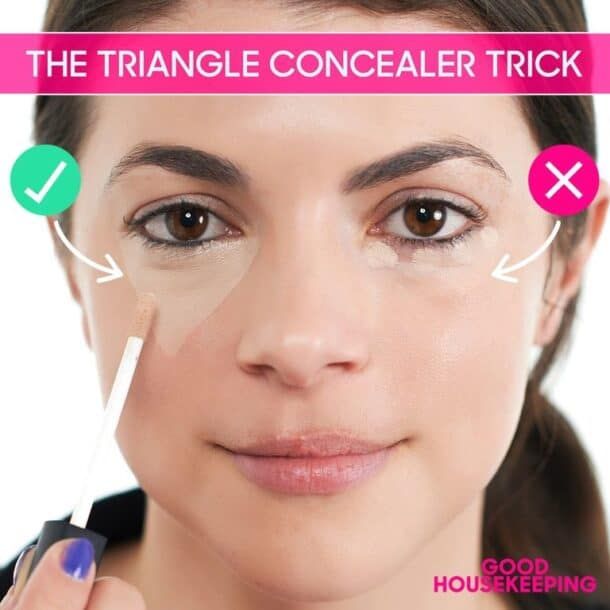
- Use a triangular shape to apply the concealer: Draw a triangle with the base along your lower lash line and the tip pointing toward your cheek. This shape helps to lift your face visually.
- For a more natural look, apply a few dots of concealer directly onto the circles. Less is more when it comes to concealer!
Step 4: Let It Sit
Allow the concealer to sit for a few moments. This helps it meld with your skin and the heat from your fingers helps it to blend more seamlessly.
Step 5: Blend, Blend, Blend
Using your finger, a sponge, or a brush, gently blend the concealer into your skin. Start from the inner corner and work your way out. This technique will help you avoid disturbing your eye cream underneath and provide a more flawless finish.
Step 6: Set It
Finally, to prevent your concealer from settling into fine lines, lightly dust a translucent setting powder over the area. Use a small, fluffy brush and try to keep the application minimal to maintain that fresh look!
Also Read This: How to Change PTCL Password: A Simple Guide
6. Tips for Blending Concealer Effectively
Now that you've got the application technique down, let’s focus on blending! Effective blending can make or break your concealer application. Here are some tips to help you achieve a smooth and flawless finish:
1. Use the Right Tool
Your choice of blending tool can impact how well your concealer looks. Makeup sponges, like the Beauty Blender, are excellent for achieving a soft, airbrushed finish. Alternatively, a small brush designed for concealing can provide more precision when blending. Just remember, don’t use your sponge or brush to swipe; instead, pat it gently.
2. Keep It Light
When blending concealer, use a light hand. Pressing too hard can cause your concealer to move around or settle into fine lines, which is the opposite of what we want. Gentle pats will help it blend seamlessly into your skin.
3. Blend in the Right Direction
Always blend toward your temples or up towards your brow bone. This direction helps to lift the eyes visually. Avoid blending down toward your cheeks, as this can create a tired look.
4. Blend in Layers
If you’re working with stubborn dark circles, don’t try to fix everything in one go. It’s better to apply a light layer of concealer, blend, and then build up more if needed. This layering approach ensures a more natural look.
5. Be Mindful of Your Other Products
If you’re using other products, like foundation or highlighter, think about how they interact with your concealer. Apply your foundation first, then follow up with concealer. If you’re using a liquid highlighter, opt for cream concealers to ensure better blending.
By mastering these application and blending techniques, you’ll be well on your way to bright, beautiful eyes that radiate confidence. Practice makes perfect, so don’t be discouraged if it takes a few tries to get it just right!
Also Read This: How to Download Videos for Free Using the Dailymotion App
7. Setting Your Concealer for Longevity
So you've applied your concealer, and your under-eye area looks fantastic! But how do you ensure it stays that way throughout the day? The key here is to *set your concealer properly. Without setting, your concealer can settle into fine lines or, worse, wear off completely.
First, let’s talk about the product you’ll need: a good-quality translucent powder*. This type of powder is lightweight and won't add any extra color or weight to your makeup. It’s crucial for those delicate under-eye areas where you want to avoid any cakiness.
Here’s how to properly set your concealer:
- Use a small powder puff or brush: A small, fluffy brush is ideal for this task. It allows for precise application without disturbing your newly-applied concealer.
- Minimal product: Take a tiny amount of translucent powder on your brush or puff, and tap off the excess. You don’t want to overwhelm the concealer—just a light dusting is all it takes!
- Press, don’t swipe: Gently press the powder onto the concealed area. Swiping can shift the concealer, so pressing works better for locking it in place.
- Consider a setting spray: After you’ve set everything with powder, finishing off with a light setting spray can provide an extra layer of longevity. Just make sure to hold the spray a good distance away to avoid soaking your makeup!
And voilà! Your concealer should now be locked and loaded, ready to face whatever your day throws at you. If you find that your under-eyes still tend to crease despite these techniques, you may want to adjust your concealer formula or simply try a lighter touch with the powder!
Also Read This: Exploring Dailymotion Features and Functionalities
8. Common Mistakes to Avoid
Even the best makeup enthusiasts can stumble when it comes to applying concealer, especially for those pesky dark circles. Here are some common mistakes to avoid so you can always look your best:
- Applying too much product: Less is often more. Over-applying concealer can lead to a cakey appearance and can accentuate fine lines instead of hiding them.
- Using the wrong shade: Always choose a concealer that’s slightly lighter than your foundation but too light can create a stark contrast. Test the shade on your skin to find the perfect match.
- Skipping moisturizer: Neglecting proper skincare can lead to dry, flaky under-eyes that highlight dark circles. Always hydrate the area with a good eye cream before applying concealer.
- Ignoring your skin type: Different skin types require different concealer formulations. If you have oily skin, opt for a matte finish. If you have dry skin, a creamy, hydrating concealer is the way to go.
- Not blending enough: Rushing through blending can leave harsh lines. Spend a little extra time ensuring your concealer is seamlessly blended into your foundation for a natural look.
- Setting with too much powder: While setting is essential, too much powder can enhance dryness and create a dull appearance. Just a light dusting is typically enough.
By avoiding these common pitfalls, you can become a pro at concealing dark circles, giving you that bright, refreshed look we all want. Remember, practice makes perfect, so don’t be discouraged if it takes a few tries to get it just right!
Also Read This: DIY Paper Bracelets Fun Craft Ideas on Dailymotion
9. Additional Makeup Tips for a Brighter Look
When it comes to achieving that radiant, well-rested appearance, a good concealer is just one piece of the puzzle. Here are some additional makeup tips that can elevate your look and help combat those dark circles:
- Start with Skincare: Never underestimate the power of a good skincare routine. Use an eye cream containing ingredients like caffeine, hyaluronic acid, or peptides. These can help reduce puffiness and brighten the skin under the eyes, providing a great base for your concealer.
- Use a Color Corrector: Consider using a color corrector before applying concealer. For dark circles, a peach or orange hue can counteract the blue tones. Apply it sparingly, and blend it out before layering your concealer on top.
- Opt for a Brightening Under-Eye Product: There are specific under-eye brighteners available that can give your whole look a boost. Look for lightweight formulas that add luminosity, which can make a significant difference in your overall appearance.
- Highlight Strategically: A subtle highlight on the inner corners of your eyes and just below the brow bone can draw attention away from dark circles. Use a cream or liquid highlighter for a more natural effect.
- Set with Powder: After applying concealer, use a light dusting of translucent powder to set it in place. This will not only help prevent creasing but will also ensure your makeup lasts throughout the day. Opt for a finely milled powder to avoid a cakey look.
- Focus on Your Brows: Well-groomed brows can frame your face beautifully and draw attention away from your under-eye area. Spend a little time filling in any sparse areas and defining your brows for a polished look.
- Choose the Right Lip Color: A pop of color on your lips can instantly brighten your face. Consider soft pinks or vibrant reds to draw attention upward, diverting focus from dark circles.
- Keep Your Eye Makeup Light: Heavy eye makeup can sometimes create a more tired appearance. Instead, stick to lighter tones and consider using a coat of mascara to open up your eyes without overwhelming them.
Each of these tips can work wonders on their own, but together, they create a complete strategy for looking fresh and awake, even on your most tired days.
10. Conclusion
Applying concealer to combat dark circles isn't just about covering up; it's about enhancing your natural beauty and achieving a look that makes you feel confident and radiant. By mastering the techniques we've discussed—from choosing the right shade to applying it flawlessly—you're already on your way to a more vibrant complexion.
Remember, practice makes perfect. It might take a little time to find the products and methods that work best for you, but don't be afraid to experiment! You might find that a slightly different approach or product can make a world of difference. Here are a few final takeaways:
- Invest in quality products that match your skin type and tone.
- Prioritize skincare to enhance your makeup application.
- Learn to blend correctly for a natural finish.
- Don't forget to set your concealer to ensure longevity.
- Incorporate additional makeup tips to balance your look.
With these effective techniques for applying concealer and a few extra tips for a bright appearance, you'll be well-equipped to tackle dark circles head-on. Embrace the process, enjoy getting ready, and remember that a little effort can lead to beautiful, glowing results!
 admin
admin


