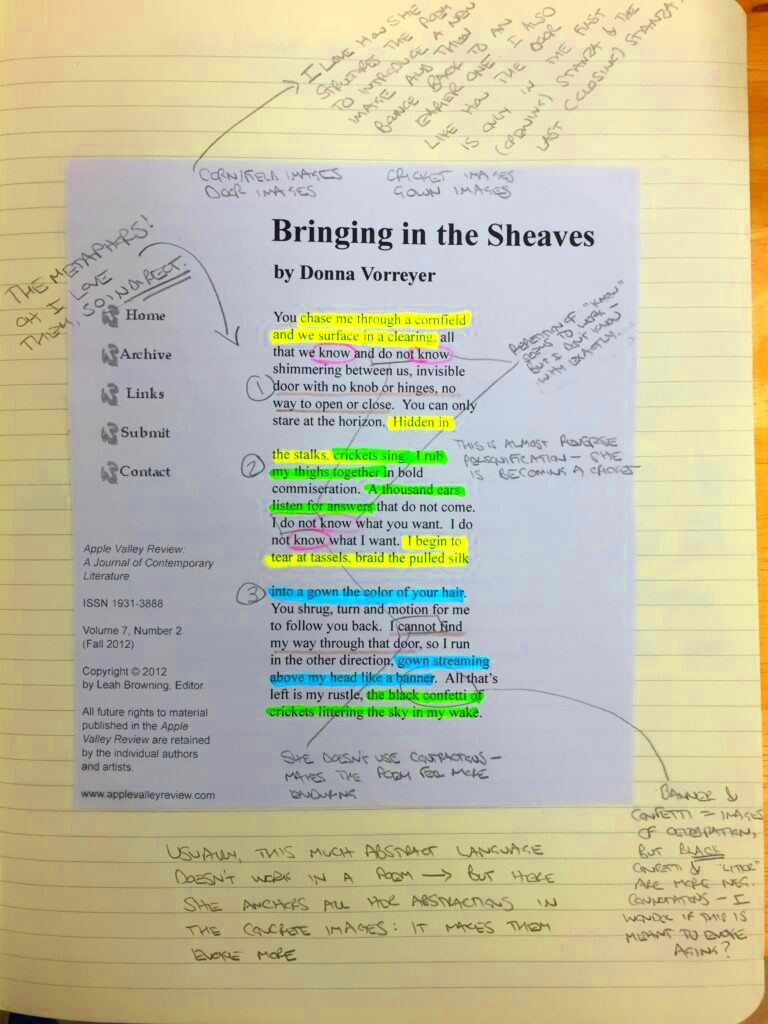
Image annotation generally refers to act of hyperlinking an image with insightful remarks or labels. It assists individuals in comprehending what the visual constituents signify, meant for and their relevance in any specific
Importance of Annotating Images
There are multiple reasons why it’s important to annotate images.
- Enhances Understanding: By adding context, annotations help viewers grasp the main ideas behind the image quickly.
- Improves Engagement: Annotated images can capture attention and encourage viewers to interact with the content.
- Aids in Learning: In educational settings, annotations can simplify complex concepts and promote better retention of information.
- Boosts Accessibility: For those with visual impairments, annotations can provide essential descriptions, making images more accessible.
In brief, picture labeling serves as an important factor in promoting understanding, generating better educational processes and making sure that information is within everybody's reach.
Also Read This: QT Imaging Cost Guide: What to Expect
Types of Image Annotations
A variety of image annotations exist, each with its own distinct role and function. Below are some in common usage:
| Type of Annotation | Description |
|---|---|
| Text Annotations | These are written notes or labels added to an image to provide context or information about specific elements. |
| Bounding Box Annotations | This involves drawing boxes around objects in an image, often used in machine learning for training algorithms. |
| Polygon Annotations | Similar to bounding boxes but allows for more detailed shapes around objects, offering precise outlines. |
| Segmentation Annotations | This type separates different objects in an image, making it easier for algorithms to analyze complex scenes. |
| Point Annotations | Small markers placed on specific locations in an image, useful for highlighting important features. |
By discerning these kinds of annotations, you can rightly pick out the procedure depending on your targets and public.
Also Read This: Our Guide to Quick and Effective Instagram to Mp4 Download
Tools for Image Annotation
A good tool can mean the difference between ineffective and effective image annotation. Fortunately, you have many software options for different reasons even as teachers, researchers or designers. Below is a list of some famous image annotation tools:
- Canva: A user-friendly design tool that allows you to easily add text, shapes, and arrows to your images. Ideal for creating engaging presentations and social media posts.
- Labelbox: This tool is designed for machine learning projects, offering features like bounding boxes, polygons, and more to train AI models efficiently.
- Adobe Photoshop: A professional-grade editing tool that allows for detailed annotation with layers and various drawing tools, perfect for intricate designs.
- Snagit: Great for capturing images and adding annotations quickly. It’s user-friendly and ideal for creating instructional content.
- Markup Hero: A simple tool that enables you to annotate screenshots and images effortlessly, sharing them with your team or audience.
Selecting the most appropriate tool will depend on the personal needs of the individual and how much they know about it; nevertheless, all these alternatives come with particular characteristics that can assist you in labeling images accurately.
Also Read This: Chromebook Convenience: Selecting Multiple Songs on Spotify – Chromebook Edition
Step-by-Step Guide to Annotate an Image
once you've grasped the concept behind your image. So, let's look at those steps in details.
- Select Your Image: Choose the image you want to annotate. It can be anything from a photograph to a graphic design.
- Open Your Annotation Tool: Launch the tool of your choice. For example, if you’re using Canva, upload your image there.
- Add Text Annotations: Click on the text tool and type your notes or labels. Place them where they make sense in relation to the image.
- Incorporate Shapes: Use arrows or boxes to point to specific areas of the image, drawing attention to important details.
- Use Color Wisely: Choose contrasting colors for your annotations to ensure they stand out but still match the overall aesthetic of the image.
- Review and Edit: Take a moment to review your annotations. Make any necessary adjustments to improve clarity and readability.
- Save Your Work: Once satisfied, save the annotated image in your desired format, ready for sharing or presentation.
By adhering to these stages, individuals could produce lucid and descriptive illustrations that precisely convey their messages
Also Read This: What Is the Cost of Alamy Stock Photos
Best Practices for Effective Annotations
Following certain best practices is paramount for effective image annotations. To guide you, here are a few tips to consider:
- Be Concise: Keep your annotations brief. Use clear language that gets straight to the point without unnecessary fluff.
- Use Clear Fonts: Select fonts that are easy to read, even at smaller sizes. Avoid overly decorative fonts that may confuse viewers.
- Maintain Consistency: Stick to a consistent style for your annotations throughout your image or project. This includes font size, color, and positioning.
- Prioritize Important Information: Highlight the most critical points first. This will help viewers understand the main ideas without getting lost in details.
- Test for Clarity: Before finalizing, ask someone unfamiliar with the image to review your annotations. Their feedback can highlight any areas that may need improvement.
If you want to make your annotations more appealing and meaningful for your audience, you should consider these suggestions.
Also Read This: Comprehensive Guide for Earning Money on Dailymotion
Common Mistakes to Avoid
When tagging images, it is easy to make some things that may vanish your endeavor. In case you want to be on the safer side, ensure that your notes are straight, explain themselves and attract a person. Below are some of the things which should be avoided:
- Overloading with Information: Adding too much text or too many annotations can overwhelm viewers. Focus on key points instead.
- Poor Placement of Annotations: If annotations are placed too far from the relevant part of the image, viewers may struggle to connect the dots. Keep them close to what they’re describing.
- Using Complex Language: Avoid jargon or overly technical language that may confuse your audience. Aim for simplicity and clarity.
- Ignoring Visual Hierarchy: Not prioritizing which information is most important can lead to confusion. Use size, color, and placement to indicate significance.
- Neglecting to Review: Failing to proofread your annotations can result in typos or unclear messages. Always take a moment to double-check your work.
Awareness of these mistakes usually allow for better annotations which are efficient in improving understanding and involvement.
Also Read This: How to Sell Your Photos on 123RF
Frequently Asked Questions
Especially for a newbie to the process, it is normal for one to have questions regarding image annotation. Here are some of the frequently asked questions that can help clarify on this:
| Question | Answer |
|---|---|
| What is the purpose of image annotation? | Image annotation helps clarify the content and context of an image, making it easier for viewers to understand its meaning. |
| Can I annotate images for free? | Yes, many free tools are available for image annotation, such as Canva and Markup Hero, which offer user-friendly features. |
| What types of images can I annotate? | You can annotate any image, including photos, infographics, diagrams, and screenshots. |
| How do I know which annotation tool to use? | Your choice of tool depends on your specific needs. Consider factors like ease of use, features, and your level of expertise. |
These frequently asked questions deal with popular issues but you are welcome to investigate deeper or pose personalized inquiries so that they align better with your requirements!
Conclusion and Final Thoughts
Putting labels on images is a strong instrument for augmentation of the communication and comprehension effectiveness. Through proper labeling of the photos, complicated content may be presented in a clearer and more interesting way for your audience. Just keep in mind that simplicity, clarity and relevancy are what matters most.
When you begin your image annotation journey, always bear in mind the significance of utilizing appropriate instruments, adhering to best practices and steering clear of frequent errors. With time and experience, you will interact better and develop informative annotations that speak to people.
Hence, whenever you happen to engage in developing educational artifacts or advertisements, for instance, it is good to embark on image annotations. The benefit of this practice is that your audience will value the work and may become more engaged with the content. Therefore, happy annotating!
 admin
admin


