When working on documents in Microsoft Word, you might find yourself needing to position images alongside your text seamlessly. This is where the concept of anchoring images comes into play. Anchoring allows you to control how an image behaves in relation to the surrounding text. Whether you're creating a professional report, a creative project, or just sprucing up a letter, understanding how to anchor images can significantly enhance the visual appeal of your document. Let’s dive into what it means to anchor images and why it's essential!
Understanding Image Anchors
Image anchors in Word are an essential feature that allows you to specify how an image interacts with the text that surrounds it. When you insert an
- Anchor Icon: When you insert an image, you’ll notice a small anchor icon. This icon indicates that the image is anchored to a specific paragraph in your document. The position of this anchor determines how the image moves when you add or remove text.
- Types of Anchors: Word allows various anchoring options, such as:
- In Line with Text: The image is treated like a text character, moving with the text.
- Square: Text wraps around the image, allowing for a more dynamic layout.
- Behind Text: The image sits behind the text, which can create interesting effects but may obscure readability.
- In Front of Text: The image sits above the text, making it stand out.
- Moving Anchors: To reposition an image, you can drag the anchor icon to a new paragraph. This change will adjust how the image relates to the surrounding text.
Understanding these aspects of image anchors will empower you to create documents that are visually appealing and well-organized. Experiment with different anchoring options to see what works best for your specific needs!
Also Read This: How to Record a Song from YouTube for Personal Use
Steps to Anchor an Image in Word
Anchoring an image in Microsoft Word is essential for keeping it in the right place within your document. Let’s walk through the straightforward steps to anchor an image successfully.
- Insert Your Image: First, go to the "Insert" tab on the ribbon. Click on "Pictures" and choose the image you want to add. Once you select it, it will appear in your document.
- Select the Image: Click on the image to select it. You’ll see a border around it, which indicates that the image is active.
- Open Layout Options: After selecting the image, look for the small icon that appears next to its top-right corner. This is the "Layout Options" button. Click on it to see a variety of text wrapping options.
- Choose an Anchor Option: Select a wrapping style that suits your needs, such as "In Line with Text" or "Square." Each option affects how the image interacts with your text.
- Access the Format Menu: With the image still selected, go to the "Format" tab. Here, you can fine-tune the position of your image and its anchor settings.
- Check the Anchor Icon: Look for the anchor icon that appears near the image. This icon indicates where the image is anchored in the text. You can drag the anchor icon to move it to a desired paragraph.
And there you go! You’ve successfully anchored your image, ensuring it stays in place as you edit your document.
Also Read This: Guide to Uploading 360-Degree Videos on YouTube and Capturing Every Angle
Adjusting Anchor Settings
Now that you’ve anchored your image, you might want to tweak its settings for better control. Adjusting anchor settings allows you to manage how your image behaves in relation to the text. Here’s how you can do it:
- Right-click on the Image: Begin by right-clicking on the anchored image. This will bring up a context menu with multiple options.
- Select "Size and Position": From the context menu, choose "Size and Position." This opens a dialog box where you can customize various settings.
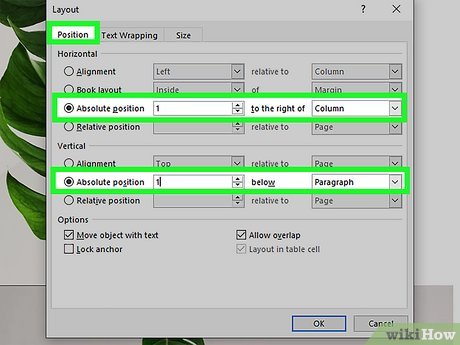
- Navigate to the "Position" Tab: In the dialog box, switch to the "Position" tab. Here, you can adjust the horizontal and vertical positioning of your image relative to the page or margin.
- Choose Relative Positioning: You can set the image to be positioned relative to characters, margins, or the page itself. This is particularly useful for ensuring your images remain where you want them, regardless of text changes.
- Lock Anchor: If you want to prevent the image from moving even when text around it changes, check the "Lock anchor" option. This ensures the anchor remains fixed to the selected paragraph.
- Preview and Apply: Don’t forget to click "OK" to apply your changes. Preview the document to make sure everything looks just right!
By adjusting these anchor settings, you can have greater control over how your images appear and behave within your Word documents.
Also Read This: how to fill a shape with an image in canva
Common Issues and Troubleshooting
When anchoring images in Microsoft Word, users often encounter a few common issues. Understanding these problems can help you troubleshoot effectively and get back to creating beautiful documents.
- Image Not Anchoring: Sometimes, you may find that your image does not anchor where you want it. This usually happens if the wrapping style is set incorrectly. Make sure to adjust the text wrapping options by right-clicking the image, selecting "Wrap Text," and choosing an appropriate style.
- Image Moves Unexpectedly: If your image shifts position as you edit your document, it might be due to the anchor moving. Always check the anchor icon (a small anchor symbol) to ensure it’s positioned correctly. You can drag it to the desired paragraph or section.
- Image Overlapping Text: If your image overlaps with text or other elements, adjust its size or the text wrapping settings. Use "Tight" or "Through" wrapping styles for a neater layout.
- Image Disappears: Occasionally, images might seem to vanish. This can occur if the image is set as "In Line with Text." To resolve this, right-click on the image, select "Wrap Text," and choose a different wrapping option.
- Anchored to the Wrong Section: If your image is anchored to a paragraph you didn’t intend, simply click on the anchor icon and drag it to the correct location.
Conclusion and Tips for Effective Image Management
Managing images in Word can elevate your document’s visual appeal, but it’s essential to do it right. As we've explored, anchoring images properly is crucial for maintaining their position throughout your editing process.
Here are some quick tips for effective image management:
| Tip | Description |
|---|---|
| Choose the Right Format | Use formats like PNG or JPEG for high-quality images while keeping the file size manageable. |
| Keep it Consistent | Maintain consistency in image style and size across your document for a professional look. |
| Regularly Save Your Work | After significant edits, save your document to avoid losing changes, especially if you're working with multiple images. |
| Use the Right Anchoring Style | Experiment with different wrapping styles to find what keeps your images in the right spot. |
By following these guidelines and being mindful of common issues, you can manage images in Word more effectively and create visually stunning documents.
 admin
admin


