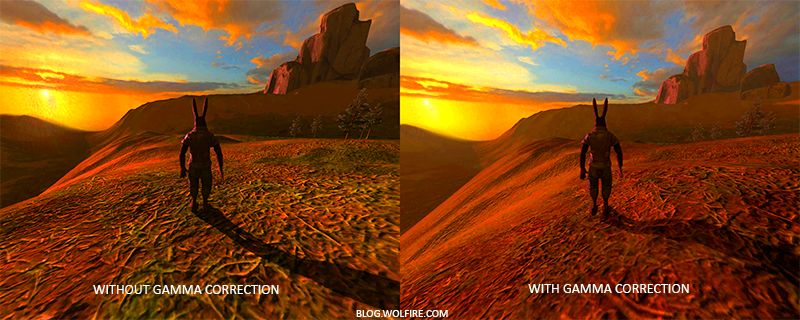
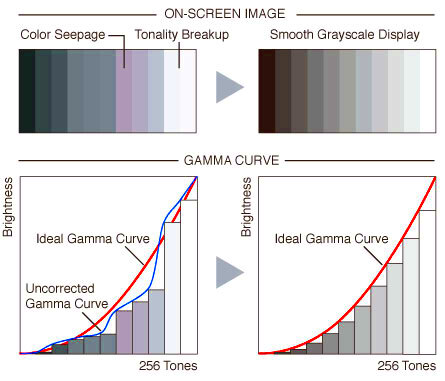
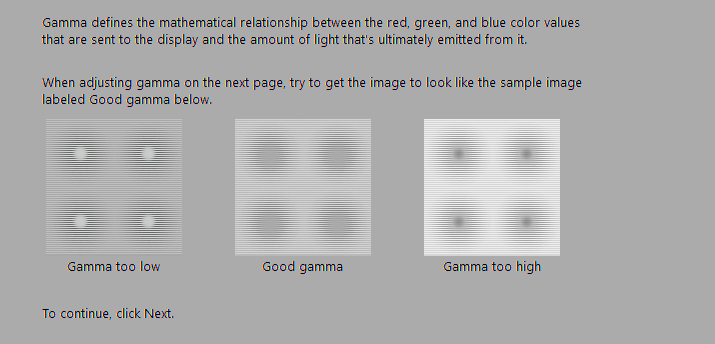
Gamma is a key factor in image quality that many people overlook. It refers to the relationship between the brightness of the pixels in an image and the actual brightness displayed on the screen. Essentially, gamma affects how we perceive light and color in images. By understanding gamma, you can make better choices for your images, whether you are editing photos or creating graphics.
When you adjust the gamma, you change the brightness and contrast of the midtones without affecting the highlights and shadows as much. This can make your images look more vibrant and lifelike. A higher gamma value increases the brightness of the dark areas, while a lower gamma value lightens the bright areas.
In summary, gamma is essential for achieving accurate color reproduction and ensuring your images look their best. Understanding gamma allows you to make informed adjustments, resulting in stunning visuals.
Why Adjust Gamma for Better Image Quality

Adjusting gamma can significantly enhance the quality of your images. Here are some reasons why you should consider making these adjustments:
- Improved Visibility: Sometimes, images can look too dark or too light. By adjusting gamma, you can bring out details that may be hidden in shadows or highlights.
- Enhanced Color Accuracy: Proper gamma settings help ensure that colors are displayed as they were intended. This is crucial for professional photography and graphic design.
- Better Depth Perception: A well-adjusted gamma can create a more three-dimensional feel in your images, making them more engaging for viewers.
- Consistent Quality: When you adjust gamma across different images, you maintain a consistent look and feel, which is vital for branding and presentation.
In short, adjusting gamma is an important step in the image editing process. It can turn an average photo into a remarkable one by improving visibility, color accuracy, and overall quality.
Also Read This: How to Successfully Sell Your Images to Getty Images for Beginners
How to Identify the Right Gamma Setting

Finding the right gamma setting can seem tricky, but it doesn’t have to be. Here are some steps to help you identify the best gamma for your images:
- Start with a Test Image: Choose a well-lit image that contains both dark and bright areas. This will give you a better understanding of how the gamma affects different parts of the image.
- Use Image Editing Software: Open the image in a photo editing tool. Most software has gamma adjustment features. Look for options labeled as "Gamma Correction" or "Brightness/Contrast."
- Adjust and Observe: Slowly adjust the gamma slider while observing the image. Make sure to pay attention to how the shadows, midtones, and highlights change.
- Use Reference Points: It helps to have a reference point to compare the original image and the adjusted one. This will assist you in identifying the setting that looks best.
- Check on Different Displays: Sometimes, an adjustment that looks good on one screen may not look the same on another. Check your images on various devices to ensure quality.
By following these steps, you can confidently find the right gamma setting that works for your images, ensuring they look their best.
Also Read This: How to Get Rid of Watermarks on Getty Images
Steps to Adjust Gamma in Popular Software
Adjusting gamma is easier than you might think, especially with the tools available in popular image editing software. Whether you’re using Adobe Photoshop, GIMP, or another program, the steps are quite similar. Here’s how to get started:
- Open Your Image: Begin by launching your preferred software and opening the image you want to adjust.
- Locate the Gamma Adjustment Tool: Look for the gamma or brightness adjustment option. In Photoshop, you can find it under Image > Adjustments > Levels or Curves. In GIMP, it’s usually under Colors > Brightness-Contrast.
- Make Your Adjustments: Use the slider to adjust the gamma level. You can often see a preview of the changes in real-time, allowing you to tweak the settings to your liking.
- Compare Before and After: Most software allows you to view a before-and-after comparison. Use this feature to ensure the adjustments improve your image quality.
- Save Your Changes: Once you’re satisfied, save the image in the desired format. Make sure to keep a backup of the original file just in case you want to revert back.
Following these steps can help you adjust the gamma easily in popular software, ensuring your images shine with the best possible quality.
Also Read This: How to Identify Copyrighted Images
Testing Image Quality After Adjustments
After adjusting the gamma, it's important to test the image quality to ensure the changes enhance rather than detract from the overall appearance. Here’s how to effectively test your images:
- Use Different Screens: Test your adjusted images on multiple devices, like smartphones, tablets, and monitors. Colors and brightness can vary widely between screens, so it’s crucial to check how they look everywhere.
- Print a Sample: If your images are intended for print, print a test copy. This helps you see how the adjustments translate to physical media.
- Gather Feedback: Share the adjusted images with friends or colleagues and ask for their opinions. Different perspectives can provide valuable insights.
- Look for Details: Pay attention to the details in shadows and highlights. Make sure that no important features are lost or washed out.
- Make Further Adjustments if Needed: If you notice any issues, don’t hesitate to go back and tweak the gamma settings further. Sometimes it takes a couple of tries to get it just right.
By testing the image quality after adjustments, you can ensure that your images look their best in any format.
Also Read This: How to Extract a Signature from an Image for Professional Use
Common Issues When Adjusting Gamma
While adjusting gamma can greatly improve image quality, it can also lead to some common issues if not done carefully. Here’s a look at potential problems and how to avoid them:
- Loss of Detail: Over-adjusting gamma can cause loss of detail in shadows or highlights. It’s essential to find a balance that preserves detail while improving visibility.
- Color Distortion: Sometimes, adjusting gamma can distort colors, making them appear unnatural. Always check your colors before finalizing any adjustments.
- Inconsistent Results: What looks good on one screen may not look the same on another. Ensure you check your images on various devices.
- Excessive Brightness: Setting the gamma too high can lead to overly bright images that lose contrast. A little adjustment goes a long way.
- Too Dark Shadows: If shadows appear too dark, it can be tempting to raise the gamma too high. Instead, try adjusting the brightness or contrast as well.
Being aware of these common issues can help you make better adjustments, leading to stunning and high-quality images.
Also Read This: how to dowload an image with a keyboard
Tips for Achieving the Best Results
Getting the best results when adjusting gamma is all about careful consideration and attention to detail. Here are some practical tips to help you optimize your images effectively:
- Work in a Controlled Environment: Ensure your workspace is well-lit and free from glare. This will help you see your adjustments more clearly and make better decisions.
- Use Calibration Tools: If you're serious about image quality, consider using a monitor calibration tool. This helps ensure your screen displays colors and brightness accurately.
- Start with a Good Base Image: The quality of your starting image greatly affects the final outcome. Choose high-resolution images that are well-exposed to begin with.
- Make Small Adjustments: Avoid making drastic changes to gamma. Small, incremental adjustments usually yield the best results and help maintain image integrity.
- Keep a Backup: Always save a copy of the original image before making adjustments. This way, you can easily revert back if you're not happy with the changes.
- Regularly Review Your Work: Take breaks and review your adjustments after some time. A fresh pair of eyes can catch mistakes you might have missed earlier.
By following these tips, you can enhance your image quality while keeping it true to life, ensuring your photos look their absolute best.
Also Read This: Creating Professional Projects for Behance with a Step-by-Step Guide
How Gamma Affects Different Types of Images
Gamma plays a crucial role in how various types of images are perceived. Understanding how gamma affects different categories can help you make informed adjustments. Here’s a breakdown:
| Image Type | Gamma Effect | Best Practices |
|---|---|---|
| Photographs | Gamma adjustments can enhance or diminish details in both bright and dark areas. | Adjust carefully to preserve skin tones and details. |
| Graphics and Illustrations | Gamma can affect the overall vibrancy and impact of colors. | Use higher gamma for bold colors and lower gamma for softer visuals. |
| Web Images | Gamma settings can change how images are displayed on different devices. | Test on multiple screens to ensure consistency. |
| Video Content | Gamma affects the mood and feel of the content. | Keep gamma consistent throughout to maintain visual storytelling. |
By understanding these effects, you can tailor your gamma adjustments to suit the type of image you're working with, achieving optimal results every time.
Also Read This: how to print a large image on multiple pages
Frequently Asked Questions
If you're new to adjusting gamma or looking to refine your technique, you might have some questions. Here are some frequently asked questions to help clarify:
- What is the ideal gamma setting?
- The ideal gamma setting often ranges between 1.8 and 2.2 for most displays. However, it can vary depending on the type of image and the intended output.
- Can adjusting gamma fix a poorly exposed image?
- While gamma adjustments can improve visibility, they cannot fully correct exposure issues. It's best to start with a well-exposed image.
- How do I know if my gamma adjustments are successful?
- Successful gamma adjustments will enhance detail without losing color accuracy. Test the images on multiple devices to ensure they look good everywhere.
- Should I adjust gamma for print images?
- Yes, adjusting gamma for print images is essential. However, remember that prints can look different than on screens, so test prints are vital.
- Is it necessary to adjust gamma for every image?
- Not every image needs gamma adjustment. Evaluate each image individually and make adjustments as necessary to improve quality.
These FAQs can help you navigate the world of gamma adjustments and enhance your overall image editing skills.
Conclusion
Adjusting gamma is a vital skill for anyone involved in image editing, whether you're a professional photographer, graphic designer, or just a hobbyist. Understanding gamma's impact on image quality allows you to enhance your visuals, bringing out details and colors that may otherwise go unnoticed. Remember to start with a well-lit environment, use the right tools, and make small, careful adjustments. Each image is unique, so take the time to assess how gamma affects it and make changes accordingly. By following the tips and techniques discussed in this post, you can ensure your images look their best across various platforms, ultimately enhancing their impact and effectiveness.

 admin
admin


