In today's digital world, your online presence matters more than ever. One simple yet effective way to enhance your professional image is by adding your LinkedIn profile to your email signature on Mac. This step-by-step guide will walk you through the process, making it easy to connect with colleagues, potential employers, and clients. By the end, you'll not only have a polished signature but also a powerful tool for networking right at your fingertips!
Why You Should Include Your LinkedIn Profile in Your Email Signature
Including your LinkedIn profile in your email signature is more than just a trendy addition; it's a strategic move that can open doors to new opportunities. Here are some compelling reasons why you should consider this practice:
- Boosts Professional Image: A well-crafted email signature reflects professionalism. By linking your LinkedIn, you showcase your commitment to your career and networking.
- Enhances Connectivity: Including your profile makes it easier for recipients to connect with you. Whether they're colleagues or potential clients, they can view your skills, endorsements, and recommendations with just a click.
- Showcases Your Expertise: Your LinkedIn profile is a living resume. It highlights not only your work experience but also your interests, achievements, and industry insights. This can be particularly attractive to recruiters.
- Encourages Networking: By providing a direct link, you're inviting others to engage with you. This could lead to fruitful conversations, collaborations, or job offers.
- Easy Updates: Unlike a traditional resume, your LinkedIn profile can be updated in real-time. As you gain new skills or experiences, your email signature maintains its relevance without the need for constant revision.
In a world where first impressions are often formed online, having a current LinkedIn profile linked in your email signature can significantly enhance how others perceive you. It's a simple step that can yield big rewards, from expanding your professional network to catching the eye of hiring managers. So why wait? Let’s dive into the how-to part and get that signature polished!
Also Read This: How to Remove Someone from LinkedIn
3. Preparing Your LinkedIn Profile Link
Before you can add your LinkedIn profile to your email signature, you need to ensure that you have the right link ready. Here’s a quick step-by-step guide to help you grab that link effortlessly:
- Log into LinkedIn: Open your web browser and go to LinkedIn. Enter your credentials to log into your account.
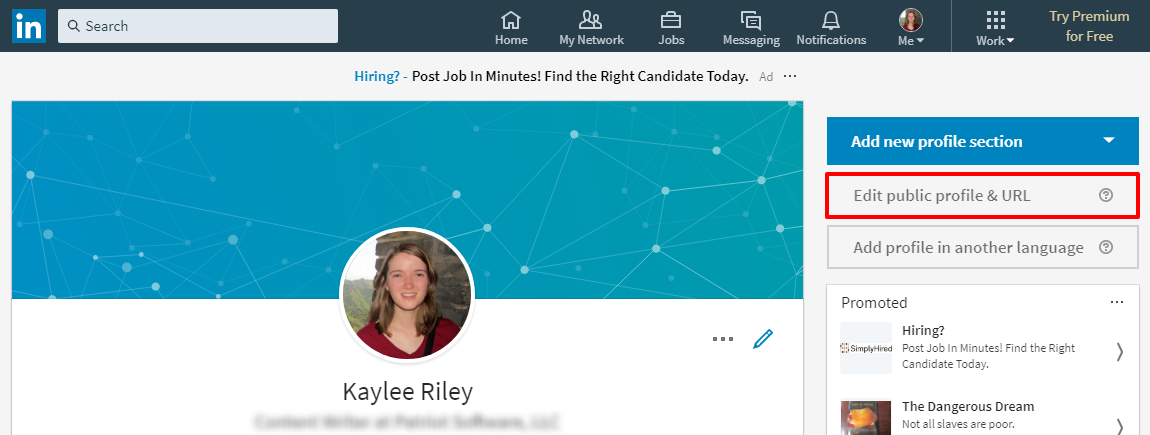
- Navigate to Your Profile: Click on your profile picture or select 'Me' from the top menu, then click on 'View Profile'. This takes you to your personal profile page.
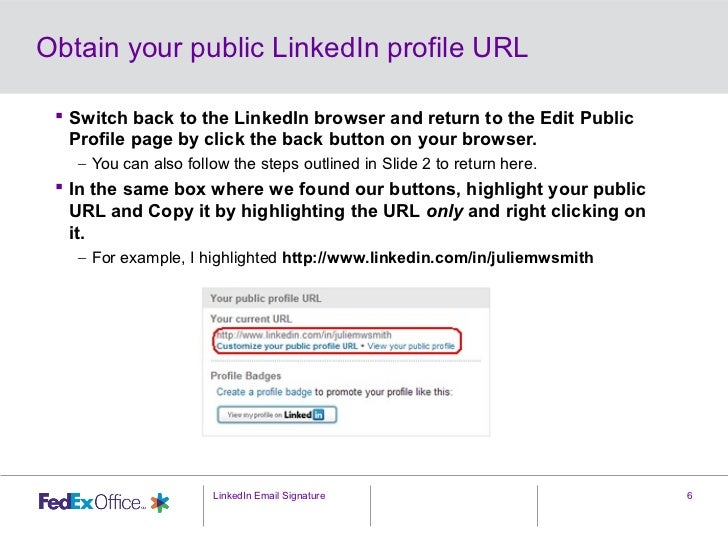
- Copy Your Profile URL: Once you're on your profile, look for a button that says 'Edit public profile & URL' on the right side. Click on it. Your URL will be displayed on the right - it usually looks like
linkedin.com/in/yourname. Click on the 'Copy' icon next to it.
Now that you have your LinkedIn profile link copied, it’s essential to make sure it looks polished. If your URL has a bunch of random numbers or it’s not user-friendly, consider customizing it:
- In the same window where you saw your URL, look for an option saying 'Edit your custom URL'. Click on it and type in a more memorable name (like your full name or a professional handle).
- Hit 'Save', and you’ll have a clean, professional link to use in your email signature.
That’s it! You now have your LinkedIn profile link ready to be added to your email signature. The next step is to access your email settings on Mac so you can incorporate this shiny new link.
Also Read This: How to Add a Link to a LinkedIn Post: A Simple Guide
4. Accessing Your Email Signature Settings on Mac

Now that you have your LinkedIn profile link at your fingertips, let’s dive into how to access your email signature settings on your Mac. Whether you’re using the Mail app or another email client, the process is fairly straightforward. Here’s a breakdown:
- Open the Mail App: Click on the Mail icon in your dock to launch the Mail app.
- Go to Preferences: In the top menu, click on 'Mail', then select 'Preferences' from the dropdown. This will open a new window with various settings.
- Select Signatures Tab: In the Preferences window, navigate to the 'Signatures' tab. Here, you’ll find all your current email signatures listed. If you don’t have any, don’t worry; we’ll create one in just a moment.
Now, you might see a sidebar with your email accounts listed. Choose the account you'd like to modify the signature for. Once selected, here’s how to create or edit your signature:
- Create a New Signature: Click the '+' button below the signatures list to create a new one. A new empty signature box will appear.
- Paste Your LinkedIn Link: In the signature box, start designing your signature. You can type your name, job title, and any other contact information. To add your LinkedIn link, simply paste it where you want it to appear.
- Hyperlink Your LinkedIn Text: Highlight the text where you want to create a hyperlink (e.g., "Connect with me on LinkedIn"). Right-click and select 'Add Link', then paste your LinkedIn URL. This makes it easy for your recipients to click through directly!
Once you’ve added all the necessary information and customized your signature to your liking, be sure to hit 'Save'. Now, every time you send out an email, your new signature will automatically be included, with a direct link to your LinkedIn profile!
Also Read This: How to Send a Connect Request on LinkedIn and Build Your Professional Network
5. Steps to Add Your LinkedIn Profile to Your Email Signature
Adding your LinkedIn profile to your email signature is a fantastic way to enhance your professional image and make it easier for people to connect with you. Here’s a simple step-by-step guide to help you through the process on your Mac:
- Open the Mail App: Start by launching the Mail application on your Mac. It’s the default email client, so you should find it in your Applications folder or via Spotlight search.
- Access Preferences: In the top menu bar, click on Mail, then select Preferences. This will open a new window where you can manage your email settings.
- Signatures Tab: Click on the Signatures tab within the Preferences window. Here, you’ll see a list of your email accounts and any existing signatures.
- Select Your Email Account: Choose the email account for which you want to add your LinkedIn profile. If you don’t have a signature yet, you’ll need to create one by clicking on the + button.
- Create Your Signature: In the right pane, you can type your signature. Start with your name, title, and contact information. Now, let’s add your LinkedIn profile link.
- Add the LinkedIn Link: Type out a phrase like “Connect with me on LinkedIn” and highlight it. Then, right-click (or Control-click) and select Add Link. A small box will pop up; here, paste your LinkedIn profile URL (e.g., https://www.linkedin.com/in/yourprofile).
- Save Your Changes: Once your signature looks good, close the Preferences window. Your new signature, complete with the LinkedIn link, should now automatically appear in your outgoing emails!
And there you have it! Simple, isn’t it? Now every email you send is a chance for someone to connect with you professionally.
Also Read This: How to Remove Your Profile from LinkedIn
6. Customizing the Appearance of Your LinkedIn Link
Now that you’ve added your LinkedIn profile to your email signature, let’s make it pop! Customizing the appearance of the link can draw attention and make it more appealing. Here are a few tips:
- Change the Text: Instead of the standard URL, use engaging text like “Let’s connect on LinkedIn!” or “View my LinkedIn Profile.” This invites action and sounds more personal.
- Format with Colors: Use rich text formatting to change the color of your link. A color that contrasts with your signature can catch the eye without being overwhelming. Just highlight the link text, click on the text color option, and choose your desired shade.
- Add Icons: Consider adding a small LinkedIn logo next to your link. You can find an icon online (just make sure to use a free resource) and copy it into your signature. Make sure it’s small enough to keep your signature looking professional!
- Adjust Font Style: You might want to use a different font style or italicize the link text. Just make sure it’s readable and matches the overall style of your signature.
Experiment with these options until you find a look that fits you. Remember, the goal is to make it easy for people to identify and click on your LinkedIn profile while maintaining a professional appearance!
Also Read This: What Is Your LinkedIn Web Address and How to Customize It?
7. Testing Your Email Signature
Once you've created your email signature that includes your LinkedIn profile link, it's time to put it to the test! Testing your signature ensures that all links work correctly and that it appears as you intended in various email clients.
Here’s a simple step-by-step guide to testing your email signature:
- Send Yourself an Email: The easiest way to start testing is by sending a sample email to yourself. Open a new message, select your newly created signature, and hit send. This will help you see how it looks in your inbox.
- Check the Formatting: Look for any formatting issues. Is the text properly aligned? Are the fonts and colors consistent? Make sure that everything appears as you designed it.
- Test All Links: Click on the LinkedIn profile link to ensure it directs you to your profile. It’s no good having a broken link in your signature! Also, check any other links you may have included.
- View on Different Devices: If possible, check your signature on both desktop and mobile devices. Sometimes, what looks good on one platform may not translate well to another. Make adjustments accordingly.
- Ask a Friend for Feedback: A fresh pair of eyes can catch things you might overlook. Send your signature to a friend and ask them for feedback. They might spot a typo or suggest a design tweak that enhances the overall look.
After completing your tests and making any necessary adjustments, you'll be ready to start using your email signature confidently!
8. Troubleshooting Common Issues
Even with careful setup, you might run into some common issues when adding your LinkedIn profile to your email signature. Don't worry; these are usually easy to fix!
Here are some common problems and their solutions:
- Link Not Working: If your LinkedIn link isn't directing correctly, double-check the URL you inserted. Ensure you’ve copied it directly from your LinkedIn profile without any extra spaces at the beginning or the end.
- Formatting Issues: If your signature looks jumbled or out of place, try adjusting the font size or style in your email settings. Some email clients interpret HTML differently, which can lead to unexpected formatting.
- Signature Not Showing Up: If your signature isn't appearing in your emails, revisit the settings in your mail client. Ensure that you've set the signature to appear in new emails and replies, as some clients require this setting separately.
- Images Not Displaying: If you’ve added any images and they’re not showing up, check that the images are hosted online and ensure the URLs are correct. Sometimes, images can be blocked by email clients for security reasons, so consider using links instead.
- Signature Appearing in Plain Text: If your signature appears as plain text, it might mean that your email is set to send in plain text format. Make sure your email is set to HTML format to display your signature correctly.
By addressing these common issues, you can ensure that your email signature looks professional and functions seamlessly, giving your contacts easy access to your LinkedIn profile!
 admin
admin


