Welcome to your ultimate guide on using Behance! For creative professionals, Behance is like a digital gallery that showcases your work to the world. Whether you’re an artist, designer, photographer, or even a musician,
In today's competitive creative industry, having an online presence is crucial. Behance allows you not only to show your projects but also to engage with other creatives, gain feedback, and even find inspiration for your next big idea. Think of it as your online résumé, where the quality of your showcased work can lead to exciting opportunities. So, let’s dive deeper into how to set up your account for maximum impact!
Setting Up Your Behance Account
Getting started on Behance is a simple process, but to really make the most of it, you'll want to pay attention to a few key steps. Here’s how to set up your account and lay a solid foundation for your creative portfolio.
Step 1: Sign Up
First things first, head over to Behance.net. You can sign up using your Adobe ID, or if you're not an Adobe user, you can create an account using your email address. Keep in mind that your name and profile picture will be visible to others, so use a professional photo and your real name if possible. This enhances trust and professionalism.
Step 2: Complete Your Profile
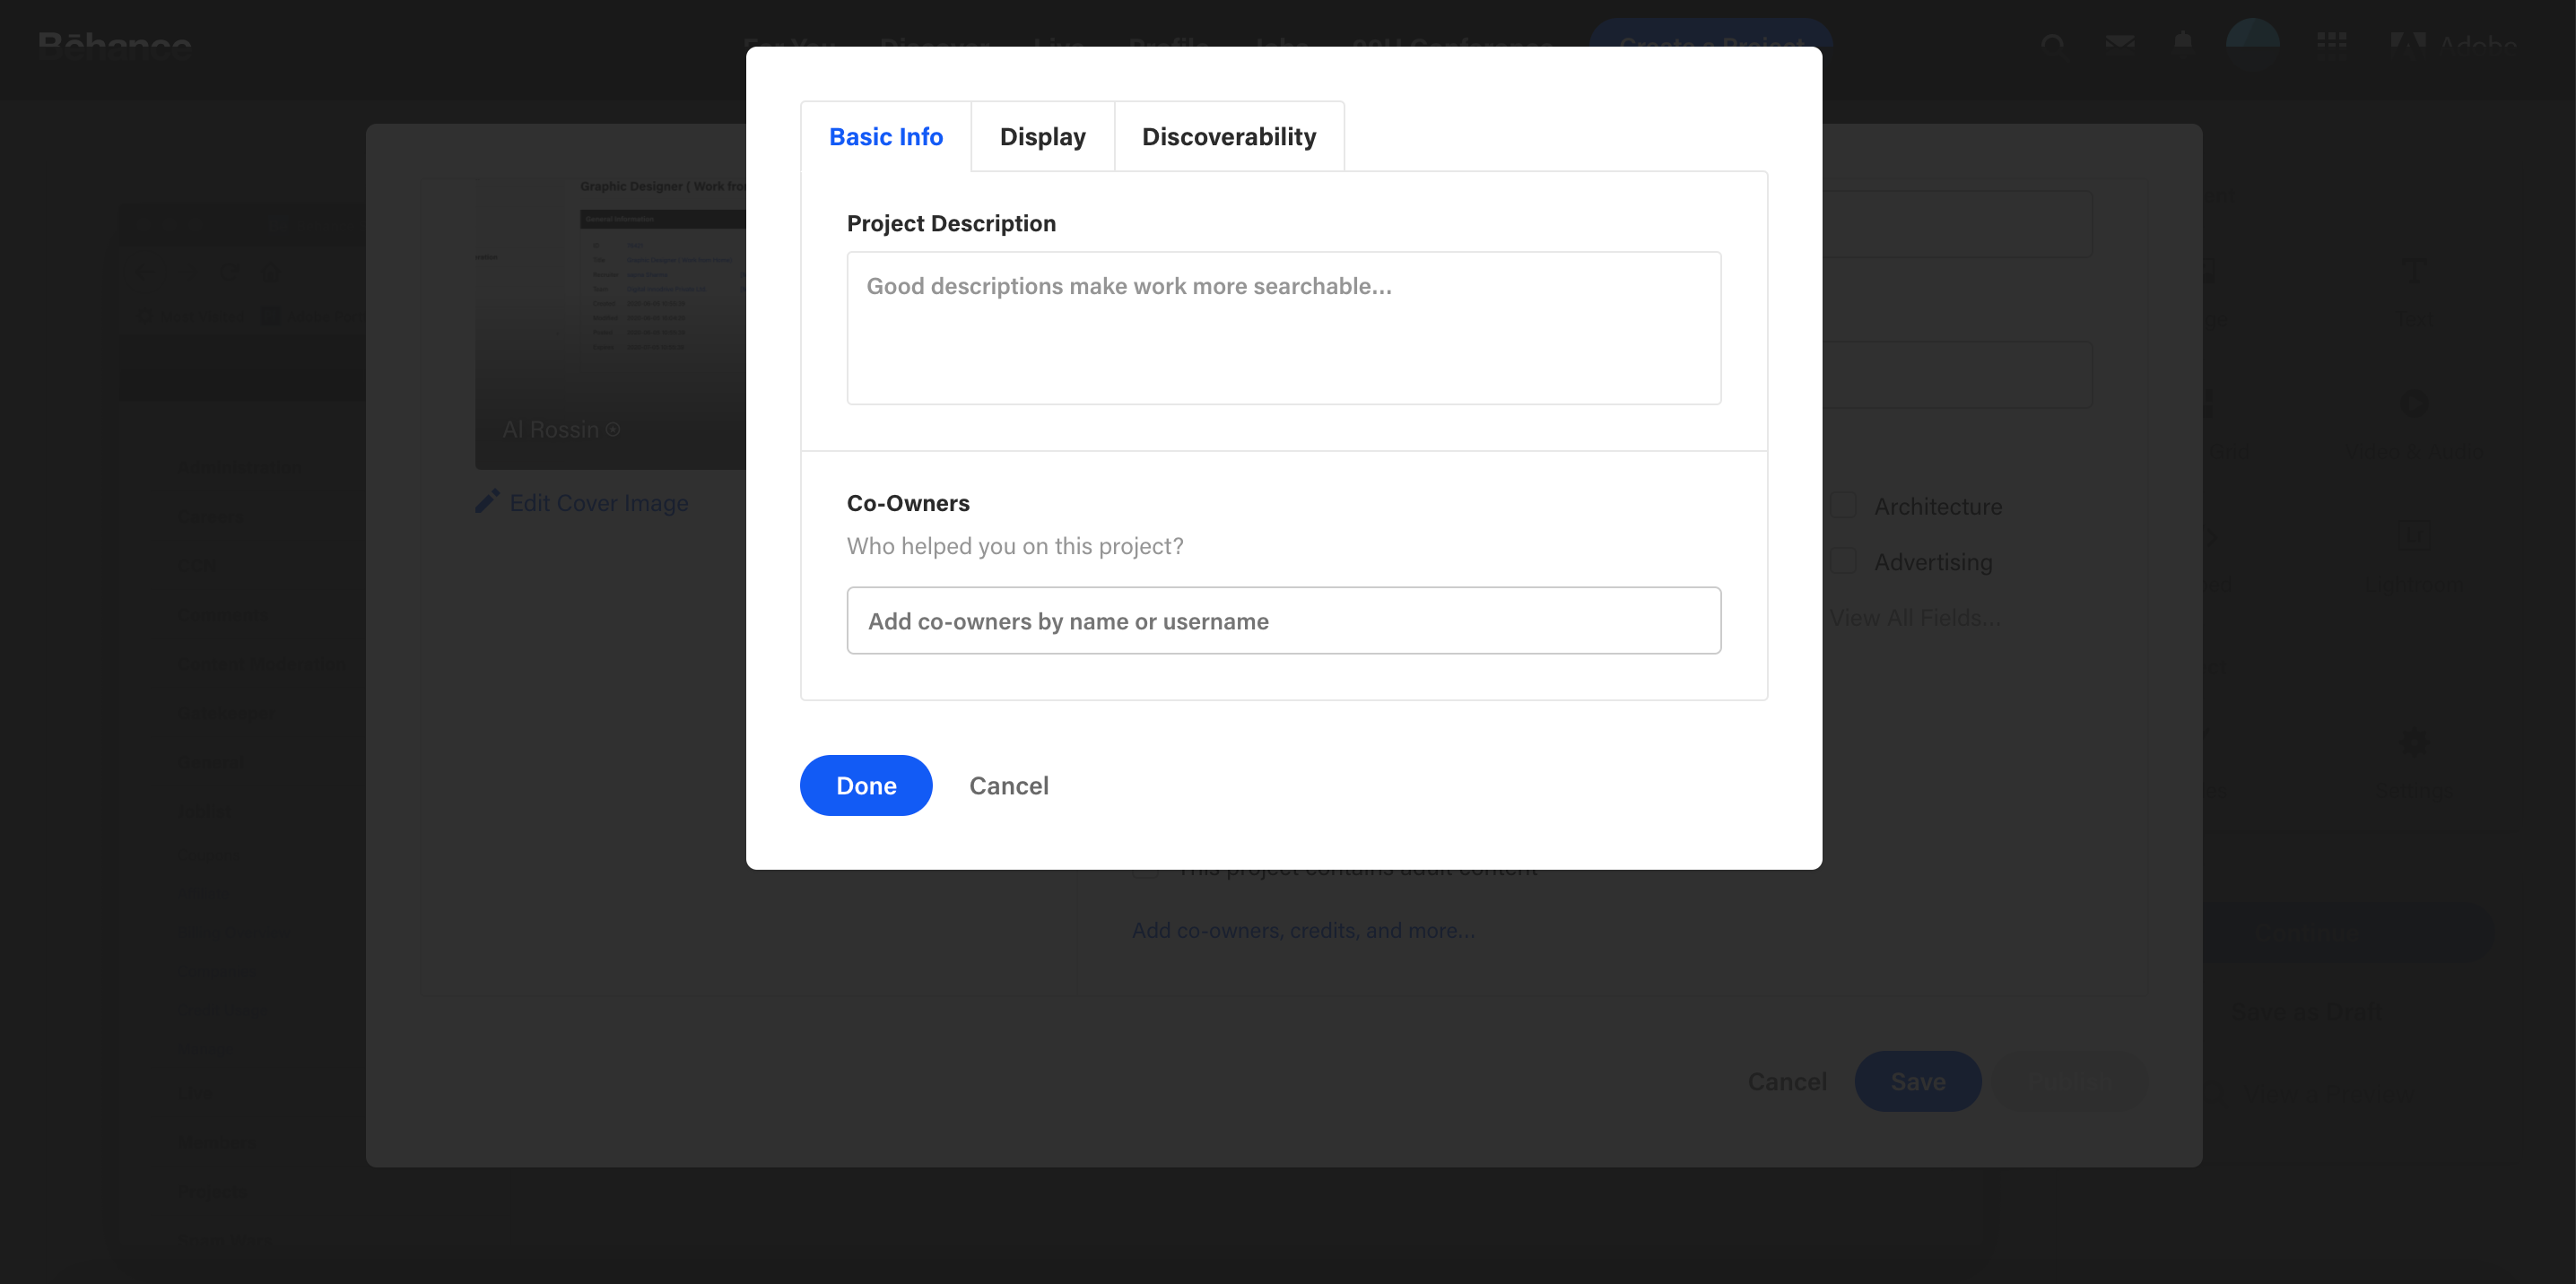
Once you’re signed up, you’ll want to fill out your profile thoroughly. A complete profile includes:
- Profile Picture: Choose a clear and professional-looking image that represents you.
- Bio: Write a short but engaging bio that explains who you are, what you do, and your creative philosophy. Don’t forget to include links to your social media accounts or personal website!
- Location: Adding your location can help local clients find you, so be sure to mention where you’re based.
Step 3: Customize Your URL
Behance allows you to customize your URL to make it easier for others to find you. It’s best to keep it simple, ideally your name or business name, to maintain professional branding.
Step 4: Showcase Your Work
Once your profile is set, the fun begins! Start uploading your projects. Make sure each project is well-documented with high-quality images or videos. Use the project description to tell its story. Why did you create it? What challenge did it address? This adds a personal touch that viewers love.
Step 5: Engage with the Community
Don’t just upload and leave. Engage with other creatives by appreciating their work, leaving thoughtful comments, and following those whose work inspires you. This builds community and can lead to collaborations or partnerships.
Step 6: Maintain and Update Your Portfolio
Your Behance account should evolve with you. Regularly update your portfolio with new projects, keep your bio current, and remove any outdated work that no longer represents your best efforts.
In conclusion, setting up your Behance account is about making a strong first impression. A well-rounded and engaging profile could be the key to unlocking new opportunities in your creative journey. So get started, showcase your artistry, and let the world see what you can create!
Also Read This: The Expensive Side of Getty Images: Factors Determining Their Premium Pricing
3. Steps to Create a New Project on Behance
Now that you're inspired to showcase your work on Behance, let's dive into the practical steps of creating a project. It’s quite an intuitive process, so don’t worry if you’re new to it! Follow these simple steps to get started:
- Log In to Your Behance Account: If you don’t have an account yet, you’ll need to create one. It’s free and straightforward. Just hit the sign-up button, fill in your details, and you’re good to go!
- Click on the “Create a Project” Button: Once you're logged in, find the “Create a Project” button located on your dashboard. This is where your creative journey begins!
- Add Your Project Files: You can start uploading your images, videos, or any other media that beautifully represents your project. Behance supports various formats, so don’t be shy to showcase your creativity!
- Organize Your Content: You have the ability to rearrange the order of your media files. This can be done simply by dragging and dropping them. Make sure they're arranged in a way that tells a compelling story about your project.
- Add Project Details: This is your chance to get descriptive! Fill in the project title, add a detailed description, and include any relevant tags that describe your work. This step is crucial for helping others find your project through search.
- Select a Cover Image: The first impression is everything! Choose an eye-catching cover image that represents your project well. Remember, the cover image is what will attract viewers to click on your project.
- Choose Project Tools: Behance allows you to select tools used for your project. This not only showcases your skills but can also help others who are interested in the same tools to find your work.
- Publish Your Project: Once you’re satisfied with how everything looks, it’s time to hit that “Publish” button. Voilà! Your project is now live for the world to see.
And remember, you can always go back to edit your project even after it's published. So, don’t stress over getting it perfect the first time. Enjoy the process and let your creativity shine!
Also Read This: Copying Fonts from Images for Inspiration
4. Tip 1: Choosing the Right Project Type for Your Work

When it comes to showcasing your work on Behance, choosing the right project type can significantly impact how your work is perceived. Here are some tips to help you make that decision:
Understand the Types of Projects You Can Create:
- Graphic Design: Perfect for showcasing designs, branding, and illustrations.
- Photography: Ideal for displaying stunning photographs, portfolios, or thematic photo essays.
- UI/UX Design: Best suited for showcasing user interfaces, mobile apps, and websites.
- Motion Graphics: Great for displaying animations, video work, or interactive designs.
- Architecture: Use this type to showcase architectural designs, blueprints, or real-world projects.
When choosing the right project type, consider the following:
- Your Target Audience: Who do you want to attract? Tailor your project type to meet the interests of your target audience, whether they are potential clients, collaborators, or fellow creatives.
- Your Strengths: Choose a project type that allows your skills and creativity to shine. If you're a graphic designer but love photography, consider a project that blends both to showcase your versatility.
- The Story You Want to Tell: Different project types allow for different narratives. Think about how each type can enhance the story you want to communicate through your work.
By carefully selecting the right project type, you increase the chances of grabbing the attention of viewers and potential employers or collaborators. So, take your time, think it through, and make sure to pick something that feels authentic to your creative vision.
Also Read This: Best Shutterstock Downloader Tools: Enhancing Your Image Acquisition Process
5. Tip 2: Crafting a Captivating Project Title and Description
When it comes to showcasing your projects on Behance, the title and description are your first impressions. Just like a good book needs an enticing title to draw readers in, your project needs a compelling name to catch the eye of potential clients and collaborators. Here’s how to make your title and description pop!
*Start with the Title: Your project title should be concise but descriptive. Ideally, it should convey what the project is about while including keywords that people might search for. Think of it as a mini-advertisement for your work. For example, instead of a bland title like "Graphic Design Project," try something captivating like "Revitalizing Brand Identity for XYZ Corp." This not only tells viewers what to expect but also hints at the impact of your work.
Here are some helpful tips to nail your project title:
- Keep it Short and Sweet: Aim for no more than 10 words. This ensures that it’s easy to remember and doesn’t get cut off in previews.
- Include Keywords: Think about what terms your target audience is searching for. Include relevant keywords that might help your project surface in searches.
- Be Descriptive: Go beyond generic terms. Use descriptive language that evokes the essence of your project.
Now, onto the Description: Once you’ve captured attention with your title, it’s time to elaborate with a detailed project description. This is your chance to tell the story behind your work:
- Context is Key: Start by explaining the background of the project—what was the problem you set out to solve? Who was your target audience? This sets the stage for your viewers.
- Talk About Your Process: Share insights into your creative process. What tools did you use? What challenges did you face? This not only demonstrates your skills but also makes your project relatable.
- Highlight Results: If applicable, mention any statistics, feedback, or outcomes that showcase the success of your project. Did you exceed client expectations? Did the design lead to increased user engagement? Numbers can speak volumes.
Lastly, don’t forget to proofread your description. Spelling mistakes or grammatical errors can detract from your professionalism. Take the time to ensure everything is polished and easy to read. In summary, a captivating title paired with a well-crafted description can significantly enhance the visibility and appeal of your project on Behance!
Also Read This: How to Change the Language on Behance: Customizing Your Experience
6. Tip 3: Using High-Quality Images and Media
In the world of design and creativity, visuals are everything. When showcasing your projects on Behance, the images and media you use can make or break your presentation. Think about it—first impressions are often visual! Here’s how to ensure your project is not only seen but remembered.
Choose Crisp and Clear Images: Blurry, pixelated, or poorly lit photographs will only undermine your hard work. Always use high-resolution images that showcase your projects in their best light. if your work is digital, ensure that the files are uploaded at the highest quality without being too large to load quickly. Aim for a resolution of at least 72 DPI (dots per inch) for web viewing.
Here are some specific tips for selecting and presenting your images:
- Use a Consistent Style: A cohesive style across your images creates a unified look. Whether you go for minimalism or a vibrant color palette, make sure your images align with your project’s brand.
- Include Process Shots: Don’t just show the final product; include images that document your process. This helps viewers understand your journey and the effort that went into your work.
- Incorporate Videos or GIFs: If applicable, consider adding videos or animated GIFs. A short time-lapse of your design process or a walk-through of your project can captivate an audience and keep them engaged more effectively than static images.
Optimize Your Images*: Before uploading, make sure your files are optimized for web use. This means reducing the file size without compromising quality. There are plenty of online tools available that can help compress your images efficiently.
Lastly, remember storytelling through visuals is crucial. Arrange your images in a way that presents a narrative. Start with teaser images, followed by close-ups, and finish with wide shots that show the entire project context. This not only makes your project visually appealing but also provides a seamless experience for your audience.
In conclusion, the quality of your images and their arrangement can greatly enhance the impact of your Behance project. So take the time to curate not just your content, but how it's presented. High-quality visuals will undoubtedly draw viewers in and keep them hooked on your work!
Also Read This: Is Shutterstock Good for Selling Photos? Evaluating the Platform’s Effectiveness
7. Tip 4: Organizing Your Project for Maximum Impact
When it comes to showcasing your work on Behance, organization is key. A well-structured project not only captures attention but also keeps viewers engaged, guiding them through your creative journey. Here are some essential tips to help you organize your project for maximum impact:
- Start with a Strong Cover Image: The first impression matters! Your cover image should be eye-catching and representative of the project. Choose a striking visual that sums up the essence of your work to entice viewers to dive deeper.
- Use a Logical Flow: Structure your project with a clear narrative. Start with an introduction that sets the context, followed by your design process, and conclude with the final results. Consider using sections or headings to break up the content and guide your audience through your thought process.
- Show Your Process: Include sketches, wireframes, or drafts to illustrate your creative journey. This not only highlights your skills but also helps viewers appreciate the effort that goes into your work. Use before-and-after comparisons to showcase your evolution and final results.
- High-Quality Imagery: Always make sure to upload high-resolution images. Blurry or pixelated visuals can diminish the perceived quality of your project. Invest time in presentation; use consistent styles and layouts for a professional feel.
- Clear Descriptions: Accompany your visuals with concise yet informative descriptions. Explain your concepts, tools used, and the challenges you faced. Don't overload your audience with too much text; instead, aim for clarity and brevity.
- Engaging Captions: Use engaging captions for each image or section. They should provide insights without overwhelming the viewer. Think of these as storytelling elements that add depth to the visual experience.
- Call-to-Action: Finish strong with a call-to-action! Invite viewers to leave feedback, follow you, or check out your other projects. Building a connection is crucial on platforms like Behance.
Remember, the goal here is to create an immersive experience that communicates your creativity and professionalism. An organized project not only allows your work to shine but also encourages engagement from potential clients and peers alike!
Also Read This: Updating Your Adobe Website with Behance Integration
8. Understanding Tags and Categories for Better Visibility
Tags and categories are vital components of your Behance projects, serving as signposts for viewers and search engines alike. Understanding how to effectively use them can significantly boost your visibility. Let’s break down the essentials:
- What Are Tags? Tags are keywords that describe your project. They help categorize your work and make it discoverable when users search for specific terms. Think of them as the GPS for your project—helping people find exactly what they're looking for!
- Choosing Relevant Tags: Be specific yet broad enough to capture a wider audience. A mix of general and niche-related tags works best. For instance, if you're showcasing a logo design, use tags like “branding,” “graphic design,” and “logo design.”
- Limit Your Tags: While you can use multiple tags, don’t overdo it. Aim for 5-10 relevant tags to avoid clutter. The idea is to maintain focus while still appealing to diverse search interests.
- Categories Matter: When creating your project, you’re prompted to select a category. This helps place your work in the correct niche. Choose wisely! Picking the right category will ensure your project gets in front of the right audience.
- Stay Current: Trends change constantly in the creative world. Keep your tags relevant by following industry trends and updating them accordingly. This will help keep your projects fresh and visible.
- Engage with the Community: Tagging isn’t just for discoverability; it’s also about community engagement. Use tags that resonate with fellow creators, and consider following popular tags to see what works for others in your field. Sometimes, community can lead to unexpected opportunities.
- Analyze and Adapt: Regularly review which of your tags and categories are working. Behance provides insights that show how your work is being found. If something isn’t resonating, don’t be afraid to tweak your approach.
In summary, effective use of tags and categories can significantly enhance your Behance project’s visibility. Take the time to think about how to best categorize your work, and don’t shy away from experimentation. The more strategic you are with your tags, the better your audience engagement will be!
Also Read This: Linking Behance to Instagram for Effective Work Showcasing
9. Publishing and Sharing Your Project
Once you've poured your creativity and hard work into your Behance project, it's time to share it with the world! But before you hit that publish button, there are a few steps to ensure your project shines and reaches the right audience.
Finalize Your Project
Before publishing, double-check all aspects of your project. Here’s a quick checklist:
- Ensure all images and videos are high quality.
- Revise your project description for clarity and engagement.
- Tag your project appropriately for easy discoverability.
- Set a captivating cover image that reflects your project’s essence.
Publishing Your Project
When you’re ready, click on the Publish button. But remember, publishing is just the beginning! After publishing, you'll be prompted to share your project. Here’s where the fun starts!
Sharing Options
Behance provides several ways to share your project:
- Direct Link: Copy the direct link to your project and share it via email or messaging apps.
- Social Media: Use the built-in options to share your project across platforms like Facebook, Twitter, and LinkedIn. A few clicks and your project is out there!
- Embed Code: If you want to showcase your project on your website or blog, Behance generates an embed code. Just copy and paste it where you want it displayed!
Engage with Your Audience
Once your project is live, keep an eye on the feedback! Respond to comments and questions. Engaging with your audience not only builds relationships but also encourages others to share your project.
Remember, the journey doesn’t end after publishing. Keep promoting and refining your project based on viewer interactions and feedback. The more you engage, the more visibility you gain!
Also Read This: How to Get a Publish Link from Behance and Share Your Work Online
10. Promoting Your Works on Social Media and Other Platforms
Now that your project is live and ready to dazzle, let's dive into some effective ways to promote your work beyond Behance. Social media is a powerful ally in showcasing your creativity to a broader audience!
Know Your Audience
Understanding who your audience is can tremendously affect how you promote your work. Are they design enthusiasts, potential clients, or fellow creatives? Tailoring your content to speak directly to them will help in gaining traction.
Choosing the Right Platforms
Different platforms cater to different audiences. Here’s a brief rundown:
- Instagram: Perfect for visual storytelling. Use reels and stories to showcase behind-the-scenes content!
- Facebook: Great for community engagement. Join design groups to share your project and get valuable feedback.
- LinkedIn: Ideal for professional networking. Ideal for reaching potential clients in a professional context.
- Pinterest: A hub for inspiration. Pin your work to reach users looking for creative ideas.
Creating Shareable Content
To maximize engagement, consider making your promotional content visually appealing. Here are some ideas:
- Short videos showcasing your project process.
- Eye-catching graphics with snippets or quotes from your work.
- Step-by-step images or infographics that tell the story of your project.
Collaborate and Network
Networking can significantly broaden your reach. Collaborate with other creatives and leverage each other’s audiences. Guest blogging, co-hosted webcasts, or shared social posts can be mutually beneficial!
Keep Engaging After Publishing
After sharing, keep the conversation going! Reply to comments and express gratitude for any shares. Being active on social media and interacting with your audience builds community and encourages future engagement with your work.
Promoting your project on social media can feel daunting but remember, it’s all about sharing your passion. Stay authentic, be patient, and watch your audience grow!
Conclusion: Maximizing Engagement and Feedback on Your Projects
In today's digital landscape, effectively showcasing your work on platforms like Behance is crucial for attracting attention and engaging with potential clients, collaborators, and other creatives. Here are some key strategies to maximize engagement and feedback on your projects:
- Encourage Interaction: Ask for feedback in your project descriptions. Simple prompts like "What do you think?" or "I’d love your thoughts!" can inspire viewers to leave comments.
- Leverage Social Media: Share your Behance projects on platforms such as Instagram, Twitter, and LinkedIn to drive more traffic to your project pages.
- Join Creative Communities: Engage with other users by commenting on their projects and following fellow creatives. Building relationships can lead to increased visibility for your own work.
- Update Regularly: Regularly updating your projects keeps your portfolio fresh and engaging. It also signals to viewers that you are active and committed to your craft.
Consider the following table to visualize the engagement strategies:
| Strategy | Benefits |
|---|---|
| Encourage Interaction | Boosts comments and discussions |
| Leverage Social Media | Increases visibility and reach |
| Join Creative Communities | Fosters connections and collaborations |
| Update Regularly | Keeps portfolio dynamic and engaging |
By implementing these strategies, you can foster a more engaging atmosphere around your projects, leading to valuable feedback and recognition within the creative community.
 admin
admin


