Are you looking to elevate your video projects with some great tunes? Whether it's for a vlog, a short film, or a social media post, adding music can really enhance the viewer's experience. In this guide, we'll walk you through the process of adding YouTube Music to CapCut on your computer. Don’t worry if you’re new to this; we’ll break it down step by step!
Requirements for Adding Music to CapCut
Before diving into the process of adding YouTube Music to CapCut, it's essential to ensure you have everything you need. Let’s go over the requirements to make this task smooth and straightforward.
1. CapCut Installed on Your Computer:
- You need to have the CapCut software installed on your computer. It’s available for both Windows and Mac.
- If you haven't installed it yet, head over to the official CapCut website, download it, and follow the installation instructions.
2. A Stable Internet Connection:
- Since you’ll be using YouTube Music, a stable Internet connection is crucial for streaming or downloading the tracks.
- A good connection will ensure that you can access the songs without interruption.
3. YouTube Music Account:
- You’ll need an account on YouTube Music to access its vast library of tracks.
- If you don’t have one, simply sign up for free. There’s also a premium option if you want to enjoy ad-free listening.
4. Audio Extraction Software (if necessary):
- Depending on the music you want to use, you may need software to extract audio from videos, especially if you’re using copyrighted material.
- Popular options include VLC Media Player or online converters, which can help you get audio in MP3 format.
5. A Basic Understanding of CapCut:
- While you don’t need to be a pro, having a basic understanding of how CapCut works will make the process much smoother.
- Familiarize yourself with the interface, including how to import files and work with audio tracks.
With these requirements in place, you’re set to go! Understanding these critical elements before you start will save you time and ensure your video editing experience is enjoyable. Now, let’s move on to the steps for adding YouTube Music to CapCut!
Also Read This: Are ParrotX2 YouTube Videos Scripted? Unveiling the Truth Behind the Popular Channel
3. Step-by-Step Guide to Downloading YouTube Music
So, you want to add some catchy tunes from YouTube Music into your CapCut projects? Great choice! Downloading music from YouTube can seem a bit tricky at first, but once you get the hang of it, you’ll be a pro in no time. Here’s a simple, step-by-step guide to help you out:
- Find Your Desired Song: First things first, head over to YouTube Music and search for the song you want to download. You can use the search bar at the top of the page to make it even easier!
- Copy the Video URL: Once you’ve found the perfect track, click on it to open the video in a new tab. Look in the address bar, and copy the URL of the song. It'll look something like https://music.youtube.com/watch?v=XXXXXXXXXXX.
- Select a YouTube to MP3 Converter: Next, you’ll need a YouTube to MP3 converter. Some popular ones include YTMP3, YTMP4, or Vidtomp3. Just open any of these converters in a new tab.
- Paste the URL: On the converter's website, you'll see a box to paste your copied URL. Go ahead and paste the link there.
- Download the MP3: After pasting the URL, click on the Convert button. Wait a few seconds for the conversion process to finish. Once it’s ready, there will be a Download button. Click on it and save the MP3 file to your computer!
And there you have it! You've successfully downloaded your favorite track from YouTube Music. Now, you’re all set to import it into CapCut!
Also Read This: How to Download Audio from YouTube on Mac: A Simple Guide for Apple Users
4. Importing Music into CapCut
Now that you have your music downloaded, it's time to bring it into CapCut. Whether you're making a video for some social media fun or just to share with friends, adding your music is an exciting step. Let's walk you through how to do this:
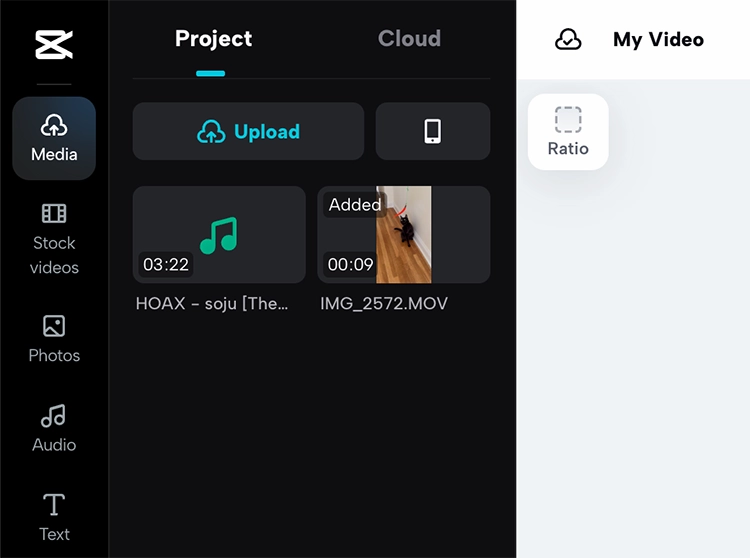
- Open CapCut: Start by launching the CapCut application on your computer. Make sure your project is open where you want to add the music.
- Go to the Audio Section: On the left panel of the CapCut interface, look for the Audio tab. Click on it to explore audio options.
- Select "Import": You should see an Import button or a + icon. Click on it to bring up your file explorer.
- Find Your Downloaded MP3: Navigate to the folder where you saved the MP3 file from YouTube Music. Select the file and click Open.
- Drag and Drop: Once the music loads into CapCut, you can drag it directly onto your timeline. Position it exactly where you want the music to start playing in your video.
- Edit as Needed: After adding the music, you can adjust the volume, trim the track, or loop it if necessary. CapCut has various editing features to help you get just the sound you want!
That's it! You’ve successfully imported music into your CapCut project. Now your video has that extra flair, making it even more engaging for your audience. So, go ahead and start editing with those awesome tunes!
Also Read This: How to Be a YouTuber as a Kid
5. Editing Music in CapCut
Alright, so you’ve successfully added your YouTube Music to CapCut—now what? It’s time to get creative! Editing music within CapCut is super intuitive, making it easy for anyone to enhance their videos. Let’s dive into some of the essential editing features you can use:
- Trimming: If your audio is longer than needed, simply select the audio track and use the trimming tool to cut it to the desired length. Just drag the ends of the audio clip to adjust.
- Splitting: Want just a specific part of the song? Use the split tool to cut the track into sections. This is great for creating seamless transitions or focusing on particular beats.
- Volume Control: Adjust the volume levels so that the music complements your video instead of overpowering it. You can fade the music in and out to create a smooth auditory experience.
- Adding Effects: CapCut allows you to add various audio effects. Experiment with reverb, echo, or equalization to enhance your music and make it fit your video’s vibe.
- Layering Sounds: If you want to add sound effects or other audio clips, you can layer them on top of your music track. This can create a richer audio landscape for your videos.
Remember, the key to great video editing is subtlety. Make sure the music enhances the visuals without stealing the show! Take your time experimenting with these features to get the perfect sound for your video.
Also Read This: How to Download YouTube Videos in HD for High-Quality Playback
6. Common Issues and Troubleshooting Tips
Even the best video editors can run into hiccups now and then—especially when dealing with audio. Here are some common issues you might face while adding or editing YouTube Music in CapCut along with handy troubleshooting tips:
Issue 1: Music Not Playing
If your audio isn’t playing, it could be due to several reasons:
- Check Volume Levels: Make sure the track volume isn’t set to zero. Double-check both the audio track and the overall project volume.
- Your Audio Track is Muted: Sometimes, common mistakes happen! Ensure that the audio track itself isn’t muted in CapCut.
Issue 2: Audio Sync Issues
Finding that your audio doesn’t quite match up with your video can be frustrating. Here’s what you can do:
- Reposition the Audio Track: Drag the audio track left or right in the timeline to get the timing right. Sometimes, a mere adjustment can work wonders!
- Adjust Playback Speed: If your video is too fast or too slow, consider adjusting the playback speed to match the rhythm of the music.
Issue 3: Poor Audio Quality
If your music sounds distorted or of low quality:
- Source Quality: Ensure that the original YouTube Music is of high quality. Low-quality recordings will always sound poor, no matter the editing.
- Bit Rate Settings: Check if CapCut has a setting that allows for higher bit rates, as this can improve the audio quality during editing.
By keeping these tips in mind, you can troubleshoot common issues and enhance your video editing experience with CapCut. Remember to save your work often so you don’t lose any creative progress! Happy editing!
Conclusion and Final Thoughts
Adding YouTube Music to CapCut on your computer can elevate your video editing projects and enhance the overall viewing experience. By following the steps outlined in this blog, you can effectively incorporate your favorite tracks without any hassle.
Here are some key takeaways to remember:
- Choose the Right Music: Ensure you select tracks that fit the mood and theme of your video.
- Convert the Music: Use reliable conversion tools to ensure high-quality audio files.
- Import with Ease: Familiarize yourself with CapCut's interface to streamline the import process.
- Check Usage Rights: Always respect copyright laws and use music that does not infringe upon artists' rights.
Remember, the right soundtrack can make a significant difference in how your audience perceives your content. Take the time to curate your audio selection and apply it effectively in your edits. With these tips in mind, you can confidently enhance your videos with vibrant soundscapes. Happy editing!
 admin
admin


