Welcome to our guide on how to add licenses and certifications on LinkedIn! In today's competitive job market, having the right credentials can certainly give you an edge. Whether you’ve just completed a course, earned a professional license, or received a certification that showcases your skills, adding these achievements to your LinkedIn profile can help you stand out to potential employers. So, let's dive into why these additions are so crucial!
Why Adding Licenses and Certifications is Important
When it comes to boosting your professional image, adding licenses and certifications to your LinkedIn profile is a smart move. Here are several reasons why they’re so important:
- Enhanced Credibility: Displaying your licenses and certifications shows that you’ve committed time and effort to honing your skills. This commitment increases your credibility and positions you as a knowledgeable expert in your field.
- Improved Visibility: Many recruiters use specific keywords when searching for candidates. By adding relevant licenses and certifications, you optimize your profile to appear in search results, enhancing your chances of being discovered.
- Competitive Advantage: With countless candidates applying for the same job, having additional qualifications can set you apart from the competition. Certifications can often make a significant difference in hiring decisions.
- Skill Highlighting: Certifications can highlight specific skills that are essential for the roles you’re interested in. Recruiters often look for particular skill sets, and having these certifications prominently displayed can catch their eye.
- Career Growth: Adding licenses and certifications demonstrates your dedication to ongoing professional development. This commitment can lead to more opportunities for promotions and raises.
In summary, adding licenses and certifications to your LinkedIn profile is more than just a resume filler; it's a strategic move to enhance your career prospects!
3. Step-by-Step Guide to Adding Licenses on LinkedIn
Adding licenses to your LinkedIn profile is a great way to showcase your professional qualifications and expertise. Here's a step-by-step guide to help you through the process:
- Log in to Your LinkedIn Account: Start by signing into your LinkedIn account. Ensure you’re on your homepage.
- Go to Your Profile: Click on your profile picture located at the top of your homepage to access your profile.
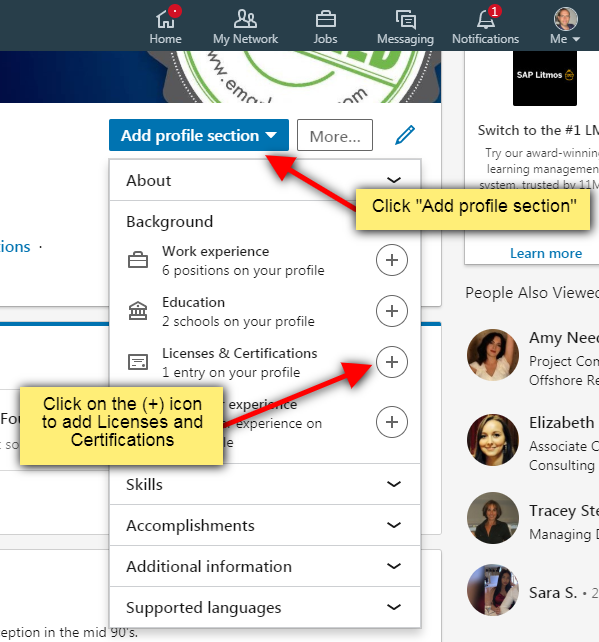
- Add New Section: Look for the “Add profile section” button, usually located below your profile photo. Click on it to expand the dropdown menu.
- Select Licenses and Certifications: Navigate to the “Accomplishments” section and find the “Licenses & Certifications” option. Click on it.
- Enter License Information: A new form will appear. Fill out the necessary details:
- License Name: Enter the title of your license.
- Issuing Organization: Name the organization that issued the license.
- License Key: If applicable, include the license number or key.
- Issue Date: Select the month and year you received the license (you can leave it blank if it’s ongoing).
- Expiration Date: Indicate if it’s valid indefinitely or has an expiration date.
- Credential URL: Provide a link if there’s an online verification option for your license.
- Save Changes: Once you’ve filled in all the relevant information, hit the “Save” button to add the license to your profile.
- Review your Profile: It’s always good to double-check your profile to ensure the license appears as intended.
4. Step-by-Step Guide to Adding Certifications on LinkedIn
Showcasing your certifications on LinkedIn can greatly enhance your profile by highlighting your commitment to professional development. Here’s how you can do this step-by-step:
- Log into LinkedIn: Access your LinkedIn account by entering your credentials on the website or app.
- Navigate to Your Profile: Click on your profile picture, or select “Me” at the top of the homepage, and then click on “View Profile.”
- Add a New Section: Find the “Add profile section” button just below your cover photo and click on it to see more options.
- Choose Certifications: Under the “Accomplishments” category, look for “Certifications” and select it.
- Fill Out Certification Details: A form will pop up where you need to provide:
- Certification Name: Write the name of your certification.
- Issuing Organization: Specify the name of the organization that granted the certification.
- Issuing Date: Select the month and year it was issued.
- Credential ID: If there’s an ID number associated with your certification, include it here.
- Credential URL: Share a link for verification if your certification has an online presence.
- Save Your Changes: Once all fields are filled out, click on “Save” to officially add the certification to your LinkedIn profile.
- Check Your Profile: Finally, give your profile a once-over to confirm that the certification looks good and is correctly displayed.
5. Tips for Highlighting Your Certifications and Licenses
When it comes to showcasing your certifications and licenses on LinkedIn, a little strategy can go a long way. Here are some tips to help your qualifications stand out:
- Use Visuals: LinkedIn allows for the addition of photos and media. Include a copy of your certificate or a badge that represents your credential. This not only makes your profile visually appealing but also establishes credibility.
- Optimize Your Headline: Your LinkedIn headline is prime real estate! Incorporate key certifications or licenses right in your professional headline. For example, instead of merely stating “Marketing Professional,” use “Certified Digital Marketing Specialist | Google Analytics Certified.” This immediately communicates your qualifications.
- Join Relevant Groups: Find groups that align with your certifications or licenses. Engaging in these communities can increase your visibility and demonstrate your commitment to ongoing professional development.
- Share Your Accomplishments: Don’t hesitate to share posts or articles about what you learned while achieving your certifications. This adds a personal touch and showcases your enthusiasm for your field.
- Request Endorsements: Engage your network by asking for endorsements for your licenses and certifications. Recommendations from colleagues or supervisors can add significant weight to your qualifications.
Remember, it's all about making your profile dynamic and engaging! Consider each certification a stepping stone, showcasing your growth and expertise in your industry.
6. Conclusion
Adding licenses and certifications to your LinkedIn profile isn’t just about listing achievements; it’s about telling your professional story. When you craft a compelling narrative around your qualifications, you not only enhance your online presence but also attract opportunities that align with your career goals.
Here’s a quick recap of the steps you should take:
- Log into your LinkedIn account and navigate to the “Add Profile Section” area.
- Select “Licenses and Certifications” to formally add your credentials.
- Make sure to include pertinent details like the issuing organization and dates.
- Highlight your licenses and certifications through thoughtful strategies like visuals, engaging headlines, and community involvement.
In this digital age, your online profile is often the first impression potential employers and networks will have of your professional self. So, take the time to make it reflect your achievements effectively. Go ahead, elevate your LinkedIn profile today by showcasing your licenses and certifications—they’re valuable assets that validate your skills and dedication!


