In today's competitive job market, standing out can be quite challenging. One of the simplest ways to enhance your profile is by adding certifications to your LinkedIn account. These additions not only showcase your qualifications but also signal to potential employers that you are dedicated to continuous learning and improvement. In the following sections, we'll delve into the significance of certifications and how they can elevate your professional profile.
Why Adding Certifications is Important

Adding certifications to your LinkedIn profile is a game-changer for several reasons. They serve as tangible proof of your skills and knowledge, giving you a competitive edge in your industry. Here’s why you should consider making this addition:
- Enhances Credibility: Certifications from reputable organizations bolster your credibility. They indicate that you possess specific knowledge and skills in your field.
- Increases Visibility: The more certifications you have, the more keywords your profile contains. This can improve your chances of appearing in LinkedIn search results, making you more visible to recruiters.
- Demonstrates Commitment: Earning a certification shows that you're willing to invest time and effort in your professional development. It reflects a commitment to continual learning, a trait highly valued by employers.
- Attracts Opportunities: Many recruiters actively search for candidates with specific certifications. Adding these credentials can open the door to job offers and networking opportunities.
- Showcases Specialization: Certifications help to highlight your areas of expertise. Whether it’s project management, data analysis, or a specific software tool, these credentials help delineate what you can bring to the table.
In a nutshell, adding certifications to your LinkedIn profile not only enhances your resume but also enriches your professional story, making you a more attractive candidate in the eyes of potential employers.
Step 1: Log into Your LinkedIn Account

Alright, first things first—you need to log into your LinkedIn account. If you already have an account, go ahead and pull out your laptop or smartphone. Open your favorite web browser or the LinkedIn app, and let’s get started!
1. *Visit the LinkedIn Website or App: If you’re on a computer, type www.linkedin.com in your browser. If you’re using a smartphone, tap on the
2. Enter Your Login Credentials: You’ll see fields for your email or phone number and password. Enter the correct details to access your account. Don’t worry if you have forgotten your password—there’s a handy “Forgot Password?” option to help you reset it.
3. Hit the Sign-In Button: After you’ve entered your information, click on the “Sign In” button. Voila! You’re in!
Once logged in, you’ll find yourself on your LinkedIn homepage, where you can see updates from your connections and companies you follow. Now that you’re in, you're just one step closer to showcasing your certifications. Let’s move on to the next step!
Step 2: Navigate to Your Profile
Now that you’re logged into LinkedIn, it’s time to navigate to your profile. Think of your profile as your digital resume; it’s where you’ll display your professional achievements, including certifications. Here’s how to get there:
1. Locate the Profile Icon: At the top of your LinkedIn homepage, you’ll see your profile picture located on the left side. Click on it—this is your gateway to your personal LinkedIn profile!
2. Access “View Profile”: After clicking your photo, a drop-down menu will appear with options. Choose “View Profile” to open your complete profile page.
3. Explore Your Profile Sections: Once you're on your profile, you'll see various sections like “About,” “Experience,” and “Skills.” This is where all the magic happens! As you scroll, you'll want to find the section for certifications.
So, whether it’s adding a shiny new certification or a certification that showcases your expertise, navigating to your profile is crucial for making those updates. Keep your profile open, and let’s move on to the fun part—adding those certifications!
Step 3: Find the Certifications Section
Alright, so you’re getting closer to showcasing your hard-earned certifications! The next step is to locate the Certifications Section on your LinkedIn profile. Here’s how you can do that:
- Navigate to Your Profile: Start by logging into your LinkedIn account. Once you're in, look at the top of your homepage where you’ll see your profile picture. Click on it, and voila! You’ll be taken to your profile page.
- Scroll Through Your Profile: Now that you’re on your profile, take a moment to scroll down. LinkedIn is designed to display your experience, skills, recommendations, and more in a tidy format.
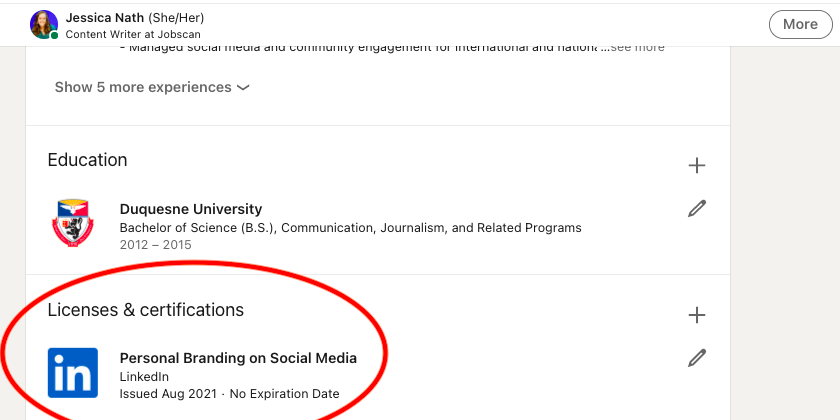
- Look for the Certifications Section: Depending on how many sections you've added to your profile, you might need to scroll a bit. The Certifications Section often falls below the Experience segment. Keep an eye out for its heading—it's pretty straightforward!
If you can’t find it right away, don’t worry! You might not have added it yet, which leads us into the next step. Remember, showcasing your certifications can help you stand out in a competitive job market, as they demonstrate your commitment to professional development.
Step 4: Click on the Add Icon
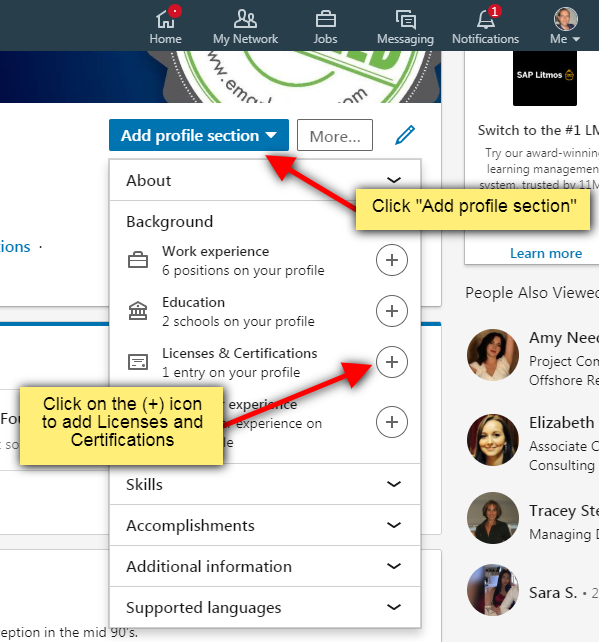
Great! You've made it to the Certifications Section. The next move is to click on the Add Icon*. Let’s break this part down:
- Find the Add Icon: It’s usually represented by a small plus sign (+) or sometimes labeled “Add Certification.” If the section is new, you might see a prompt inviting you to add. It’s pretty visible, so you can’t miss it!
- Click to Open the Form: Once you’ve located the Add Icon, give it a click! This will bring up a form where the magic happens—the place where you’ll enter the details of your certification.
- Fill Out the Information: Here’s where you can get specific. You will need to fill out several fields such as:
- Certification Name: What’s the title?
- Issuing Organization: Who awarded you the certification?
- Issue Date: When did you receive it?
- Expiration Date: If applicable, when does it expire?
- Credential ID: If you have one, enter it here.
- Credential URL: This is great for linking directly to your certificate as proof!
This form is super user-friendly and designed to help you succinctly represent your accomplishments. After you’ve entered all the necessary details, you’re almost done! Get ready for the final touches in the next steps.
Step 5: Fill in Certification Details
Now that you’ve clicked on the "Add Certificate" button, it’s time to fill in the certification details. This part is crucial since it’s where you provide essential information that potential employers or connections will see. Let’s break down the key fields you need to complete:
- Certification Name: This is the most critical part. Use the exact name of the certification as it appears on your certificate or from the issuer.
- Issuing Organization: Typically, this will be the name of the organization that awarded the certification. Make sure to type it accurately to ensure credibility.
- Issue Date: Enter the month and year when you received your certification. If it’s one that doesn’t expire, you can choose the “This certification does not expire” option.
- Expiration Date: If your certification has a limited validity, make sure to input the end date. This keeps your profile current and trustworthy.
- Credential ID: Some certifications offer a unique ID number. If applicable, include it here for easy verification.
- Credential URL: If you have a link that verifies your certification or leads to a certificate Copy, it’s great to include this. It adds an extra layer of credibility!
After entering all this info, take a moment to double-check your spelling and date entries. Accuracy matters! Also, keep in mind that even if a particular field isn’t required, providing as much information as possible helps paint a fuller picture of your qualifications.
Step 6: Save Your Changes
Alright, you've entered all the juicy details about your certification, and now it's time to make it official—let's save your changes! This step is pivotal because it ensures that all your hard work won’t go to waste.
To do this, simply look for the “Save” button—typically found at the bottom or top of the certification details window. A quick tip: before you click that button, do one final review. Here’s a checklist to consider:
- Is the certification name spelled correctly?
- Did you input the right issuing organization?
- Are the issue and expiration dates accurate?
- If applicable, did you include your credential ID and URL?
Once you’re confident everything is accurate, go ahead and click “Save.” You should see a confirmation message indicating that your certification has been successfully added to your profile. It’s a gratifying moment, right? Now, take a moment to visit your LinkedIn profile and check out the new addition—this is how you showcase your continued professional growth!
Step 7: Tips for Showcasing Certifications Effectively
Once you’ve added your certifications to your LinkedIn profile, the next step is showcasing them effectively. This can make a real difference in how potential employers perceive your qualifications. Here are some handy tips to ensure your certifications stand out:
- Prioritize Your Certifications: Not all certifications have the same weight! Highlight the ones that are most relevant to your career goals and the job roles you’re targeting. Place those at the top of your certifications list.
- Use Keywords: Incorporate industry-related keywords in your certification descriptions. This can improve your chances of appearing in recruiter searches. Think about what terms someone would use to look for professionals with your skills.
- Add Descriptions: For each certification, you can include a brief description. This is your chance to explain what skills you gained or how the certification has helped you in your career. Keep it concise but informative!
- Include Media: If you have any visual materials associated with your certifications, such as photos from workshops or videos from courses, add those too! Visual elements can make your profile pop.
- Engage with Your Network: Share updates about your certifications or related projects in your feed. Engage with your network by asking for their thoughts. This keeps your profile active and in people’s minds.
- Be Authentic: Always be honest about your certifications. If you’ve genuinely acquired a skill, showcase it proudly. Authenticity resonates well with connections and employers alike!
Conclusion
Adding certifications to your LinkedIn profile isn’t just about filling out a field; it’s about showcasing your professional development and making a positive impression on your network. Throughout this process, you’ve learned how to choose the right certifications, how to enter them correctly, and how to showcase them in a way that draws attention.
Remember to stay proactive even after you've added your certifications. Continuously update your profile as you acquire more credentials or gain experience that relates to those certifications. Stay engaged with your industry by sharing insights, participating in discussions, and connecting with others who have similar qualifications.
In conclusion, few things can enhance your career prospects like a well-curated LinkedIn profile. Your certifications are evidence of your commitment to lifelong learning and professional excellence. So, take these tips to heart, and watch as your profile becomes a magnet for opportunities!
 admin
admin


