Have you ever noticed how the emails you receive often feature a personalized signature at the bottom? That’s an email signature! It serves as a digital business card that provides essential contact information and represents your personal brand. Whether you’re sending messages to clients, friends, or colleagues, a well-crafted email signature can leave a lasting impression. In this post, we’ll guide you through the process of adding an image to your email signature, enhancing your professional presence with just a few simple steps.
Importance of Adding an Image to Your Email Signature

So, why should you consider adding an image to your email signature? The answer lies in the power of visual communication and branding. Here are several key reasons why including an image can be beneficial:
- Enhanced Branding: Incorporating your company logo or a personal photo helps reinforce brand identity. Consistent visual branding across all platforms builds recognition and trust among recipients.
- Professionalism: A polished email signature that features an image conveys professionalism and attention to detail. It shows that you care about your communication and how you present yourself.
- Personal Connection: Adding a friendly, professional photo can humanize your communication and create a personal connection. This is especially relevant in business relationships where trust plays a crucial role.
- Visual Appeal: An image can break the monotony of text and make your email signature more visually attractive. A creative design draws the reader’s eye and can make them more inclined to remember you.
- Call to Action: You can use images as clickable elements, guiding recipients toward your website, social media, or specific promotions—to engage them more interactively.
Additionally, consider that in professional environments, every email sent with a properly designed signature can serve as a subtle yet effective marketing tool. Whether it’s an image of your logo or a unique graphic, it stands out and can subtly encourage positive recognition and curiosity.
In summary, adding an image to your email signature is not just about aesthetics; it’s about crafting a more comprehensive and compelling professional identity. Let’s delve into how you can easily add that image in just a few simple steps in the following sections!
Also Read This: how to transfer an image
3. Step-by-Step Guide to Adding an Image
Now that you're all geared up to enhance your email signature, let’s walk through the step-by-step process of adding an image. It's easier than you might think! Here’s how to do it, whether you're using Gmail, Outlook, or Apple Mail.
For Gmail:
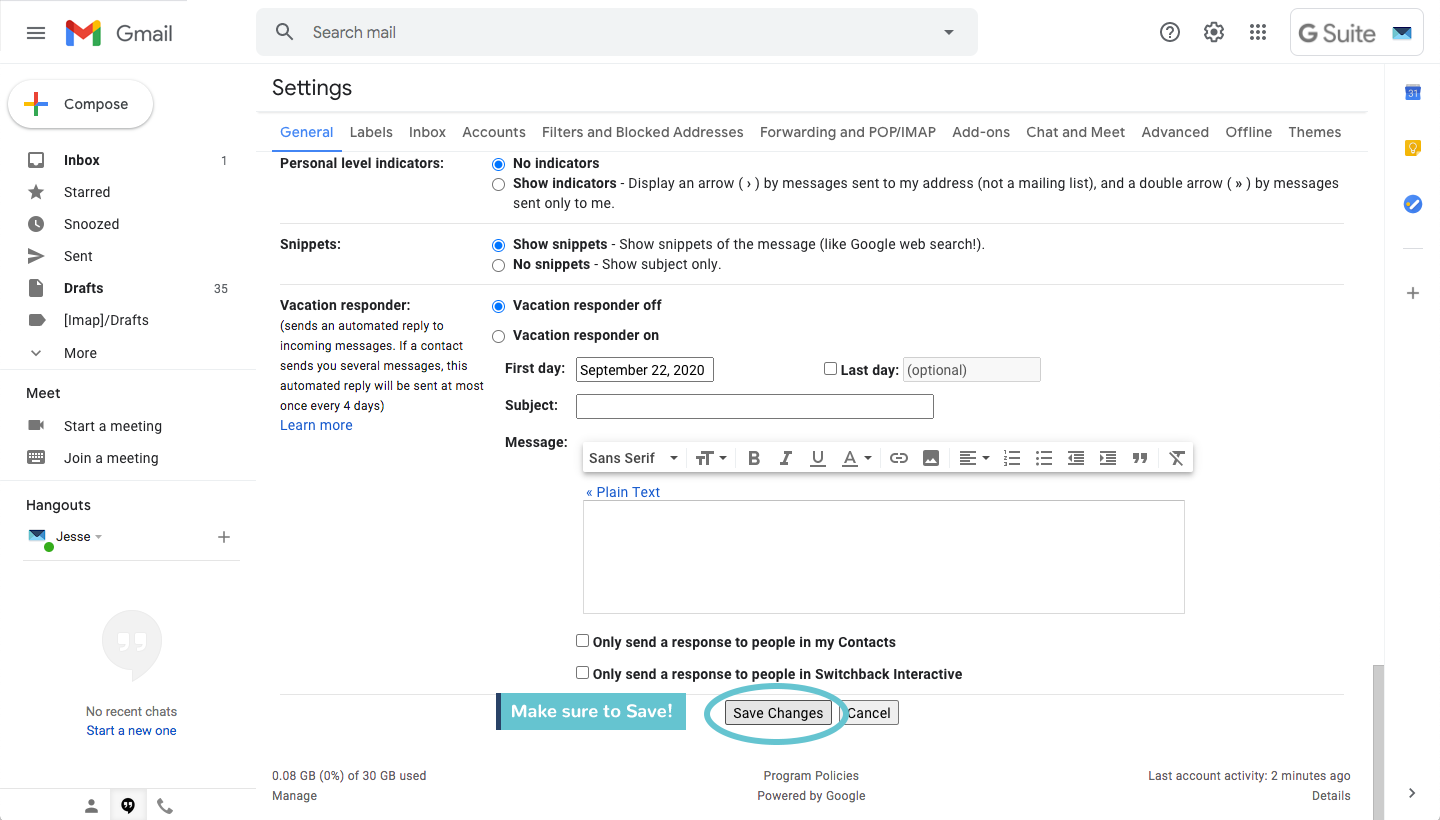
- Open Gmail: Start by logging into your Gmail account.
- Access Settings: Click on the gear icon located in the top-right corner, then select "See all settings."
- Signature Section: Scroll down until you find the "Signature" section under the "General" tab.
- Create Signature: If you haven't created a signature yet, click on “Create new.”
- Insert Image: Now, click on the image icon in the signature editor. You can either upload a new image or use an image URL. Simply click on the “Upload” tab to insert an image from your computer.
- Resize If Necessary: After adding, you can resize the image by clicking on it and choosing Small, Medium, Large, or the Original size.
- Save Changes: Don’t forget to scroll down and hit "Save Changes" at the bottom of the settings page.
For Outlook:
- Open Outlook: Launch the Outlook application or access Outlook on the web.
- Navigate to Settings: For the web version, click on the gear icon, then “View all Outlook settings.”
- Mail and Signatures: Under "Mail," find the “Compose and reply” section.
- Create Signature: Create a new signature or edit an existing one by typing in the text box provided.
- Add the Image: Click on the image icon and select an image saved on your device. Alternatively, use a URL link for an online image.
- Adjust Image Size: Ensure the image fits well within your signature. You may want to keep it at a reasonable size for professionalism.
- Save: Remember to save your changes before exiting.
For Apple Mail:
- Open Apple Mail: Launch the Mail app on your Apple device.
- Preferences: Go to “Mail” from the top left and select “Preferences.”
- Signatures Tab: Navigate to the “Signatures” tab.
- Select an Account: Choose the email account you want to add a signature to.
- Drag and Drop: Simply drag an image file from your Finder into the signature box, or click on the image icon to select one.
- Customize Text: Add any additional text you want alongside the image. You can format it as you desire.
- Close Preferences: Close the preferences window, and your new signature will automatically be saved.
And there you have it! Each email client has slightly different methods, but they all essentially revolve around these straightforward steps. Once you've added your signature, send a test email to yourself to see how it looks!
Also Read This: How to Move an Image Forward for Better Layering
4. Choose the Right Image
When it comes to adding an image to your email signature, choosing the right one is crucial. Your image can say a lot about your brand or personality, and it should complement your overall professional image. Here are some tips to help you select the perfect image:
Consider Professionalism:
It’s important to choose an image that resonates with your professional image. Here are a few types of images you might consider:
- Logo: A company logo is a classic choice. It helps improve brand recognition and adds a layer of professionalism.
- Headshot: For personal branding, a professional headshot can create a more personal touch, making you approachable.
- Custom Graphics: Consider using graphics that reflect your industry or services, such as icons or thematic designs.
Image Quality Matters:
A blurry or pixelated image can detract from your professionalism. Ensure the image you choose is high-quality and clear. Here are some key points to remember:
- High Resolution: Use a high-resolution image so it doesn’t appear blurry when viewed on different screens.
- Right Format: JPEG and PNG are common formats, but make sure they are optimized for email.
- Size Consideration: Keep the file size small to avoid long loading times for recipients.
When you’ve chosen the right image, you’ll find that it enhances the overall impact of your email signature, reflecting who you are and what you represent. Remember, your signature is often the last impression you make, so make it count!
Also Read This: How Dailymotion Enhances Educational and Creative Video Experiences
5. Upload Your Image to an Image Hosting Service
Now that you have your image ready, it’s time to upload it to an image hosting service. But what exactly is an image hosting service? Simply put, it's a platform that allows you to store images online, making them accessible via a URL. This is essential for email signatures because attaching images directly to emails can lead to large file sizes or problematic loading times.
Don’t worry; uploading an image is usually straightforward! Here’s a quick step-by-step guide:
- Choose an Image Hosting Service: There are several options available, both free and paid. Popular choices include:
- Imgur - Great for sharing images quickly.
- Postimages - Simple and free, with an easy interface!
- TinyPic - User-friendly and allows for various image formats.
- Flickr - While more focused on photography, it can also host images for signatures.
And there you go! Within moments, your image will be live on the internet. It’s a simple process, yet an essential step in making your email signature visually appealing. Just ensure you remember where you uploaded it; you’ll need to grab that URL in the next step!
Also Read This: A Step – by – Step Guide to Help You Download Bilibili Video Without Watermark
6. Copy the Image URL
Now that your image is uploaded, it's time to grab the image URL, which is the link that points directly to your image online. This is crucial because it’s the address that you’ll be using in your email signature to display the image. Follow these steps to locate and copy the URL:
- Locate Your Image: Once the upload is complete, your image will usually be displayed on the same page. Look for an option that says "Link," "Direct Link," or something similar. This link should end with an image format, like .jpg, .png, or .gif.
- Copy the URL: Highlight the URL provided. Right-click and select "Copy" or use the keyboard shortcut (Ctrl + C on Windows or Command + C on Mac). Be sure to only copy the direct link, as some platforms may provide other links that won’t work for your email signature.
- Test the URL: To make sure you’ve copied the right address, paste it into your browser's address bar and press Enter. If it opens your image, you're good to go! If not, you might have copied the wrong link, so don’t hesitate to try again.
With the image URL now safely stored in your clipboard, you’re one step closer to having a polished email signature. This link is what will bring your signature to life, adding a personal touch that stands out in anyone's inbox!
Also Read This: How to Upload HD Video to YouTube for High-Quality Uploads
7. Access Your Email Signature Settings
Now that you’re ready to add a splash of personality to your emails by including an image in your signature, the first step is to access the email signature settings. The process can vary slightly depending on the email service you’re using, but I’ll guide you through some of the most popular ones!
Here’s a quick guide for the three major email providers:
- Gmail:
- Open Gmail and click on the gear icon in the upper right corner.
- Select “See all settings.”
- In the "General" tab, scroll down to the "Signature" section.
- Outlook:
- Open Outlook and click on “File” in the top menu.
- Select “Options,” then go to the “Mail” category.
- Click on “Signatures” and you’ll find options for managing your signatures.
- Apple Mail:
- Open Apple Mail and go to “Mail” in the top left corner.
- Select “Preferences,” then click on the “Signatures” tab.
- Select the email account you want to modify and click the “+” button to create a new signature.
Once you’ve found the signature settings, you can either create a new signature or edit an existing one. This is where the magic begins—get ready to express yourself!
Also Read This: How to Crop an Image in Revit for Professional Use
8. Insert the Image into Your Email Signature
Now that you’re in your email signature settings, it’s time to get that image in there! This step is usually pretty simple, but the actual method can differ based on the email platform you’re using. So, let’s break it down:
For Gmail:
- In the signature editor, place your cursor where you want the image to appear.
- Click the “Insert Image” icon (it looks like a small picture).
- You can upload an image from your computer, or, if your image is stored online, you can paste the URL directly.
- Once the image is inserted, you can adjust its size by clicking on it and selecting small, medium, or large.
For Outlook:
- In the signature editor, click on the “Image” icon.
- Select an image file from your computer. Make sure you choose a relevant and not-too-large image, as email clients can sometimes have size limitations.
- After inserting, you can resize the image by clicking on it, then dragging the corners.
For Apple Mail:
- In the signature section, simply drag and drop your image from your Finder or desktop directly into the signature area.
- If you prefer, you can click the “Image” icon and select your desired image from your files.
- Once the image is in, you can adjust the size by clicking and dragging its corners.
Remember, the image should look great on both desktop and mobile views. Test it out! Send an email to yourself or a friend to see how it appears—this way, you can ensure it’s all set to impress your recipients!
Also Read This: how to replace the image in canva
9. Test Your New Email Signature
Congratulations! You've designed a stunning email signature that represents you or your brand beautifully. But before you start using it in your everyday communications, it’s crucial to test your new email signature thoroughly. Why? Because you want to ensure that it displays correctly across different devices and email clients. Here’s how to do it:
- Send Test Emails: The first step is to send test emails to yourself and to a few colleagues. Use different email platforms, like Gmail, Outlook, and Yahoo, to see how your signature appears in each.
- Check on Mobile: Don’t forget about mobile users! Open the email on your phone and tablet to confirm that your signature looks just as good on smaller screens.
- Look for Broken Links: If your signature includes links, especially social media icons or your website, click on each one to ensure they lead to the correct destinations.
- Review Formatting: Sometimes, formatting can shift when viewed on a different email client. Make sure your fonts, colors, and images are all exactly where they should be.
- Ask for Feedback: After testing it yourself, consider asking a colleague for their opinion. They might spot something that you missed!
By taking the time to test your signature, you avoid any awkward moments in professional correspondence. You want to create a polished impression every time someone sees your signature! After ensuring that everything works seamlessly, you can start using your new email signature with confidence.
Also Read This: How Difficult Is It to Make Money with Foap?: Everything You Need to Know
10. Best Practices for Email Signature Images
Adding an image to your email signature can make it more visually appealing and personalized, but it's essential to follow best practices to ensure a professional presentation. Here are some key tips:
- Use a High-Quality Image: Always choose high-resolution images for your signature, whether it's a logo or a profile picture. Blurry or pixelated images can make your signature look unprofessional.
- Optimize Your File Size: Large images can increase the loading time of your emails, which might frustrate recipients. Use an image compressor to reduce the file size without losing quality.
- Consider Image Format: The common formats for email signatures are JPEG, PNG, and GIF. JPEGs are great for photographs, while PNGs are preferable for logos that need a transparent background. Choose wisely!
- Use Alt Text: Adding alt text to your images is a good practice for accessibility. If your images do not load, the alt text will inform the recipient what the image was intended to convey.
- Be Mindful of Image Size: Keep your image dimensions appropriate. A typical logo size is around 300px wide, which is sufficient to ensure visibility without being overpowering.
- Test Visibility: As discussed in the previous section, test how your image renders across various devices and email clients. This step will help you ensure no one misses out on your brand representation.
By following these best practices, you can ensure that the images in your email signature enhance your message instead of detracting from it. A well-crafted image can reinforce your branding and create a memorable impression, so get it just right!
Also Read This: Top 5 Reverse Image Search Tools of 2025
11. Size and Format Considerations
When adding an image to your email signature, it's crucial to consider both the size and the format of the image. After all, you want your signature to look great across various email clients and platforms!
1. Image Size: Ideally, your signature image shouldn't be too large in file size. Aim for under 100 KB if possible. Large files can slow down email load times and may even get flagged by spam filters. You want your signature image to load quickly and look crisp without causing unnecessary delays for recipients.
2. Dimensions: When it comes to the physical dimensions of the image, keep it reasonable. A good width for an image in an email signature is typically around 300 pixels. Heights can vary, but try to keep it under 100 pixels to ensure it doesn’t overpower your text. You don't want your signature to overshadow your actual message!
3. Format: The file format you choose is equally important. The most commonly used formats for email signature images are:
- JPEG: Great for photographs, these images compress well but may lose some quality.
- PNG: Best for images that require transparency or need to retain high quality. Keep in mind that PNG files can be larger than JPEGs.
- GIF: Perfect for simple graphics and logos, especially if you want to use animation, but they tend to be lower in color depth.
By paying attention to size and format, you can ensure your signature looks polished and professional, no matter where it’s viewed. So take a moment to check the dimensions and file size before hitting that send button!
Also Read This: Creating a YouTube Video on Roblox to Share Your Gaming Journey
12. Keeping It Professional
Last but definitely not least, let’s talk about maintaining a professional appearance in your email signature. Your email signature is essentially your digital business card; it's how people remember you. Here's how to keep it looking sharp:
1. Choose Appropriate Images: The images you select should align with your brand's identity. If you’re a freelancer, using your logo or a professional portrait is wise. Avoid using personal photos that don’t convey professionalism. Remember, what works in a casual setting might not fly in a business environment!
2. Consistent Branding: Ensure that the colors and style of your signature are consistent with your brand's aesthetic. This helps create a cohesive image for your recipients. Use colors from your logo and simple, readable fonts. Overly flashy colors or elaborate designs can be distracting and diminish your professionalism.
3. Limit the Number of Images: While a signature image can be an excellent way to enhance your branding, too many images can clutter your signature and make it look unprofessional. Aim for one central image, whether it’s a logo or a professional photo. Less is often more!
4. Include Relevant Information: Don't forget that while the image is important, you should also include essential contact details below or alongside it. This includes:
- Your full name
- Your job title
- Your phone number
- Your company name and website
Remember, your goal is to make it easy for recipients to reach out or learn more about you without confusion. By keeping your image and text organized, you present a competent and polished image.
By adhering to these guidelines, you ensure your email signature remains both visually appealing and professionally appropriate, leaving a lasting, positive impression on your recipients!
Also Read This: Photo Exodus: Downloading All Photos from Photobucket
13. Ensuring Accessibility
When it comes to adding an image to your email signature, accessibility should be at the forefront of your mind. You want to ensure that everyone, regardless of their abilities, can engage with your content. Here are a few key tips to consider:
- Use ALT Text: Always include ALT text for your images. ALT text describes the image for those who use screen readers, allowing visually impaired recipients to understand what’s being conveyed. Aim for a concise description that captures the essence of the image.
- Consider Image Size: Large images can load slowly, especially on mobile devices or slow internet connections. Keep your image sizes small (ideally under 100KB) to improve loading times.
- Choose High Contrast: Ensure that the image contrasts well with the background color of your email. High contrast helps those with visual impairments distinguish the image easily.
- Avoid Text in Images: Whenever possible, use text in the body of the email rather than embedding it in an image. This guarantees that all recipients can read your message, no matter what devices or settings they're using.
- Test on Multiple Devices: Before sending your email, test how your signature appears across various devices and email clients. This includes checking how it looks on mobile versus desktop. Accessibility varies widely depending on the device.
By incorporating these strategies, you not only ensure a wider reach for your emails but also demonstrate inclusiveness in your communication. After all, effective communication means making sure your message is accessible to everyone.
Also Read This: How to Effectively Publish and Share Your Work on Behance
14. Common Issues and Troubleshooting Tips
Even with the best intentions, things can go awry when adding images to your email signature. Here are some common issues you might encounter and tips for troubleshooting them:
- Image Not Displaying: If your image doesn’t show up in the email signature, it could be due to a few reasons. First, check if the image URL is correct. If you’re linking to an online image, ensure it’s accessible and not broken. Alternatively, consider embedding the image directly into your email signature for guaranteed visibility.
- Image Appears Blurry: A blurry image can be a big turn-off. Make sure the image is high resolution but still optimized for quick loading. Generally, images around 72 DPI (dots per inch) work best for digital use.
- Signature Formatting Issues: Sometimes, email clients may not render your signature as expected. This can happen due to different HTML interpretations. Test your signature in multiple email clients (like Outlook, Gmail, and Apple Mail) to see if the formatting remains consistent.
- Images Blocked by Email Clients: Many email clients block images by default. To counter this, keep your email's text content strong and make sure your subject line and message entice recipients to enable images. You might also want to remind recipients to allow images to see your full signature.
- Image Too Large: If you're trying to include a large image that makes your email signature bulky, consider resizing it or using a smaller version. A practical size for an email signature image is around 300 pixels wide.
By staying aware of these common issues and their solutions, you can save yourself a lot of time and frustration. Remember that the goal is to create an attractive, professional email signature that enhances your communication without any hiccups!
Also Read This: What Should I Shoot for Shutterstock? Tips for Capturing Marketable Images
15. Conclusion
Adding an image to your email signature can significantly enhance your professional communication. Whether it's a logo, a personal photo, or a relevant graphic, an image can convey professionalism, brand identity, and personality all in one glance. Remember, the key is to ensure that the image complements your email signature rather than distracts from it. A well-chosen image can create lasting impressions, allowing your recipients to remember you and your brand more vividly.
To wrap things up, here are a few points to keep in mind:
- Size Matters: Opt for images that are not too large, as they can slow down loading times or get flagged by spam filters.
- Format: Use widely accepted formats like JPEG, PNG, or GIF for compatibility.
- Testing: Always send a test email to yourself to see how the signature appears on various devices.
- Consistency: Make sure your email signature reflects your brand’s style and messaging consistently across all your communications.
By following these simple guidelines, you can ensure that your email signature looks professional and effectively represents your brand. Happy emailing!
16. Further Resources and Tools
If you're looking to dive deeper into enhancing your email signature or digital communication skills, there are plenty of resources out there to guide you. Here’s a curated list of tools and articles that can help you not just add images to your email signature but also improve its overall design and effectiveness:
- Canva – A user-friendly design tool that offers customizable email signature templates.
- Mail Signature Generator – A simple online tool to create professional email signatures with images easily.
- Wix Email Signature Generator – A robust generator that allows you to create stunning signatures with logos and images.
- HubSpot Blog on Email Signature Best Practices – An insightful article that covers best practices beyond just images.
- TechRepublic Guide on HTML Email Signatures – Learn how to add HTML elements including images to your email signature effectively.
These resources can empower you to take your email communications to the next level. Whether it’s through designing an eye-catching signature or optimizing it for maximum impact, exploring these tools will surely enhance your professional email game!
 admin
admin


