So, you're diving into the world of video editing, and you've got some brilliant footage that you want to enhance with a green screen effect. That’s where CapCut comes in! This user-friendly app makes it super simple to edit videos, even if you’re a beginner. In this guide, we'll walk you through the steps to add images to your green screen footage in CapCut, making your videos pop with creativity. Let’s get started!
Step 1: Importing Your Video
The first thing you'll need to do is get your video into CapCut. It may sound simple, but getting this part right is crucial for the whole process to run smoothly. So, let’s break it down step by step:
- Open CapCut: Start by launching the CapCut app on your device. If you haven’t installed it yet, you can find it in your app store.
- Create a New Project: Once you’re in the app, tap on the ‘New Project’ button. This will lead you to your device’s media library.
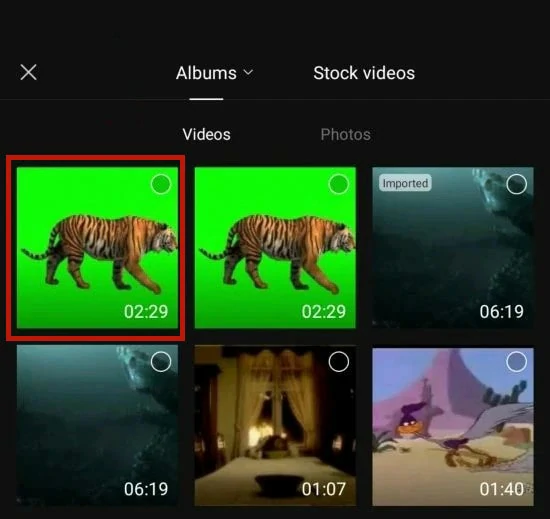
- Select Your Video: Browse through your gallery and find the video you want to edit. Tap on it to select it, and you’ll see a preview pop up.
- Add the Video to the Timeline: After selecting your video, click the ‘Add’ button (often marked with a "+" sign) to include the video in your project timeline.
- Check Your Workspace: Take a moment to familiarize yourself with the workspace. You’ll see your video on the timeline at the bottom, and options for editing on the right-side panel.
And that's it for the first step! Easy-peasy, right? Now that you’ve imported your video, you're ready to move on to adding that cool green screen effect. Make sure your footage is well-lit and the green screen is evenly lit for the best results!
Also Read This: Complete Guide to Downloading Dailymotion Videos in MP3 Format
Step 2: Adding the Green Screen Effect
Alright, let's dive into the process of adding that all-important green screen effect! This step is crucial for blending your image into the backdrop of your choice. Are you ready? Let’s get started!
First off, you'll want to ensure that your video clip is loaded into CapCut. If you haven't uploaded it yet, just hit the "+" button and select the video from your device. Once your video is in place, it’s time to add the green screen effect:
- Select Your Video Clip: Tap on the video layer in the timeline. This is your main clip where you want to apply the green screen effect.
- Access the Effects Menu: Look for the “Effects” option at the bottom of the screen. Click on it to explore various effects available in CapCut.
- Locate the Green Screen Option: Inside the Effects menu, scroll until you find the “Chroma Key” or “Green Screen” feature (it might look like a little green paintbrush). Select it!
- Adjust the Settings: After selecting the green screen effect, you’ll see options to tweak the color. Use the color picker tool to select the green hue from your video. You can adjust the intensity and shadow or even feather out the edges for smoother blending.
And just like that, your green screen effect is applied! Take a moment to preview the effect and ensure that it’s working as intended. If everything looks good, it’s time to move on to the next step!
Also Read This: How to Take a High-Quality Still Image from Video
Step 3: Inserting Your Image
Now comes the fun part—adding your image to the scene! This is where you’ll see your creative vision come alive as your chosen picture blends seamlessly with the video. Let's go through the steps together:
- Import Your Image: Start by tapping on the "+" button again, just like you did for your video. This time, select the image you want to insert from your device.
- Place Your Image on the Timeline: Once your image is imported, it will appear in your media library. Drag and drop it onto the timeline, placing it above your video layer. This layering is super important!
- Adjust Image Size and Position: Tap on your image layer in the timeline. Use pinch gestures on the preview screen to resize it and drag it around to position it where you want in your video.
- Fine-Tune the Image: Access the “Edit” menu by tapping on your image. Here, you can adjust brightness, contrast, saturation, and even add filters to make your image pop against the background.
Once you’re satisfied with how your image looks, play around with the transitions between your video and the image to ensure they fit well together. And voila! You are almost done! A quick preview of your work will help you fine-tune any last adjustments necessary for that spectacular finish.
Also Read This: How to Use Mixcloud? Tips and Tricks for You
Step 4: Adjusting Image Position and Size
Alright, you’ve got your image on the screen now—it’s all about making it fit just right! Adjusting the position and size of the image is crucial for making your green screen video look professional.
First, let’s talk about position. You want your image to be placed accurately in the scene. Here’s how you can do that:
- Tap on the image layer in your timeline. You'll see a frame appear around your image.
- Now, click and drag the image around until it's sitting perfectly where you want it on the screen.
- If you need finer control, you can usually enter the numerical values for x (horizontal) and y (vertical) positions to place the image more precisely.
Now let’s resize the image:
- Select the image layer, and you’ll see white dots or handles around the edges of the image.
- Drag these handles to scale the image up or down. Be mindful of maintaining the aspect ratio to avoid stretching the image!
- If you want to adjust the size evenly, hold down the shift key while dragging to keep proportions intact.
Once you’re satisfied with the position and size, your image should seamlessly integrate with the rest of your scene. Take a moment to play around with it until it feels just right!
Also Read This: Understanding the Costs of Behance and Its Subscription Plans
Step 5: Finalizing the Edit
Your video is almost ready—woohoo! Now it’s time for the final touches to ensure everything pops and looks cohesive.
Start by reviewing your video from the beginning. Make sure the transitions between your clips and the image are smooth. Focus on:
- Color Grading: Sometimes, the image might look a bit different in color compared to the rest of your video. Use CapCut's color adjustment tools to tweak brightness, contrast, and saturation until it matches.
- Effects: You can enhance your image with various effects. Apply shadows or outlines to help it blend more naturally into the scene.
- Timing and Animation: Consider adding subtle animations to your image for a more dynamic feel. Maybe it fades in or slides onto the screen? You can control this in the animation settings.
Finally, make sure to save your project regularly. Once you're happy with your edits, it’s time to export your video. Choose your desired resolution and format based on where you plan to share it, such as social media or a personal project. Just hit that export button, and you’re done! Take a moment to admire your work—you deserve it!
How to Add an Image to a Green Screen in CapCut
Adding an image to a green screen in CapCut is an effective way to enhance your videos. The CapCut app offers a user-friendly interface and a variety of features that simplify the editing process. Below is a step-by-step guide that explains how to successfully incorporate images into your videos using a green screen.
Step-by-Step Guide
- Open CapCut: Start the app and create a new project.
- Import Your Video: Select the video with the green screen background from your device.
- Remove the Green Screen:
- Tap on the video layer in the timeline.
- Select the Chroma Key option in the editing menu.
- Adjust the intensity to remove the green background.
- Add an Image:
- Tap the Overlay option in the menu.
- Select Add Overlay and choose the image you wish to add.
- Position the Image: Resize and move the image to your desired location in the frame.
- Adjust Layer Order: Ensure the image layer is above the video layer to make it visible.
- Export Your Video: Once you're satisfied with the results, export the video by tapping the export button.
Tips for Best Results
- Choose an image with a similar resolution to your video for seamless integration.
- Experiment with different positions and sizes of the image to achieve the desired effect.
- Utilize CapCut’s built-in effects to enhance your final video.
In conclusion, adding an image to a green screen in CapCut is a straightforward process that can significantly enhance your videos. By following the steps outlined above, you can create professional-looking content effortlessly.
 admin
admin


