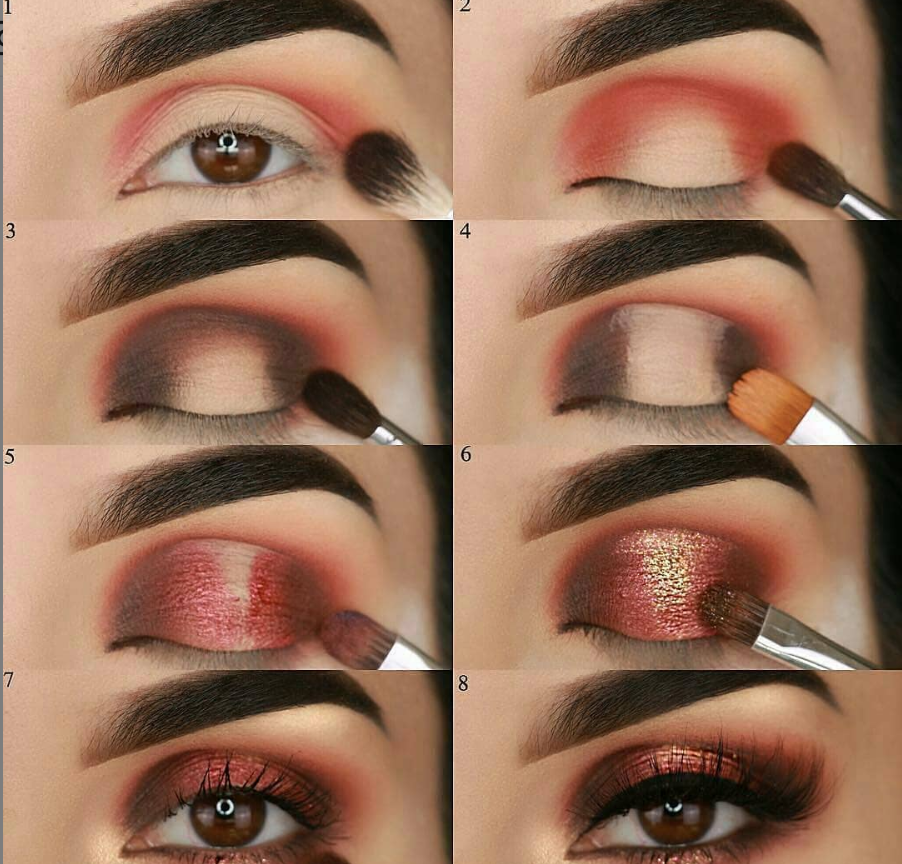
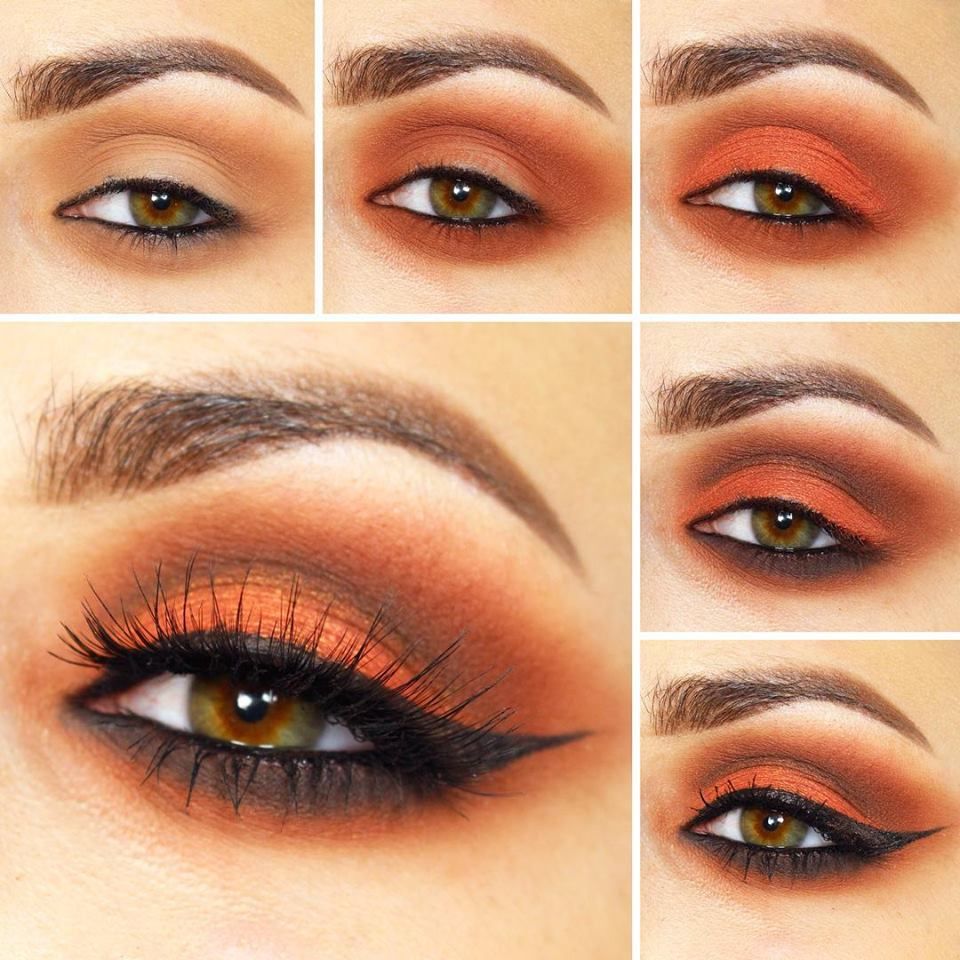
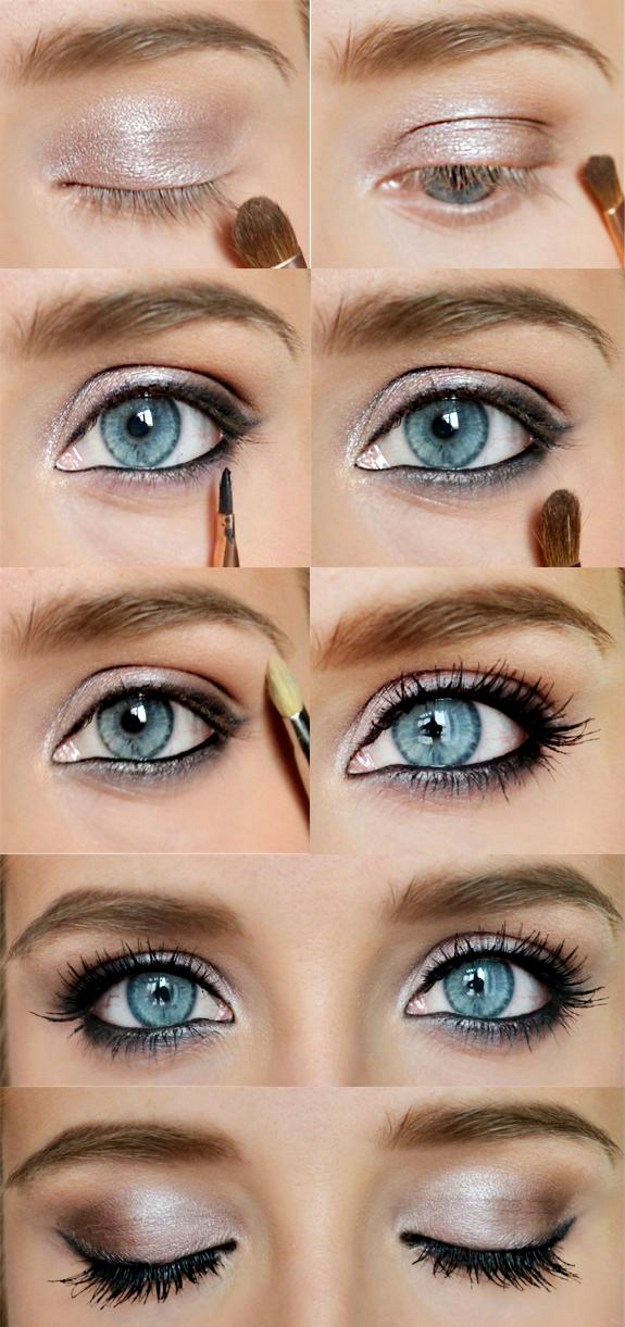
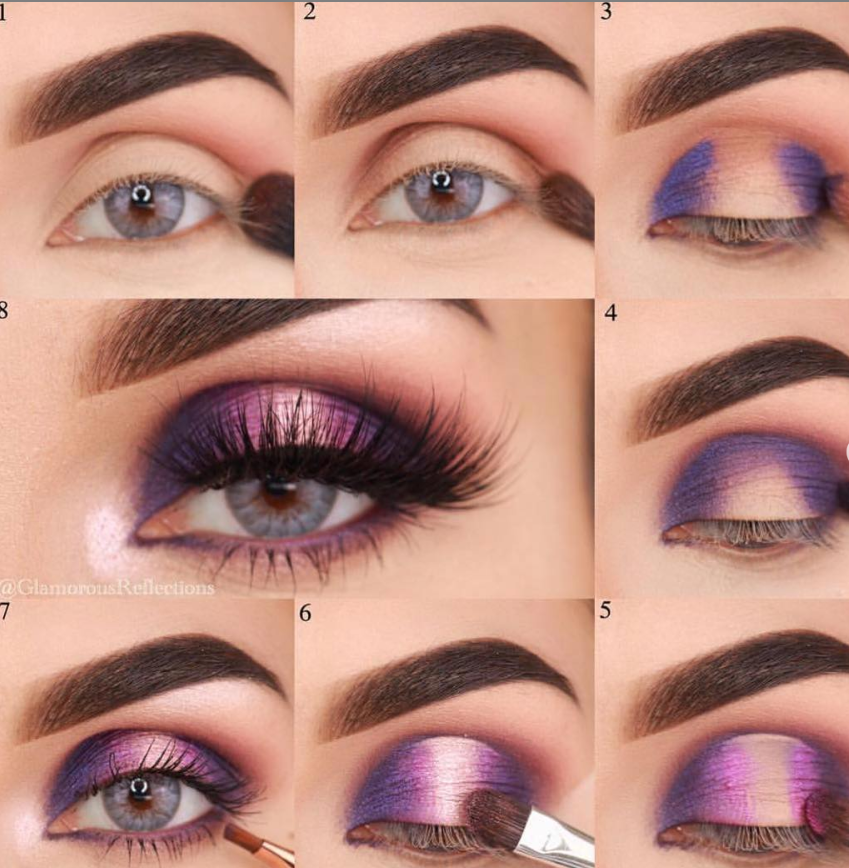
Eye makeup is one of the most exciting parts of beauty routines—it can completely transform your look and enhance your natural beauty. Whether you're going for a subtle daytime vibe or a bold evening statement, the eyes truly are the windows to the soul. In this tutorial, we’ll walk through essential techniques and tips that will help you achieve stunning eye makeup, perfect for any occasion.
Essential Tools and Products for Eye Makeup

Before diving into the actual application, it’s crucial to gather all the necessary tools and products. Having the right items at your fingertips can make a world of difference in your makeup experience. Here’s what you’ll need:
- Makeup Brushes: A good set typically includes:
- Flat Shader Brush: For packing on eyeshadow
- Blending Brush: To diffuse harsh lines and create a seamless look
- Precision Brush: For detailed work, especially on the lower lash line
- Angled Brush: Perfect for applying eyeliner or eyebrow products
- Eye Primers: Eye primers help keep your makeup in place and intensify colors.
- Eyeshadows: Choose a palette that suits your style. You can go with neutral tones or vibrant shades, depending on your mood.
- Eyeliners: Liquid, gel, or pencil eyeliners will allow you to create a variety of looks, from dramatic wings to subtle lines.
- Mascara: A good mascara will volumize, lengthen and define your lashes, making your eyes pop.
- False Lashes (optional): For those looking to amplify their lash game, false lashes can add drama and depth.
- Setting Spray: To lock your eye makeup in place for hours on end.
By ensuring you have these essentials ready to go, you'll set yourself up for a stunning eye makeup application. Let's get started on mastering your eye makeup skills!
Also Read This: Annotating Images for Clearer Explanations
Step 1: Preparing Your Eyelids

Before diving into the fun part of applying eyeshadow, it's crucial to start with a clean canvas. Properly prepping your eyelids can make all the difference in how your eye makeup lasts and looks throughout the day. Here’s how to get those eyelids ready:
- Clean Your Eyelids: Begin with a fresh and clean surface. Use a gentle makeup remover or micellar water to wipe away any residual makeup or oils. This helps the eyeshadow adhere better.
- Moisturize: Apply a lightweight eyeshadow primer or a small amount of your regular face moisturizer to your eyelids. This not only helps in smoothing out any uneven texture but also provides hydration.
- Use an Eyelid Primer: This step is often overlooked but is essential. Apply an eyelid primer across your lids. This will enhance your eyeshadow's vibrancy and longevity, preventing it from creasing or fading.
- Set with Powder: For extra insurance against creasing, you can dust a translucent setting powder over the primer. This creates a smooth base and further locks the eyeshadow in place!
By following these simple steps, you’ll be setting yourself up for eye makeup success. Trust me, taking the time to prep your eyelids properly is totally worth it!
Also Read This: Stunning Graphics for Wedding Planners with VectorStock
Step 2: Applying Eyeshadow

Now that your eyelids are perfectly prepped, it’s time to apply the eyeshadow! This is where you can truly express your creativity. Here’s a step-by-step guide to applying eyeshadow like a pro:
- Choose Your Colors: Select a palette that suits your desired look. A basic palette with a mix of matte and shimmer shades works great for beginners.
- Start with a Transition Shade: Use a fluffy blending brush to apply a light neutral shade to your crease. This acts as a transition and helps blend the darker colors smoothly.
- Define with a Darker Shade: Next, choose a darker shade for the outer corners of your eyelids. Use a smaller, denser brush to pack on the color and blend it into the crease.
- Add a Lid Color: For the center of your eyelids, pick a beautiful lid color. A shimmer shade can really make your eyes pop! Apply it with a flat brush for maximum intensity.
- Highlight the Inner Corner: To brighten up your eyes, apply a light shimmer shade to the inner corners. This will give you that well-rested look.
- Blend Everything Together: Use a clean blending brush to softener the edges between the shades. Blending will create a seamless transition and avoid harsh lines.
And there you have it! A stunning eyeshadow application that can elevate your entire makeup look. Don’t forget to practice—you'll get better with every application!
Also Read This: How to Make an Image 1024 by 576 Pixels
Step 3: Enhancing Your Eyes with Eyeliner

Once you've laid the groundwork for your stunning eye makeup with your eyeshadow, it's time to enhance your eyes even further with eyeliner. This crucial step can transform your look, adding depth and definition that really makes your eyes stand out.
Here are some popular eyeliner options to consider:
- Pencil Eyeliner: Great for beginners! It’s easy to apply and offers a softer finish.
- Liquid Eyeliner: Perfect for bold lines and dramatic looks. Just be steady with your hand!
- Gel Eyeliner: A lovely hybrid that offers a creamy texture with long-lasting wear.
- Felt-tip Eyeliner Pen: A user-friendly option that gives you control and precision.
To start applying your eyeliner, follow these simple steps:
- Choose Your Look: Decide if you want a thin line for a subtle effect or a thicker line for a more dramatic look.
- Start from the Inner Corner: Begin applying your eyeliner from the inner corner of your eye, making small strokes.
- Follow the Natural Shape: Follow your lash line, and don’t be afraid to lift the line slightly at the outer corner for a cat-eye effect.
- Finish with a Flick (Optional): If you want to spice things up, add a little flick or wing at the end!
Remember, practice makes perfect! Don’t rush through this step; take your time to get that eyeliner just right!
Also Read This: Mastering Background Blur in Photoshop for Stunning Effects on Dailymotion
Step 4: Adding Volume with Mascara
Now that your eyeliner is applied and your eyes are beautifully defined, it’s time to add the finishing touch with mascara. This step is all about volume and length, and it can take your eye makeup to the next level.
Here’s how to choose the right mascara:
- Volumizing Mascara: Ideal for giving your lashes that full, lush look.
- Lengthening Mascara: If you’re looking for longer lashes, this is what you need.
- Waterproof Mascara: Great for all-day wear, especially in humid conditions or if you’re going to cry happy tears!
Follow these steps to achieve luscious lashes:
- Wand Positioning: Start at the base of your lashes and wiggle the wand back and forth as you move towards the tips.
- Layering: For added volume, apply 2-3 thin layers, allowing each layer to dry for a few seconds.
- Bottom Lashes: Don’t forget to apply a little mascara to your bottom lashes for a more balanced look.
- Comb Through Lashes: If you've got any clumps, use a clean spoolie to comb through for a separated look.
And there you have it! With your eyeliner and mascara properly applied, your eyes are sure to be the stars of your makeup look!
Also Read This: How to Master Lip Makeup for Gorgeous Lips
Step 5: Finishing Touches and Tips
Alright, you’ve done an amazing job getting your eyes prepped, blended, and perfectly colored! Now it’s time for the finishing touches that will take your eye makeup from great to absolutely stunning. Here are some tips to ensure your look is polished and flawless:
- Highlight the Inner Corners: Adding a light, shimmering shade to the inner corners of your eyes instantly brightens your eyes. Use a small brush or your pinky finger for application.
- Define Your Brows: Don’t forget about your brows! A little brow gel or pencil can frame your eyes beautifully.
- Set Your Makeup: Use a setting spray to ensure your hard work lasts throughout the day. Just a couple of spritzes will keep everything intact!
- Perfect Your Liner: If you’ve used eyeliner, make sure it’s smudge-free and well-defined. A quick touch-up can make a world of difference.
- False Lashes or Mascara: Depending on your preference, consider adding false lashes for drama or applying a coat of volumizing mascara to make your lashes pop!
- Keep it Clean: Use a cotton swab dipped in makeup remover to clean any smudges or mistakes around your eyes.
Finally, don’t forget to smile while looking at your stunning work in the mirror! Confidence is truly the best accessory.
Conclusion: Embracing Your Eye Makeup Skills
Congratulations! You’ve journeyed through a detailed step-by-step tutorial on achieving stunning eye makeup. Remember, practice makes perfect. The more you put your newfound skills to work, the better you will get. Embracing your eye makeup skills means allowing creativity to flourish. It’s not just about the final look but also the joy of experimenting!
Here are a few reminders as you continue your eye makeup journey:
- Experiment with Colors: Don’t be afraid to step out of your comfort zone. Try vibrant colors, unique combinations, or even bold eyeliner.
- Invest in Quality Products: Quality brushes and makeup can make a significant difference in your application process and the longevity of your look.
- Be Patient: Rome wasn’t built in a day, and neither will your eye makeup skills be perfected overnight. Take your time!
Embrace the journey, find joy in the process, and soon enough, you’ll be creating stunning looks that reflect your unique style and personality. Happy blending!
 admin
admin


