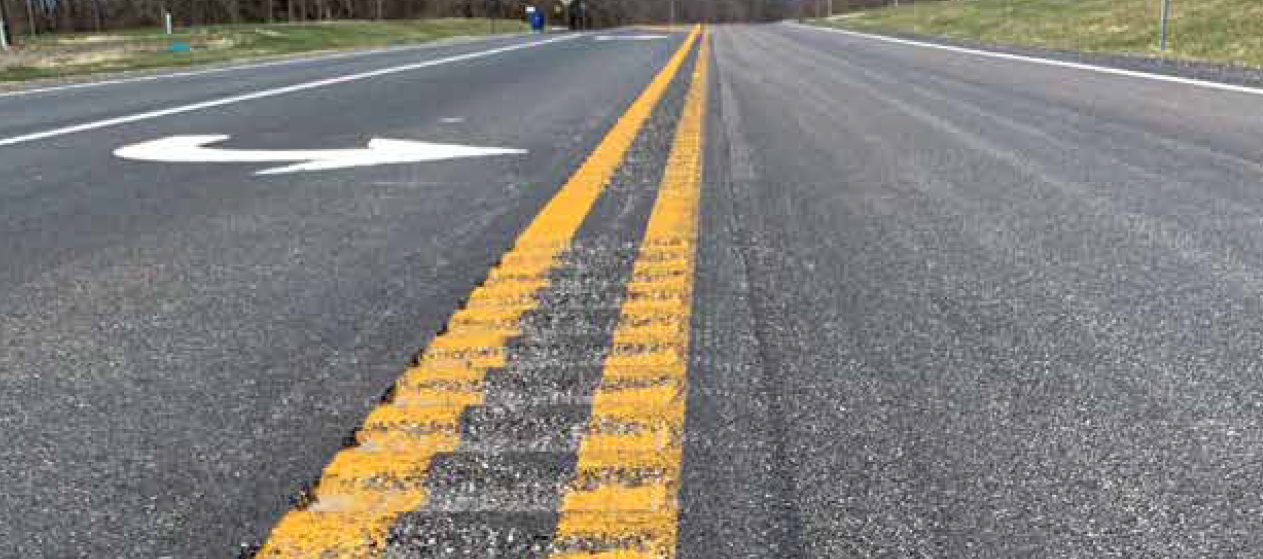
Have you ever been driving on a highway and felt that sudden jolt as your tires crossed over a rough section of the road? That’s no accident! What you experienced is the function of rumble strips. These little grooves and bumps are designed to improve road safety significantly. In this blog post, we’ll dive deeper into what rumble strips are, how they are made, and why they are so crucial for drivers everywhere.
What Are Rumble Strips?

Rumble strips are tactile markings that can be found on roadways, typically along the edges or the center lines. Their primary purpose is to alert drivers through auditory and physical sensations when they drift too close to the edges of the roadway or cross into oncoming traffic. These strips can prevent accidents by creating a rumbling sound and vibration that effectively captures the driver’s attention.
Rumble strips come in two main types:
- Shoulder Rumble Strips: Placed on the sides of the road to prevent veering off the pavement.
- Centerline Rumble Strips: These are used to minimize head-on collisions by alerting drivers when they cross into opposing traffic.
So, why are they important? Let’s break it down:
| Benefit | Description |
|---|---|
| Accident Prevention | By startling drivers, rumble strips help prevent unintentional lane changes. |
| Increased Awareness | The vibrations wake sleepy or distracted drivers, reminding them to focus. |
| Cost-Effective | Installing rumble strips is less expensive than implementing other forms of road safety measures. |
With these points in mind, it’s clear that rumble strips are invaluable for maintaining safety on the roads. They play a crucial role in reminding drivers to remain vigilant, which ultimately saves lives.
3. Materials Used in Rumble Strip Production

Creating effective rumble strips is no small feat, and it all begins with the right materials. There's a bit of engineering magic involved, ensuring that these road safety features are durable, weather-resistant, and effective in alerting drivers. Here's a closer look at the key materials used in rumble strip production:
- Asphalt: The most common material for rumble strips, asphalt is favored for its flexibility and ability to withstand various weather conditions. It can be molded into the necessary shapes during the paving process.
- Concrete: In some instances, concrete is used, especially in areas where asphalt may wear down too quickly. Concrete rumble strips are usually precast, which helps maintain a consistent quality.
- Reflective paint: To enhance visibility, many rumble strips are coated with a reflective paint. This is particularly crucial during twilight and nighttime hours, helping drivers to spot the strips before it's too late.
- Polymer materials: Some modern designs incorporate polymer materials for added durability. These materials can resist environmental wear and tear, offering a longer lifespan for the rumble strips.
- Epoxy resins: Used in some instances for binding materials or for creating textured surfaces on the strips which increase their effectiveness, especially in wet conditions.
In short, the materials used in rumble strip production are carefully chosen to ensure they not only serve their purpose but also stand the test of time and varied environmental conditions.
4. Step 1: Design and Planning
The journey of creating rumble strips doesn't start with construction; it begins with thoughtful design and planning. This phase is crucial to ensure that the strips will be effective in their intended purpose of enhancing road safety.
Here's a breakdown of what goes into the design and planning stage:
- Site Assessment: The first step is always understanding where the rumble strips will be located. Engineers and planners conduct comprehensive assessments of the areas, taking into account traffic patterns, accident history, and environmental factors.
- Design Specifications: Once the site is evaluated, specific design specifications are developed. This includes determining the length, width, and spacing of the rumble strips. The overall goal is to ensure that the strips produce enough sound and vibration to alert drivers without causing discomfort.
- Consultation with Stakeholders: Communicating with local authorities, traffic safety experts, and the public is vital in this phase. Input from these stakeholders can provide insights into the specific needs of the area.
- Material Selection: Choosing the right materials is a part of the design. Engineers must balance durability, cost, and effectiveness in their selection to ensure the designed strip will perform as expected.
- Compliance with Regulations: Adhering to local and national safety regulations is non-negotiable. The design must meet all guidelines to ensure not only safety but also legal compliance.
Ultimately, the design and planning stage sets the foundation for successful rumble strip installation, ensuring that they will serve their life-saving purpose effectively.
Step 2: Manufacturing Process
The manufacturing process of rumble strips is quite fascinating and involves several precise steps to ensure that they meet safety and quality standards. Let’s break it down:
- Material Selection: The first step is selecting the right materials. Rumble strips can be made of various materials, including asphalt, concrete, or thermoplastic. The choice often depends on the intended lifespan and local climate conditions.
- Designing the Rumble Strips: Engineers create detailed designs that dictate the width, depth, and spacing of the strips. A common dimension is about 12 to 18 inches wide and 0.5 to 1 inch high, which effectively alerts drivers without being too disruptive.
- Manufacturing: Once the designs are approved, the manufacturing begins. For asphalt or concrete rumble strips, a mixture is prepared and poured into molds that form the strips. For thermoplastic, the material is heated until it becomes pliable, then shaped accordingly.
- Curing: After molding, the strips are cured to ensure they attain the necessary strength and durability. This process varies based on the material used – for concrete, it might involve moisture and temperature management, while thermoplastic products cool down rapidly.
- Quality Control: Finally, the manufactured strips undergo rigorous testing. Quality checks are essential to verify that they conform to specified standards before they are shipped for installation.
In summary, the manufacturing of rumble strips combines scientific precision with practical engineering to create a vital safety feature on roads.
Step 3: Installation Procedures
Once the rumble strips are manufactured, the next critical phase is installation. This process ensures that they are placed correctly for the most effective use. Here’s a look at how installation works:
- Site Assessment: Before installation, engineers conduct a thorough site assessment. They evaluate traffic patterns, road conditions, and appropriate placements based on where the strips will be most effective in alerting drivers, like at intersections or curves.
- Preparation of the Surface: The surface where the rumble strips will be installed needs to be clean and well-prepared. This often involves cleaning debris, filling cracks, and ensuring that the road surface is in good condition to facilitate proper adhesion.
- Placement: Once the area is prepared, the installation team marks where the rumble strips will go. This step ensures that they are aligned according to the design specifications. Precision is key here, as misaligned strips can reduce their effectiveness.
- Installation Techniques: Depending on the type of rumble strips, different installation methods are employed. For asphalt or concrete strips, they are typically adhered to the road surface using strong adhesives. For thermoplastic types, the heated material is applied directly to the road.
- Post-Installation Inspection: After installation, a thorough inspection is carried out to ensure that the strips are securely attached and meet safety guidelines. This may include checking the height and shape against standards.
Installation is a crucial step, as poorly installed rumble strips can lead to accidents instead of preventing them. A successful installation enhances driver safety, ensuring that those vibrations through the vehicle act as a reliable warning.
Step 4: Quality Control and Testing
Once the rumble strips are fabricated, it's time for the critical phase of quality control and testing. This step ensures that the strips not only meet safety standards but also perform effectively on the roads. Quality control is essential because even the slightest imperfection can impact drivers' experiences. Here’s how it typically works:
- Visual Inspections: Skilled inspectors begin with a thorough visual assessment, checking for any obvious flaws such as cracks, uneven surfaces, or incorrect dimensions. This initial step is crucial for catching issues before they escalate.
- Material Testing: Samples of the material used for making the rumble strips are often sent for laboratory testing. This might involve examining the material's durability, flexibility, and resistance to weather conditions.
- Dimensional Checks: Precise measurements are taken to ensure that the rumble strips adhere to agreed-upon specifications. They check the width, depth, and spacing of the strips, which are critical for proper functionality.
- Sound Testing: Rumble strips are designed to create a particular sound when vehicles pass over them. Testing this aspect involves running vehicles over the strips to measure the sound levels and confirm that they are within the desired range.
- In-Road Testing: Finally, select batches may even be installed in controlled road conditions for real-world testing. This phase allows engineers to evaluate their effectiveness in real scenarios and make any necessary adjustments.
With safety being paramount, this rigorous quality control process ensures that when vehicles hit those rumble strips, they do so safely and effectively. After all, these simple strips can save lives!
Conclusion
Rumble strips may look like unassuming lines on the road, but their journey from conception to installation involves several meticulous steps. Understanding how they are made highlights not just the engineering behind them, but also the commitment to safety they represent.
In summary, the process involves:
- Material Selection: Choosing durable and effective materials.
- Production Techniques: Employing methods that ensure precision and quality.
- Quality Control: Conducting stringent checks to guarantee performance and reliability.
As we’ve seen, safety is at the core of everything done in the manufacture of rumble strips. From alerting distracted drivers to reducing accidents, these simple devices play a vital role in promoting road safety. So next time you drive over a rumble strip, remember the extensive work that went into creating them, all for your safety and that of others on the road.
Rumble strips are a perfect example of how seemingly simple road features can have a massive impact on our daily lives. Stay safe out there!
 admin
admin


