Are you looking to enhance your designs in Adobe Illustrator? Stock photos can be a fantastic way to add visual appeal to your projects! Importing these images might seem daunting, but with a few simple steps, you'll be seamlessly integrating stunning visuals into your work. This guide will walk you through the process and help you select the perfect stock photo for your needs. Let’s dive in!
Choosing the Right Stock Photo
Finding the ideal stock photo can feel overwhelming, especially with the vast number of options available. Here are some tips to help you select the perfect image for your project:
- Define Your Purpose: Before you start searching, ask yourself what message you want to convey. Are you aiming for a professional look, or do you want something more playful?
- Consider Your Audience: Think about who will be viewing your work. A corporate audience may appreciate clean, minimalist images, while a younger audience might favor bold and vibrant designs.
- Resolution Matters: Always choose high-resolution images, especially if your design will be printed. Aim for at least 300 DPI (dots per inch) for print and 72 DPI for digital use.
- Check Licensing: Ensure that you understand the licensing agreements associated with the stock photo. Free images often come with restrictions, while paid options might offer broader usage rights.
Once you have a clear idea of what you need, it’s time to search! Here are some popular stock photo websites to explore:
| Website | Features |
|---|---|
| Unsplash | Free high-resolution images, diverse categories, and a user-friendly interface. |
| Shutterstock | Vast library of images, illustrations, and videos; offers various subscription plans. |
| Adobe Stock | Seamless integration with Adobe products, high-quality images, and flexible pricing. |
| Pexels | Free to use, user-uploaded content, and a straightforward search function. |
Once you find your chosen stock photo, make sure it aligns with your design’s color palette and style. If it doesn’t match, consider using filters or adjustments within Adobe Illustrator to tweak the image to fit your vision.
Incorporating the right stock photo can elevate your design, making it more engaging and visually appealing. Take your time in this selection process—it’s worth the effort!
Also Read This: How to Identify a High-Resolution Image
3. Preparing Adobe Illustrator for Import
Before diving into the exciting world of stock photo imports, it’s essential to set up Adobe Illustrator for a smooth experience. Here are some steps to get your workspace ready:
- Update Illustrator: Ensure that you’re using the latest version of Adobe Illustrator. Updates often come with bug fixes and new features that enhance performance.
- Create a New Document: Open Illustrator and create a new document by going to File → New. Choose the appropriate size and orientation based on your project needs.
- Check Your Workspace: Familiarize yourself with your workspace. You might want to use the Essentials workspace setting for a clean slate. Go to Window → Workspace → Essentials.
- Manage Layers: It’s a good practice to have a dedicated layer for your stock photos. You can create a new layer by going to the Layers panel and clicking on the Create New Layer icon.
By preparing your workspace, you’ll streamline the import process and have all the tools you need at your fingertips. Now, let’s move on to the fun part — importing your stock photo!
Also Read This: Reducing TIFF Image File Size Efficiently
4. Step-by-Step Guide to Importing Stock Photos
Importing a stock photo into Adobe Illustrator is straightforward, but following these steps will ensure you do it efficiently and effectively:
- Locate Your Stock Photo: First, find the stock photo you want to use. This can be from a stock photo website or your own collection. Make sure it’s saved in a format that Illustrator supports, like JPEG, PNG, or TIFF.
- Open Your Document: With Adobe Illustrator open and your document ready, you’re set to bring in that beautiful image.
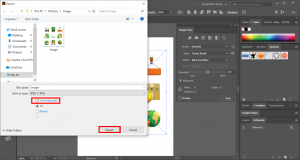
- Import the Photo: Go to File → Place. This opens a dialog box where you can browse your computer for the stock photo. Once you’ve found it, select the image and click Place.
- Positioning the Image: After placing, your cursor will change to a placement icon. Click anywhere on your artboard or click and drag to position and size the image as you prefer. If you need to resize it later, remember to hold down the Shift key to maintain its proportions.
- Embed or Link the Image: Once you’ve placed the image, decide whether to embed it or link it. Embedding allows the image to be part of your Illustrator file, which is great for portability. To embed, select the image, go to the top menu, and click Embed. Linking keeps the file size smaller but requires you to keep the original image file in the same location.
- Final Adjustments: After importing, feel free to make any necessary adjustments. You can rotate, crop, or apply effects to your stock photo. Use the Transform tools and Effects menu to explore what looks best.
And there you go! You’ve successfully imported stock photos into Adobe Illustrator. With a little practice, you’ll be combining images and illustrations like a pro in no time!
Also Read This: Essential Video Editing Software Used by YouTubers
5. Editing and Customizing Your Imported Photo
Once you've imported your stock photo into Adobe Illustrator, the fun really begins! This is where you can unleash your creativity and tailor the image to fit your design needs. Here’s how to effectively edit and customize your photo:
Adjusting Image Size and Position: Start by selecting the photo with the Selection Tool (V). You can resize it by clicking and dragging the corner handles. To maintain the photo’s proportions, hold down the Shift key while resizing. If you want to reposition the image, simply click and drag it to your desired location on the artboard.
Applying Image Effects: To add a little flair, consider applying effects. Go to the Effect menu and explore options like Gaussian Blur for a soft background effect or Drop Shadow to make your image pop. Play around with the settings until you find the perfect look!
Using the Clipping Mask: If you want your photo to fit a specific shape, clipping masks are your best friend. Create a shape using the Pen Tool or any shape tool, then place it on top of your photo. Select both the shape and the photo, right-click, and choose Make Clipping Mask. This way, your image will only show through the shape you've created. It’s a great technique for adding interest to your design!
Color Adjustments: Sometimes, the colors in stock photos aren't quite right for your design. You can adjust the color using the Recolor Artwork option found under the Edit menu. This lets you tweak hues and saturation until the image aligns perfectly with your color palette. You can also use the Live Color feature to experiment with color variations that complement your overall design.
Finally, don’t forget to use layers effectively. Organizing different elements (like your photo, text, and shapes) into layers can help manage your design better. Keep your stock photo on a separate layer so you can easily adjust it without disturbing other elements.
Also Read This: How to Know the Pixel Size of an Image
6. Saving and Exporting Your Final Design
Once you're satisfied with your design and edits, it’s time to save and export your work. This step is crucial to ensure that your design retains its quality and is ready for use in various formats. Here’s how to do it:
Saving Your Project: First, make sure you save your project in Adobe Illustrator’s native format (.ai). Go to File > Save As and choose a location on your hard drive. It’s a good idea to save regularly while you’re working to avoid losing any progress.
Exporting for Different Uses: Depending on how you plan to use your design, you might need to export it in a different format. Here are some common options:
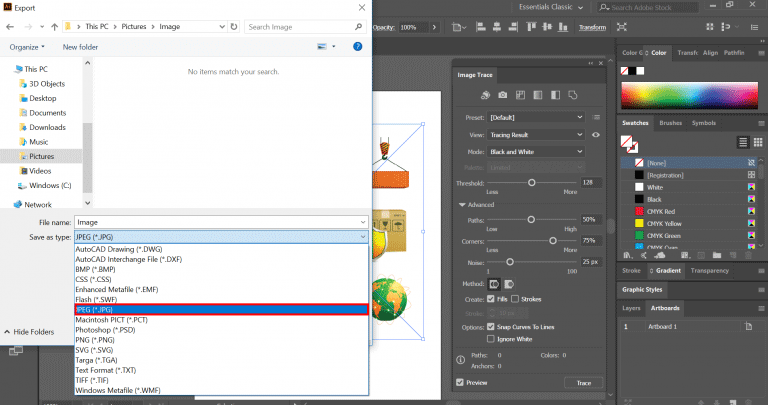
- JPEG: Ideal for web use or sharing on social media. Just go to File > Export > Export As and select JPEG from the format options.
- PNG: Perfect for images that need transparency. Follow the same steps as exporting a JPEG, but choose PNG instead.
- PDF: Great for print. You can export your design as a PDF by selecting File > Save As and choosing PDF from the format dropdown.
Choosing Resolution: When exporting, especially for raster formats like JPEG and PNG, pay attention to the resolution. For web use, 72 DPI is sufficient, but for print, you’ll want to export at 300 DPI for crisp quality.
Finally, give your file a clear name that reflects your design, and ensure you’re saving it in the correct location for easy access later. With your design safely saved and exported, you’re all set to share your creative work with the world!
Also Read This: Is Selling Photos on iStock Worth It
7. Common Issues and Troubleshooting Tips
Importing stock photos into Adobe Illustrator can sometimes lead to unexpected issues. Here are some common problems you might encounter and tips to resolve them:
- File Format Issues: Always check if the stock photo's format is compatible with Illustrator. Common formats like JPEG, PNG, and TIFF work best. If you're dealing with a different format, consider converting it using an online converter.
- Low Resolution: If the image looks pixelated or blurry after importing, it might be due to a low-resolution file. Check the DPI (dots per inch) of the image. For print quality, aim for at least 300 DPI.
- Linking vs. Embedding: Sometimes, users mistakenly link images instead of embedding them. If your image disappears when you move files around, make sure to embed it by choosing File > Place and checking the Link option to disable it.
- Color Mode Issues: If your stock photo appears washed out or off-color, it might be due to color mode differences. Ensure both your Illustrator document and your image are in the same mode (RGB for digital, CMYK for print).
- Performance Lag: Large images can slow down Illustrator. If your application is lagging, try reducing the image size or using a lower resolution version for your initial design work.
If you encounter issues not covered here, don’t hesitate to check Adobe’s official forums or communities like Reddit where fellow designers often share solutions.
8. Conclusion and Further Resources
Importing stock photos into Adobe Illustrator opens a world of creative possibilities. Whether you’re designing a flyer, a website, or graphics for social media, high-quality visuals can elevate your work significantly. Remember, the key steps include:
- Finding the right stock photo.
- Using the File > Place command to import.
- Adjusting image settings for optimal results.
For further learning, check out these resources:
- Adobe Illustrator Tutorials - Official tutorials that cover everything from basics to advanced techniques.
- Best Stock Photo Sites - A list of top stock photo websites to find quality images.
- YouTube Tutorials - Video guides showing the import process visually.
With practice and the right resources, you’ll become proficient at importing and optimizing stock photos in your designs. Happy illustrating!
 admin
admin


