If you're new to using a Chromebook or just looking for ways to optimize your experience, downloading images can seem a bit tricky at first. Whether you want to save stunning wallpapers, memorable photos from friends, or images for your school project, it’s a straightforward process! In this post, we'll walk through the essential steps you need to follow to download images easily on your Chromebook. Let’s dive in!
Step-by-Step Guide to Download Images
Downloading images on a Chromebook is quite simple once you know the steps. Follow these easy guidelines to save images right to your device:
Step 1: Find the Image You Want
Start by locating the image you want to download. This could be on a website, through a search engine like Google, or even within your social media feed. Once you’ve found that perfect picture, you’re ready for the next step!
Step 2: Right-Click the Image
- If you have a mouse connected to your Chromebook, right-click the image directly.
- If you’re using the trackpad, you can perform a right-click by tapping with two fingers simultaneously.
This should open a context menu where you will see several options related to the image.
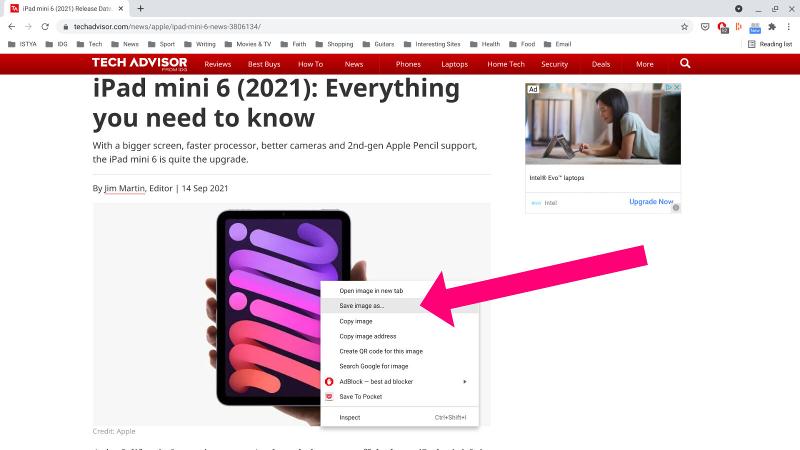
Step 3: Choose “Save Image As”
From the context menu that appears, click on “Save Image As”. This action prompts your Chromebook to ask where you’d like to save the image. You can select the folder or location you prefer, such as Downloads or a specific folder you’ve created.
Step 4: Name Your Image
After selecting the save location, you may have the option to rename the image. It’s good practice to give it a name that makes sense. For instance, if you saved a picture of a sunset, you might want to name it "Sunset.jpg". This way, you can easily find it later. Once you’ve named the file, click “Save”.
Step 5: Access Your Downloads
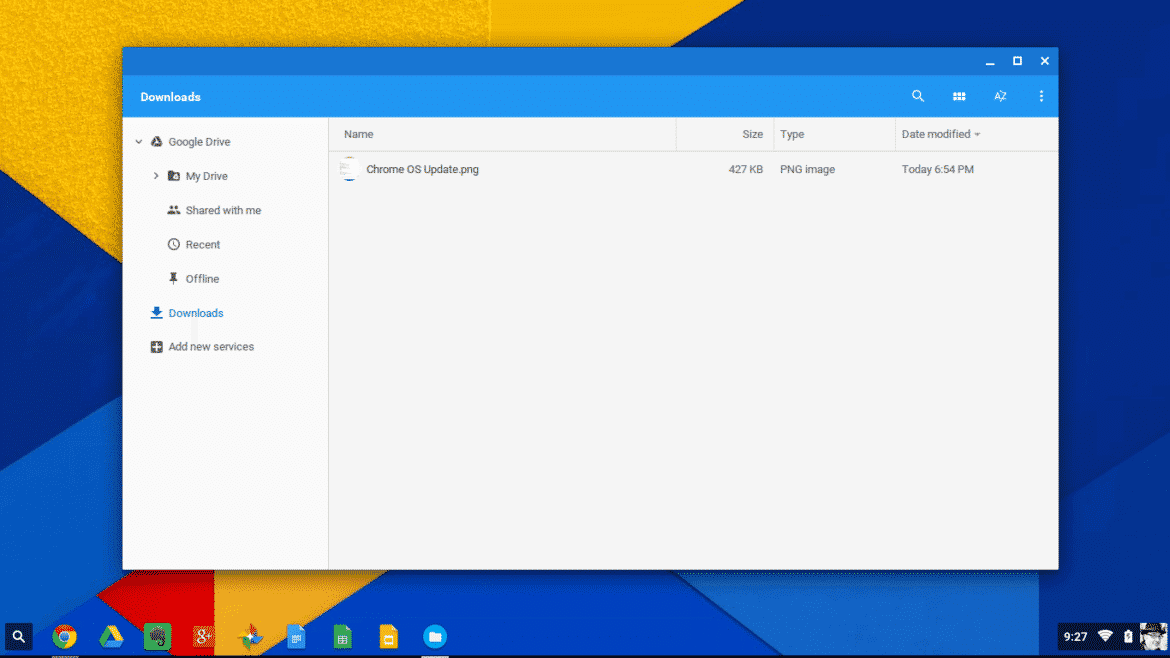
This is perhaps the most satisfying step! To view the image you just downloaded, you can go to the Files app on your Chromebook. This app looks like a folder icon:
- Open the Files app from your shelf (the bottom bar).
- Click on Downloads on the left sidebar to find your image.
Your downloaded image should appear there, ready for you to view or edit as you wish!
Quick Tips:
- If the image doesn’t download, check your internet connection and try again.
- For some images, especially those on websites with protected content, you might not see the “Save Image As” option.
- Remember to respect copyright and only download images that are free to use or ones you own.
And that’s it! You’ve successfully downloaded an image on your Chromebook. With these simple steps, you can gather all the images you need for your projects or simply for personal enjoyment. Enjoy your new found image collecting skills!
Also Read This: Foap: How to Make Money Selling Your Photos Online
3. Using the Right-Click Menu for Image Downloads
Downloading images on a Chromebook is super simple, especially when you take advantage of the right-click menu. If you’ve ever used a mouse or a trackpad before, you’re probably familiar with this handy option. Here’s how to get those images saved to your device with just a few clicks!
First off, locate the image you want to download. This could be anything from a stunning nature shot to a cute cat meme! Once you’ve found it, all you have to do is right-click on the image. If you’re using a trackpad, you can usually accomplish this by tapping with two fingers, which simulates a right-click.
When the right-click menu pops up, you’ll see a few options. Look for the one that says “Save image as…”. Click on that, and a dialog box will appear asking where you’d like to save the image. Just choose your desired location—might be the Downloads folder or another folder of your choice. If you want to rename the image, you can do that here, too. Once you’ve got everything set, hit “Save” and voilà! The image is now safely downloaded onto your Chromebook.
Pro Tip: Be sure to check the file format of the image you're downloading. Most images will save as a .jpg or .png file, but there are other formats. If you’re using the image for a specific purpose, like printing, make sure the quality and format are appropriate.
Also Read This: Understanding YouTube’s Audio Features and Settings
4. Downloading Images from Different Browsers

With a Chromebook, you have the freedom to choose from several browsers like Chrome, Firefox, and even Safari. Each browser has its quirks, but the basic process of downloading images remains fairly consistent. Let’s dive into how you can download images using a few of the most popular browsers!
1. Google Chrome: As the default browser on Chromebooks, Chrome's method is what we just discussed. Just right-click, select the option to save, and you’re set. Chrome also provides a straightforward interface, making it a user-friendly option for downloading images.
2. Mozilla Firefox: If you’re rocking Firefox, the process is almost identical to Chrome. Right-click on your desired image, select “Save Image As…”, name your image, choose a saving location, and hit “Save.” Easy peasy!
3. Safari: While Safari isn't a native option for Chromebooks, if you’re using a Chrome OS in a cross-platform way via a web app or a virtual machine, the process is the same. Right-click the image and look for the “Download Image” option. Done!
4. Microsoft Edge: Even if you're on a Chromebook, you might have access to Edge. The download process is nearly identical. Just right-click the image and select “Save Image As…” to download. Edge also offers a few neat features like reading mode if you're looking to save articles along with images.
Extra Tip: Some websites may disable right-click functions or have restrictions about downloading their images—usually to protect copyright. If you come across this, try using the keyboard shortcut Ctrl + S (or Cmd + S on a Mac) instead, as this often brings up an option to save the entire page, including images.
So there you have it! Downloading images on a Chromebook varies slightly depending on the browser you choose, but mastering these techniques will have you collecting your favorite images in no time.
Also Read This: How to Convert YouTube Video to MP4 with a Step-by-Step Guide for Downloading
Troubleshooting Common Download Issues on Chromebooks
Downloading images on a Chromebook generally goes smoothly, but sometimes you might encounter a few hiccups along the way. Don't worry; many users face similar issues, and most can be resolved with a bit of troubleshooting. Here are some common problems you might encounter and how to fix them:
- Download Fails to Initiate: If clicking the download link doesn’t start the process, try refreshing the page or using a different browser. Sometimes, a simple refresh can solve the issue.
- Images Save in the Wrong Format: If the image is saving as a .webp file instead of a .jpg or .png, consider using a different browser, such as Firefox, which often saves images in the original format.
- No Notification of Downloads: If you’re not receiving download notifications, check your settings. Go to Settings > Advanced > Downloads, and make sure notifications are enabled.
- Insufficient Storage Space: If downloads aren’t completing due to storage issues, ensure you have enough space. You can check available storage by clicking on the status area in the bottom right corner of the screen, then selecting Settings.
- File Not Found After Download: If you can't locate the downloaded image, it can usually be found in your Files app under Downloads. If you still can’t find it, use the search feature within the Files app.
Another helpful tip is to keep your Chromebook's software up to date, as updates can fix bugs that may affect downloading. You can check for updates by going to Settings > About Chrome OS > Check for updates.
Also Read This: How Much Can You Earn By Selling Images Online
Tips for Organizing Downloaded Images
Once you’ve successfully downloaded your images on a Chromebook, the next step is to keep them organized. A well-organized collection not only saves time when you're looking for a specific image but also enhances your workflow. Here are some tips to help you keep your images in order:
- Create Folders: Just like a filing cabinet, create folders for different categories of images. You can have folders for personal photos, work-related images, artwork, or any other category that fits your needs. To create a folder in the Files app, simply click on the New Folder icon.
- Use Descriptive Names: When saving images, give them clear and descriptive names. Instead of “image1.jpg,” try something like “Beach_Vacation_2023.jpg.” This makes it much easier to find what you're looking for later.
- Use Tags (When Applicable): If you find a specific image particularly useful or important, consider adding tags to it. While Chromebooks don’t have a built-in tagging system, you can use descriptive names or even emojis to mark images that hold special significance.
- Regularly Clean Up: Schedule a time every month or so to go through your downloaded images. Delete duplicates, blurry photos, or images that you no longer need. This keeps your collection fresh and manageable.
- Use Cloud Storage: Consider backing up your images to cloud storage services like Google Drive. This not only frees up local space but also helps keep important images safe from data loss.
By adopting these organizing strategies, you can make your experience on a Chromebook efficient and enjoyable. An organized collection not only saves time but can also inspire creativity when you’re looking for that perfect image.
Conclusion and Final Thoughts on Image Downloads
Downloading images on a Chromebook is a straightforward process that empowers you to save and manage your favorite visuals efficiently. Here are some key points to remember when downloading images:
- Browser Compatibility: Ensure you're using a compatible browser like Google Chrome for the best experience.
- File Management: Familiarize yourself with the Files app to easily locate your downloaded images.
- Image Permissions: Always check the copyright and usage rights of any images before downloading them to avoid potential legal issues.
Additionally, it’s helpful to remember:
| Action | Instructions |
|---|---|
| Right-Click Download | Right-click on the image and select "Save image as." |
| Keyboard Shortcut | Press Ctrl + S after clicking on an image. |
| Using Extensions | Consider adding image downloading extensions from the Chrome Web Store for advanced options. |
In summary, with just a few simple steps, you can effectively enhance your Chromebook experience by easily downloading and accessing images. Whether for personal use, work, or creative projects, mastering these techniques can greatly improve your workflow. Don’t hesitate to experiment with different methods and tools to find what works best for your needs!
 admin
admin


