Copying images on a Chromebook can be a breeze once you get the hang of it! Whether you’re gathering pictures for a project, saving memes to share with friends, or just organizing your vacation photos, knowing how to effectively copy and paste images is essential. In this blog post, we'll break things down into simple steps to make your image copying experience smooth and easy. Let’s dive right in!
Understanding the Basics of Image Copying on a Chromebook

Before we get into the nitty-gritty of copying images, let’s understand a few basic concepts about how Chromebooks handle images. Unlike traditional PCs or Macs, Chromebooks run on Chrome OS, which is designed for efficiency and simplicity. This means that although the process may differ slightly, copying images is straightforward!
Here are the most common methods to copy images on your Chromebook:
- Using the Right-Click Method:
Most of the time, you'll find that right-clicking on an image gives you a menu of options. To do this:
- Navigate to the image you want to copy.
- Right-click on the image (if you’re using a trackpad, you can click with two fingers).
- Select Copy image from the dropdown menu.
- Using Keyboard Shortcuts:
If you prefer using shortcuts (they can save you loads of time!), here’s the way to go:
- Click on the image you want to copy.
- Press Ctrl + C to copy it to your clipboard.
- Dragging and Dropping:
This method is especially handy when you’re working with images in your files:
- Open the folder where your image is located.
- Click and hold on the image.
- Drag it to the desired destination (like a folder or document) and release it.
Once you’ve copied the image, pasting it is just as easy!
To paste:
- Go to the location where you want to place the image (like a document or presentation).
- Right-click and select Paste, or you can simply hit Ctrl + V on your keyboard.
It’s that simple! Just like that, you can copy and paste images to wherever you need them.
In case you want to save images directly to your Chromebook, right-clicking might also give you the option to Save image as.... This way, you can directly download the image to your files instead of copying it first. This method is especially useful when you want to keep a copy of an image for later use.
So now that you know the basic methods, you’re well on your way to becoming an image copying pro on your Chromebook! In the next sections, we’ll explore some tips and tricks to manage your copied images more effectively. Stay tuned!
Also Read This: How to Add an Image to a Green Screen in CapCut
3. Using Keyboard Shortcuts to Copy and Paste Images
If you're looking to speed up your workflow on your Chromebook, using keyboard shortcuts is a game changer! Not only does it save time, but it can also make the whole process feel more seamless. Let’s break down how you can efficiently copy and paste images using these handy keyboard shortcuts.
First things first, to copy an image, navigate to the image you wish to copy on your screen. Once you've found it:
- Click on the image to select it. This action makes sure you focus on the right piece of content.
- Next, use the keyboard shortcut Ctrl + C (or Cmd + C on a Mac). This will copy the image to your clipboard.
Now that you've got that image on your clipboard, let's move on to pasting it wherever you need it:
- Navigate to the location where you want to paste the image, which could be a document, an email, or a chat application.
- Use the shortcut Ctrl + V (or Cmd + V on a Mac) to paste the image. Voila! The image should appear in your chosen application.
Tips to enhance your copying and pasting experience:
- Make sure that the application you are pasting into supports image pasting. Some programs might only accept text.
- If you're not seeing the image appear, double-check that you've copied it successfully by trying to paste it into another app, like a drawing tool or a blank document.
- For some file types, you may find it easier to right-click (or tap and hold) the image and select “Copy” from the context menu instead of using the keyboard shortcut.
By mastering these shortcuts, you can quickly grab images from various sources and have them ready in your projects or communications without skipping a beat!
Also Read This: How to Vectorize an Image in Procreate
4. Copying Images from the Web
Copying images from the web is one of the most common tasks for Chromebook users. Whether it’s for a presentation, a school project, or simply sharing a cool image with friends, knowing how to do it properly makes a world of difference. Let’s dive into how you can easily copy images from the web in a few straightforward steps!
To start, open your Chromebook and go to your favorite web browser. Follow these instructions:
- Navigate to the website that contains the image you want to copy.
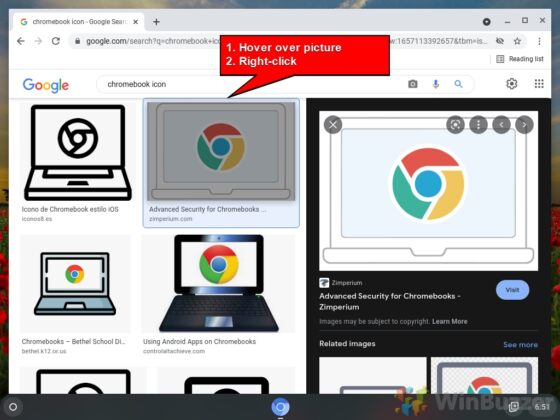
- Once you find the desired image, right-click on it. If you’re using a trackpad, you can often simulate a right-click by tapping with two fingers.
- From the context menu that appears, select “Copy image”.
Now, the image is on your clipboard, ready to be pasted! Here’s how to do that:
- Go to the application where you want to paste the image, such as a Google Doc, Slides, or an email.
- Click in the spot where you want the image to appear and use Ctrl + V (or Cmd + V on a Mac) to paste it.
Keep in mind that some websites might have restrictions on copying images, especially if the image is protected by copyright. If you encounter this:
- Look for alternate sources like stock image websites that offer free images for personal or commercial use.
- Always respect copyright and usage rights when copying images from the web.
- Consider using screenshot features if you can't directly copy the image. However, remember to check the usage rights before doing so.
Overall, copying images from the web can be quick and easy once you get the hang of it. With these methods in your toolkit, you can grab images effortlessly and enhance your projects or communications in no time! So go ahead, explore, and let your creativity flow!
Also Read This: How to Use GIMP to Crop an Image for Professional Editing
5. Copying Images from Local Files
When you're working on a Chromebook, copying images from local files is a breeze! Unlike traditional desktop operating systems, Chromebooks make file management super easy with their built-in tools. If you’ve downloaded an image or saved one from the web, here’s how you can copy it to your clipboard:
Step 1: Open the Files App
First things first, locate the Files app on your Chromebook. You can find it by clicking on the circle button in the lower-left corner of your screen (it’s called the Launcher) and looking for the folder icon. Open this app, and you’ll see all the files stored on your Chromebook.
Step 2: Navigate to Your Image
Now, browse through your folders to find the image you want to copy. It might be in the Downloads folder, or perhaps you saved it in a custom location. Once you find your image, just click on it to select it.
Step 3: Copy the Image
Next, you can copy the image in a couple of ways. The easiest method is to use the keyboard shortcut: press Ctrl + C. Alternatively, you can right-click on the image and select Copy from the context menu. That’s it! Your image is now copied to your clipboard.
Step 4: Paste the Image
Now that you've copied your image, you can paste it wherever you need! Open an application like Google Docs, your email service, or any place that allows image paste. Simply click where you want the image to appear and press Ctrl + V, or right-click and select Paste.
And voila! You’ve successfully copied an image from your local files on a Chromebook. This process is straightforward and efficient, making it easy to retrieve your favorite images without hassle.
Also Read This: Understanding Your Earnings on Rumble and the Factors That Affect Them
6. Using the Right-Click Menu to Copy Images
Another super handy way to copy images on your Chromebook is by using the right-click menu! This method works great for images on websites, in applications, or even in your local files. Here’s how to do it:
Step 1: Find the Image
Begin by navigating to the image you want to copy. This can be anything from a photo in your Google Photos, a picture in a Google Doc, or even an image from a website you’re browsing. Simply locate it and prepare to copy!
Step 2: Right-Click on the Image
Now, let’s get to the good stuff! To bring up the right-click menu, you have a couple of options:
- Use the trackpad: Click with two fingers simultaneously.
- Use an external mouse: Just right-click as you normally would.
Once you do this, a context menu will pop up with several options.
Step 3: Select 'Copy Image'
From the right-click menu, look for the option that says Copy Image. Click it! This copies the image directly to your clipboard, making it super easy to move it wherever you need.
Step 4: Paste the Image
Just like before, you can paste your copied image into any compatible application by navigating to where you want it and pressing Ctrl + V, or by right-clicking and choosing Paste.
This right-click method is incredibly versatile and can save you time, especially when dealing with images online. It’s a quick way to gather images for presentations, projects, or even personal use. Happy copying!
Also Read This: Uploading Custom Images in ESPN Fantasy Football
7. Saving Copied Images to Your Chromebook
Once you've successfully copied an image on your Chromebook, the next step is to save it. The process is straightforward, and we'll break it down to ensure you don’t hit any snags along the way. Here's how to do it:
- Open Your Image Editing or Document Application: This could be anything from Google Docs to a photo editing app like Pixlr. If you just want to save the image directly, you can use the Files app.
- Paste the Image: Click in the document or image editor where you want the image to appear, then right-click and select “Paste,” or simply press Ctrl + V on your keyboard.
- Save Your Work: After pasting the image, it’s time to save it. If you used Google Docs or another online tool, click on the “File” menu and choose “Download” or “Save.” Make sure to select the desired format (like .jpg, .png) if prompted.
If you’re using the Files app:
- Open the Files App: You can find this in your app launcher. It’s where all your downloaded files are stored.
- Creating a New Folder (Optional): If you want to keep things organized, consider creating a new folder for your images. Right-click in the Files app and choose “New Folder.”
- Right-Click and Paste: In the folder (or anywhere in the Files app) where you want to save the image, right-click and select “Paste.” Your copied image will now appear there.
And that’s it! You've successfully saved your copied image to your Chromebook. Depending on where you pasted the image, you can easily access it every time you need it. Remember, keeping your images organized helps you find them faster in the future!
Also Read This: How to Download Behance Videos
8. Troubleshooting Common Issues When Copying Images
Even with a simple process, you might run into a few hiccups when copying images on your Chromebook. Don’t worry, though—most issues are easy to fix! Let’s go over some common problems and their solutions.
1. Image Not Copying
If you find that you can’t copy an image, it might be due to:
- Protected Content: Some websites prevent image copying to protect copyrights. You can try right-clicking on the image and seeing if there’s an option to “Open Image in New Tab.”
- Browser Issues: Ensure your browser is up to date. Sometimes, an outdated browser can cause features to malfunction.
2. Pasted Image is Blank or Broken
If the pasted image appears blank or as a broken link:
- Recheck the Copy Process: Make sure you highlighted the image correctly before copying it. Sometimes a misclick can lead to nothing being selected.
- Try Another Browser: If you consistently run into problems, switching browsers might help. Chrome or Firefox generally works well with image copying.
3. Unable to Save Images
If your images aren't saving correctly, consider these:
- Storage Space: Check your Chromebook’s available storage space. If you’re low on space, images might not save correctly.
- Permissions: If you're trying to save to an external source like Google Drive, make sure you have the necessary permissions set up.
With these tips, you should be able to easily navigate any obstacles you encounter while copying images on your Chromebook. Remember to take your time and try these solutions, and you’ll have all the images you need in no time!
Conclusion
Copying images on a Chromebook is a straightforward process that can be accomplished in just a few simple steps. Whether you're grabbing images from the web, transferring them from a USB drive, or even taking screenshots, mastering these techniques can enhance your productivity and streamline your workflow. Here’s a quick recap of the methods discussed:
- Right-click Method: Simply right-click on any image to either copy it or save it directly.
- Keyboard Shortcuts: Use Ctrl + C to copy and Ctrl + V to paste your images wherever needed.
- Screenshot Tool: Capture images on your screen using Ctrl + Show windows (or F5) to take a screenshot.
Troubleshooting tips should also be kept in mind, such as ensuring that images are not restricted from being copied due to copyright issues. Additionally, organizing your downloaded images in appropriate folders can save time when you need to access them later.
With practice, you'll be able to efficiently copy and utilize images on your Chromebook, enhancing your projects and presentations.
 admin
admin


