If you're looking for high-quality stock images to enhance your content, Getty Images is a top choice! Founded in 1995, this platform has become a premier source for photographers, videographers, and creatives alike. With a vast library of millions of assets, Getty Images offers everything from stunning photography to compelling illustrations. Whether you're a blogger, marketer, or social media manager, knowing how to embed these images in your posts can elevate your work and engage your audience like never before.
Why Use Getty Images in Your Content?
Choosing the right images can make or break your content. Here are several compelling reasons to consider using Getty Images:
- Quality and Variety: Getty Images boasts a rich catalog filled with professional-grade visuals. From breathtaking landscapes to candid lifestyle shots, you’ll find images that resonate with almost any topic.
- Credibility: Using trusted sources like Getty Images enhances the credibility of your content. It signals to your audience that you value high-quality resources and are committed to professionalism.
- Search Functionality: The platform’s well-designed search features allow you to filter results by orientation, color, and more, making it easy to find exactly what you need.
- Licensing and Rights: Getty Images provides a straightforward licensing process, ensuring that you have the appropriate permissions to use the visuals legally. This can save you a lot of headaches down the line.
- Inspiration: Browsing through Getty's diverse offerings can spark new ideas and creativity. Sometimes, the perfect image can inspire a fresh perspective on your writing.
Moreover, incorporating high-quality visuals not only enriches your text but also enhances user experience, leading to longer engagement times. According to research, posts with images receive 94% more views compared to text-only pieces. That's a statistic worth considering!
Finally, let’s not forget about SEO! Using relevant images, combined with the right alt texts and descriptions, can help improve your search engine rankings. When done correctly, embedding Getty Images can drive more traffic to your posts and increase your online visibility.
In summary, leveraging the high-quality visuals from Getty Images can provide serious benefits for your content strategy. It’s a smart move for anyone looking to create engaging, visually appealing, and optimal content!
Also Read This: How to Verify the Copyright Status of Images for Legal Use
3. Steps to Embed a Getty Image
Embedding a Getty Image into your post is a straightforward process, and it's a great way to enhance your content visually. Here’s how you can do it in a few simple steps:
- Find Your Image: Start by searching for the image you want on the Getty Images website. Use keywords related to your topic to narrow down the options.
- Select the Image: Once you find an image you like, click on it to open the image details. Here, you will see information about the image's licensing options.
- Choose the Embed Option: After selecting the image, look for an "embed" button or option in the details section. Getty provides a specific code snippet for embedding images.
- Copy the HTML Code: Once you find the embed option, click on it, and you'll see a box with HTML code. Highlight this code and copy it (Ctrl+C on Windows or Command+C on Mac).
- Paste the Code in Your Post: Go to your blog or website editor where you want the image to appear. Switch to the HTML editor (if you're using a platform like WordPress, there’s usually a tab for HTML). Paste the code you copied (Ctrl+V on Windows or Command+V on Mac).
- Preview the Post: Before publishing, make sure to preview your post. This step is crucial to ensure the image appears as expected. Adjust the size or placement if necessary by editing the HTML code.
- Publish: Once everything looks great, publish your post! Your readers will now see the captivating image you embedded from Getty.
Remember, embedding images rather than downloading and uploading them can save you from potential copyright issues and usually keeps the image quality intact. Plus, it provides a link back to the source, which is always a smart move in the blogging community!
Also Read This: Shutterstock Payment Method: Options for Receiving Earnings as a Contributor
4. Finding the Right Getty Image
Finding the right Getty Image for your blog can feel like searching for a needle in a haystack, but with a few tips and tricks, you can streamline the process. Let's dive into how you can easily spot the perfect image that resonates with your content.
- Use Specific Keywords: Begin with clear and specific keywords related to your topic. For example, if your post is about healthy eating, you might use keywords like "fresh vegetables" or "nutritional meals." The more specific you are, the better the results will be.
- Apply Filters: Once you search, utilize the filter options available on Getty Images. You can filter by orientation, color, and even the type of image (photograph, illustration, etc.). This can help narrow down your choices considerably.
- Check Licensing Options: Make sure to examine the licensing options for any image you consider. Some images may be available for free with proper attribution, while others might require payment. Knowing this upfront will guide your choices effectively.
- Preview the Image: Click on any images that catch your eye to see a larger version. Check how it looks in various sizes to ensure it fits well within your post layout.
- Look for Trends: If you're not sure what's relevant, consider current events or trending topics. Using images that connect with popular culture can draw in more readers.
Finding the right Getty Image can take some time, but remember: it's all about enhancing your content and adding value for your audience. A stunning image not only breaks up the text but can also communicate messages faster than words alone. Happy hunting!
Also Read This: How to Remove Watermarks from Getty Images Using Reddit Insights
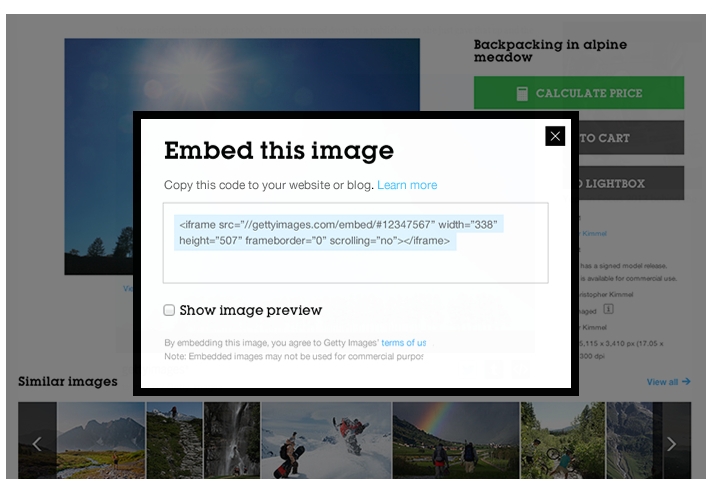
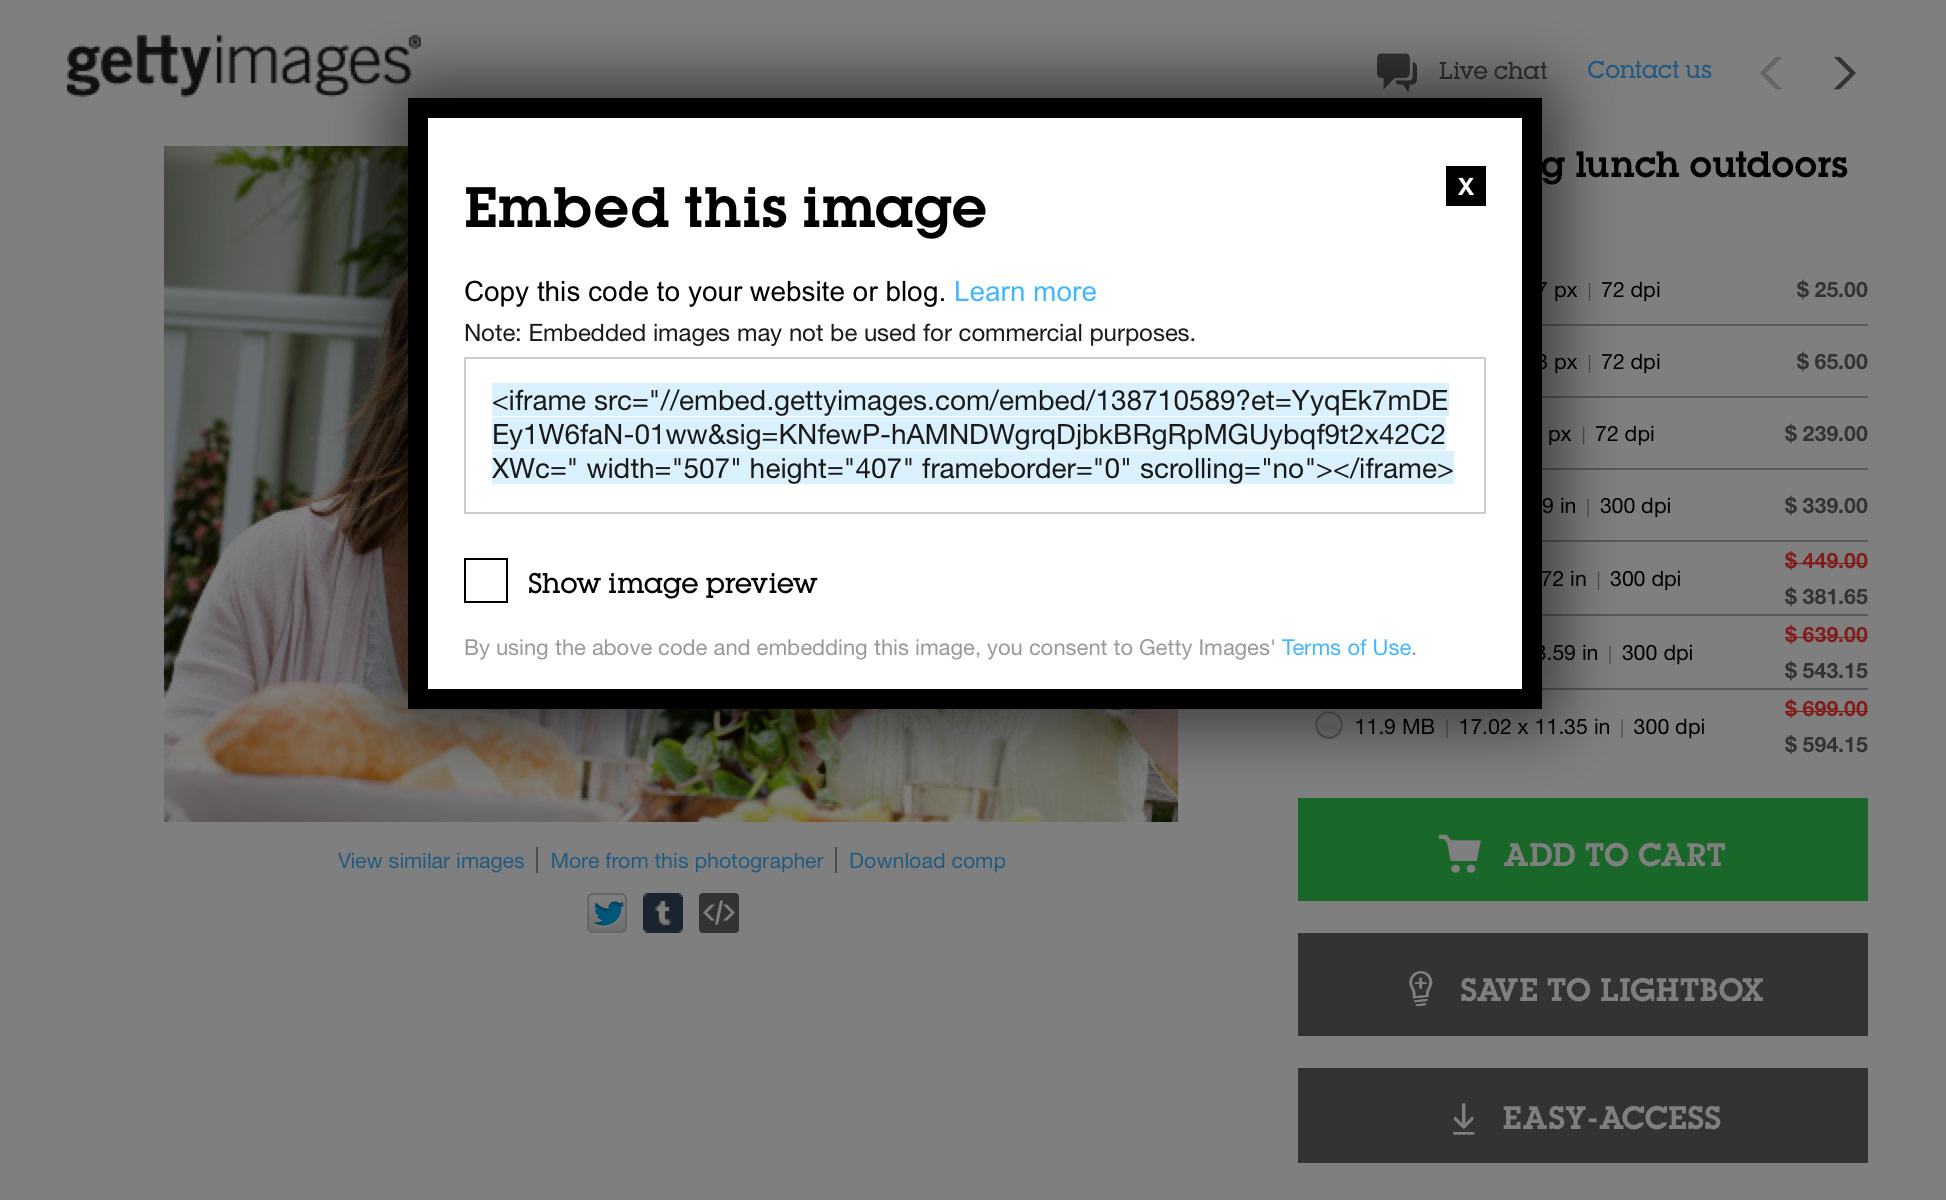
5. Copying the Embed Code
Now that you've selected the perfect Getty Image for your post, it's time to grab that embed code! This is a crucial step that ensures the image displays correctly on your site while also giving proper attribution. No ownership issues here!
Here's how to copy the embed code:
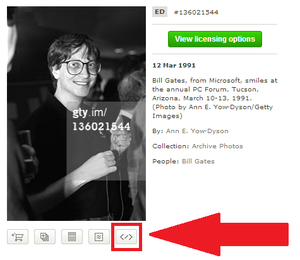
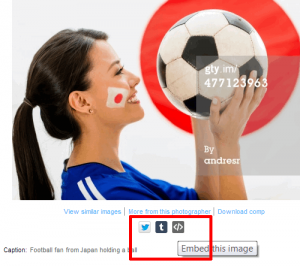
- Find the image you want on Getty Images. Once you’re on the image page, look for a button that says "Embed". This is usually located right beneath the image or in the sidebar.
- Click on the "Embed" button, and a modal or pop-up will appear.
- Within this pop-up, you’ll see different options for embedding the image. You might notice sizes and styles you can choose from, depending on your layout needs. Select the size you’d prefer!
- Once you're satisfied with your choice, locate the embed code provided, which typically starts with <iframe>.
- Highlight the entire code with your cursor. Make sure you get all of it so nothing is left out!
- Right-click and select "Copy" or simply use the shortcut Ctrl+C (or Cmd+C for Mac users).
And just like that, you’ve copied the embed code! It’s a simple process, but it’s essential for properly integrating that beautiful image into your content.
Also Read This: How to Download Images from Getty Images Without Watermark for Your Projects
6. Pasting the Embed Code into Your Post
Great! Now that we've got the embed code safely copied to your clipboard, it’s time to bring it to life by pasting it into your post. Depending on how you manage your blog or website—I know some of you might be on WordPress while others might use a custom CMS—this part may vary slightly. But no worries, I’ve got you covered!
Here’s a step-by-step guide:
- Navigate to Your Post: Open the blog post or page where you want to include the Getty Image. Whether you’re drafting a new post or editing an existing one, just head to that editor.
- Switch to HTML/View Mode: If you're using a visual content editor, look for an option that allows you to switch to HTML or code view. In WordPress, this is often labeled “Text” rather than “Visual”. This will let you paste the embed code directly.
- Find the Right Spot: Click in the editor where you want the image to appear. It could be at the beginning, middle, or end of your content—whatever fits your flow best!
- Paste the Embed Code: Now, right-click and select "Paste" or use the shortcut Ctrl+V (or Cmd+V for Mac). Your embed code will pop right in!
- Preview Your Post: Always a good idea! Click the "Preview" button to see how your post looks with the newly embedded image. Make sure everything aligns well and that the image displays perfectly!
- Save and Publish: Once you’re satisfied with how it looks, hit "Save" or "Publish." Your readers will soon get to enjoy that beautiful Getty Image!
And there you have it! You’ve successfully embedded a Getty Image in your post. Easy, right? With just a few clicks, you can enhance your articles and make them visually appealing. Trust me, your readers will appreciate the rich, engaging content!
Also Read This: Best Getty Images Downloader: Simplifying the Image Downloading Experience
7. Tips for Optimizing Embedded Getty Images
When it comes to using Getty Images in your posts, simply embedding an image is just the beginning. To ensure that your images enhance your content rather than hinder it, here are some handy tips to optimize your embedded Getty Images:
- Choose the Right Image: Make sure the image aligns with your content. Whether you’re illustrating a concept or adding a visual element to a blog post, the right image will encapsulate your message.
- Use High-Quality Images: Always opt for high-resolution images. Getty Images offers a plethora of options, so take advantage of this to ensure your posts look professional. Blurry or pixelated images can distract readers.
- Consider Loading Speed: Large images can slow down page loading times. Even though you're embedding, make sure you're not using the largest size available unless necessary. Balance quality with performance!
- Add Alt Text: Although embedded images don’t always allow for customization, make a habit of adding alt text where you can. This boosts accessibility and is helpful for SEO purposes. Describe the image in a few keywords.
- Position Strategically: The placement of your embedded images is crucial. Consider where they fit within your text for maximum impact. Images should break up large blocks of text, maintaining reader engagement.
- Incorporate Captions: Captions can provide context or additional information, enhancing the viewer's understanding. Sometimes a simple line can add depth to the image and make it more meaningful.
- Monitor Image Performance: Use tools like Google Analytics to see how your embedded images are performing. Check engagement metrics to understand if they resonate with your audience.
By following these tips, you’ll not only improve the aesthetic appeal of your posts but also enhance user experience. Remember, a well-optimized image can make all the difference in how your content is perceived!
Also Read This: How to Work for Getty Images as a Photographer and What to Expect
8. Common Issues When Embedding Getty Images
Even though embedding images from Getty is relatively straightforward, there are some common hurdles you might encounter. Being aware of these issues can save you time and frustration:
- Access Restrictions: Some images may have restrictions or permissions that prevent them from being easily embedded. Always check the licensing requirements as they can vary widely between images.
- Broken Links: Occasionally, the embed code may link to an image that is no longer available. This leads to a broken image icon, resulting in a poor user experience. It’s a good idea to periodically review your posts!
- Size Compatibility: Not all embedded images will fit perfectly within your website’s design. Sometimes they might be too large or too small for your layout, requiring adjustments post-embed which can be tricky.
- SEO Considerations: While images enhance your content, they can also clutter your HTML if not properly managed. Ensure that they don't dilute your site's SEO ranking by unnecessarily slowing down load times.
- Quality Control: Some embedded images may lose clarity when viewed on different devices. Ensure your images look great on both desktop and mobile views, as readability matters!
- Embed Code Changes: If Getty updates their embed code structure, it might render your existing embeds non-functional. Stay informed on any updates to avoid disruptions.
- Legal Concerns: Always ensure you have the right to use the images in the way you’ve chosen. Even with embedded images, there are legal implications surrounding usage which can be avoided with proper diligence.
Being proactive and reviewing these potential issues can help ensure that your experience with embedding Getty Images is a smooth one, leading to captivating and engaging content for your audience!
Conclusion and Best Practices
Embedding Getty Images in your posts can greatly enhance the visual appeal and engagement of your content. However, to ensure that you do so effectively and ethically, consider the following best practices:
- Choose Relevant Images: Select images that directly relate to your content. This helps in maintaining audience interest and supports your message.
- Credit the Source: Always provide proper attribution to Getty Images. This not only respects copyright laws but also builds credibility with your audience.
- Optimize for Speed: Ensure that the images are optimized for web use to avoid slow loading times. Compressed images can lead to a better user experience.
- Check Licensing: Be aware of the licensing terms associated with any image you wish to use. Ignoring these can lead to costly penalties.
- Incorporate Alt Text: Use descriptive alt text for accessibility purposes. This aids visually impaired users and enhances SEO.
Additionally, consider measuring the impact of the images on your audience's engagement. Tools like Google Analytics can help you understand how the inclusion of images affects site metrics such as bounce rate and time spent on page.
By following these best practices, you can successfully integrate Getty Images into your posts, enriching your content while remaining compliant and responsible.
 admin
admin


