Have you ever stumbled upon an image on a website that you could click on, only to be taken to another page or resource? That’s the magic of hyperlinking images! In this post, we’ll explore how to add hyperlinks to images seamlessly, transforming simple graphics into gateways for more content. By doing this, not only do you enhance your content's interactivity, but you also improve user experience. Let’s dive into the world of image hyperlinks and see how they can breathe life into your web design!
Why Use Hyperlinks on Images?
Using hyperlinks on images is a powerful technique in web design that can significantly enhance both the functionality and aesthetics of your site. Here are several compelling reasons why incorporating hyperlinks into your images is beneficial:
- Enhance User Experience: Clickable images provide a more engaging experience for visitors. Instead of just static images, they can serve as interactive elements that prompt users to explore more content.
- Improve Navigation: Hyperlinked images can act as navigational tools. For example, a logo might link back to the homepage, while a product picture could link to its dedicated product page, making it easier for users to find what they need.
- Drive Traffic: By linking to relevant blog posts, product pages, or external resources, you can direct users to more of your content, increasing page views and reducing bounce rates.
- Visual Appeal: Images often capture attention faster than text. By hyperlinking a visually striking image, you can highlight important information or services in a way that’s far more appealing than a plain list.
- SEO Benefits: Hyperlinking images can even enhance your site’s SEO. Search engines consider the quality and relevance of linked content, which can help in boosting your site’s search rankings.
Let’s now consider a few scenarios where using hyperlinks on images can be particularly effective:
| Scenario | Description | Example |
|---|---|---|
| Product Showcase | Linking product images directly to their detail pages allows customers to easily browse and purchase. | An image of a sneaker linked to its product page. |
| Call to Action | Using images as buttons for newsletter sign-ups or promotional offers boosts conversion rates. | A vibrant banner image encouraging sign-ups. |
| Content Promotion | Linking blog post images to their respective articles can encourage readers to explore related content. | An eye-catching infographic linking to a comprehensive article. |
As you consider how hyperlinks can enhance your images, remember that the key is to strike a balance between aesthetics and functionality. Too many hyperlinks can overwhelm users, while too few might leave them searching for more information. So, choose wisely and make each link count!
Also Read This: Resolving Issues with the YouTube Comment Section
3. Step-by-Step Guide to Adding Hyperlinks to Images
Adding hyperlinks to images can seem daunting at first, but with a little guidance, you’ll find it’s a breeze! Let’s break down the process step by step.
- Choose Your Image - First, identify the image you want to use. Whether it’s a logo, a product picture, or any other visual element, ensure it’s saved in your computer or accessible online.
- Decide on the Link - Next, think about where you want to link this image. This could be a webpage, a PDF, or even an email link. Make sure you have the correct URL handy!
- Open Your HTML Editor - Now, open the HTML editor of your choice. This could be a simple text editor like Notepad for small edits or a more robust web development tool like Visual Studio Code or Atom for larger projects.
- Insert the Image Tag - Ensure you have the image tag correctly set up. It typically looks something like this:
Replace `URL-of-your-image.jpg` with your actual image URL, and provide a brief description for accessibility.<img src="URL-of-your-image.jpg" alt="Description of Image"> - Wrap the Image Tag with a Link Tag - Here comes the fun part! To make the image clickable, you simply wrap your image tag with an anchor tag (<a>). Here’s how it looks:
Replace `URL-of-your-link` with the link where you want the image to redirect.<a href="URL-of-your-link"> <img src="URL-of-your-image.jpg" alt="Description of Image"> </a> - Test It Out - After you’ve inserted the code, it’s time to test it! Save your HTML file and open it in a web browser. Click on the image to ensure it redirects to the desired link.
And there you have it! With these steps, you should be able to add hyperlinks to any image on your site.
Also Read This: Simple Tips to Save Images from Google Slides
4. Using HTML to Hyperlink an Image

Now that we’ve covered the steps, let’s dive a little deeper into the HTML code you'll use to hyperlink an image. It’s important to understand the syntax to make sure everything functions smoothly.
The basic structure of linking an image with HTML involves a few essential components:
-
Anchor Tag (<a>): This tag creates a hyperlink. You indicate the destination of the link using the
hrefattribute. For example:<a href="https://www.example.com"> -
Image Tag (<img>): This tag inputs the image into your webpage. You need the
srcattribute which points to the image's location and thealtattribute to describe the image. For example:<img src="image-url.jpg" alt="This is an image"> -
Combining Both: When you combine both an anchor and an image, it looks like this:
<a href="https://www.example.com"><img src="image-url.jpg" alt="This is an image"></a>
Here's a practical example:
<a href="https://www.openai.com">
    <img src="logo.png" alt="OpenAI Logo">
</a>
In this case:
- The image will serve as a clickable logo.
- When you click on the logo, it will navigate to OpenAI’s homepage.
Now, you can style your image further with CSS if you'd like to adjust its size or appearance. Just remember that all the hyperlink functionality depends on the correct placement of your <a> tag around your <img> tag.
Feel free to experiment with different images and links until you get exactly what you want!
Also Read This: how to copy image from google slides
5. Adding Hyperlinks in WordPress
If you're using WordPress, adding a hyperlink to an image is a simple process. It's a fantastic way to drive traffic to another page or provide additional resources for your visitors. Here’s how to do it:
- Upload Your Image: First, head over to your WordPress dashboard and navigate to Media > Add New. Upload your image or select one that’s already in your media library.
- Insert Image into Post: Go to the post or page where you want to add the image. Click on Add Media and select your image. After inserting it, you'll see an attachment display settings sidebar on the right.
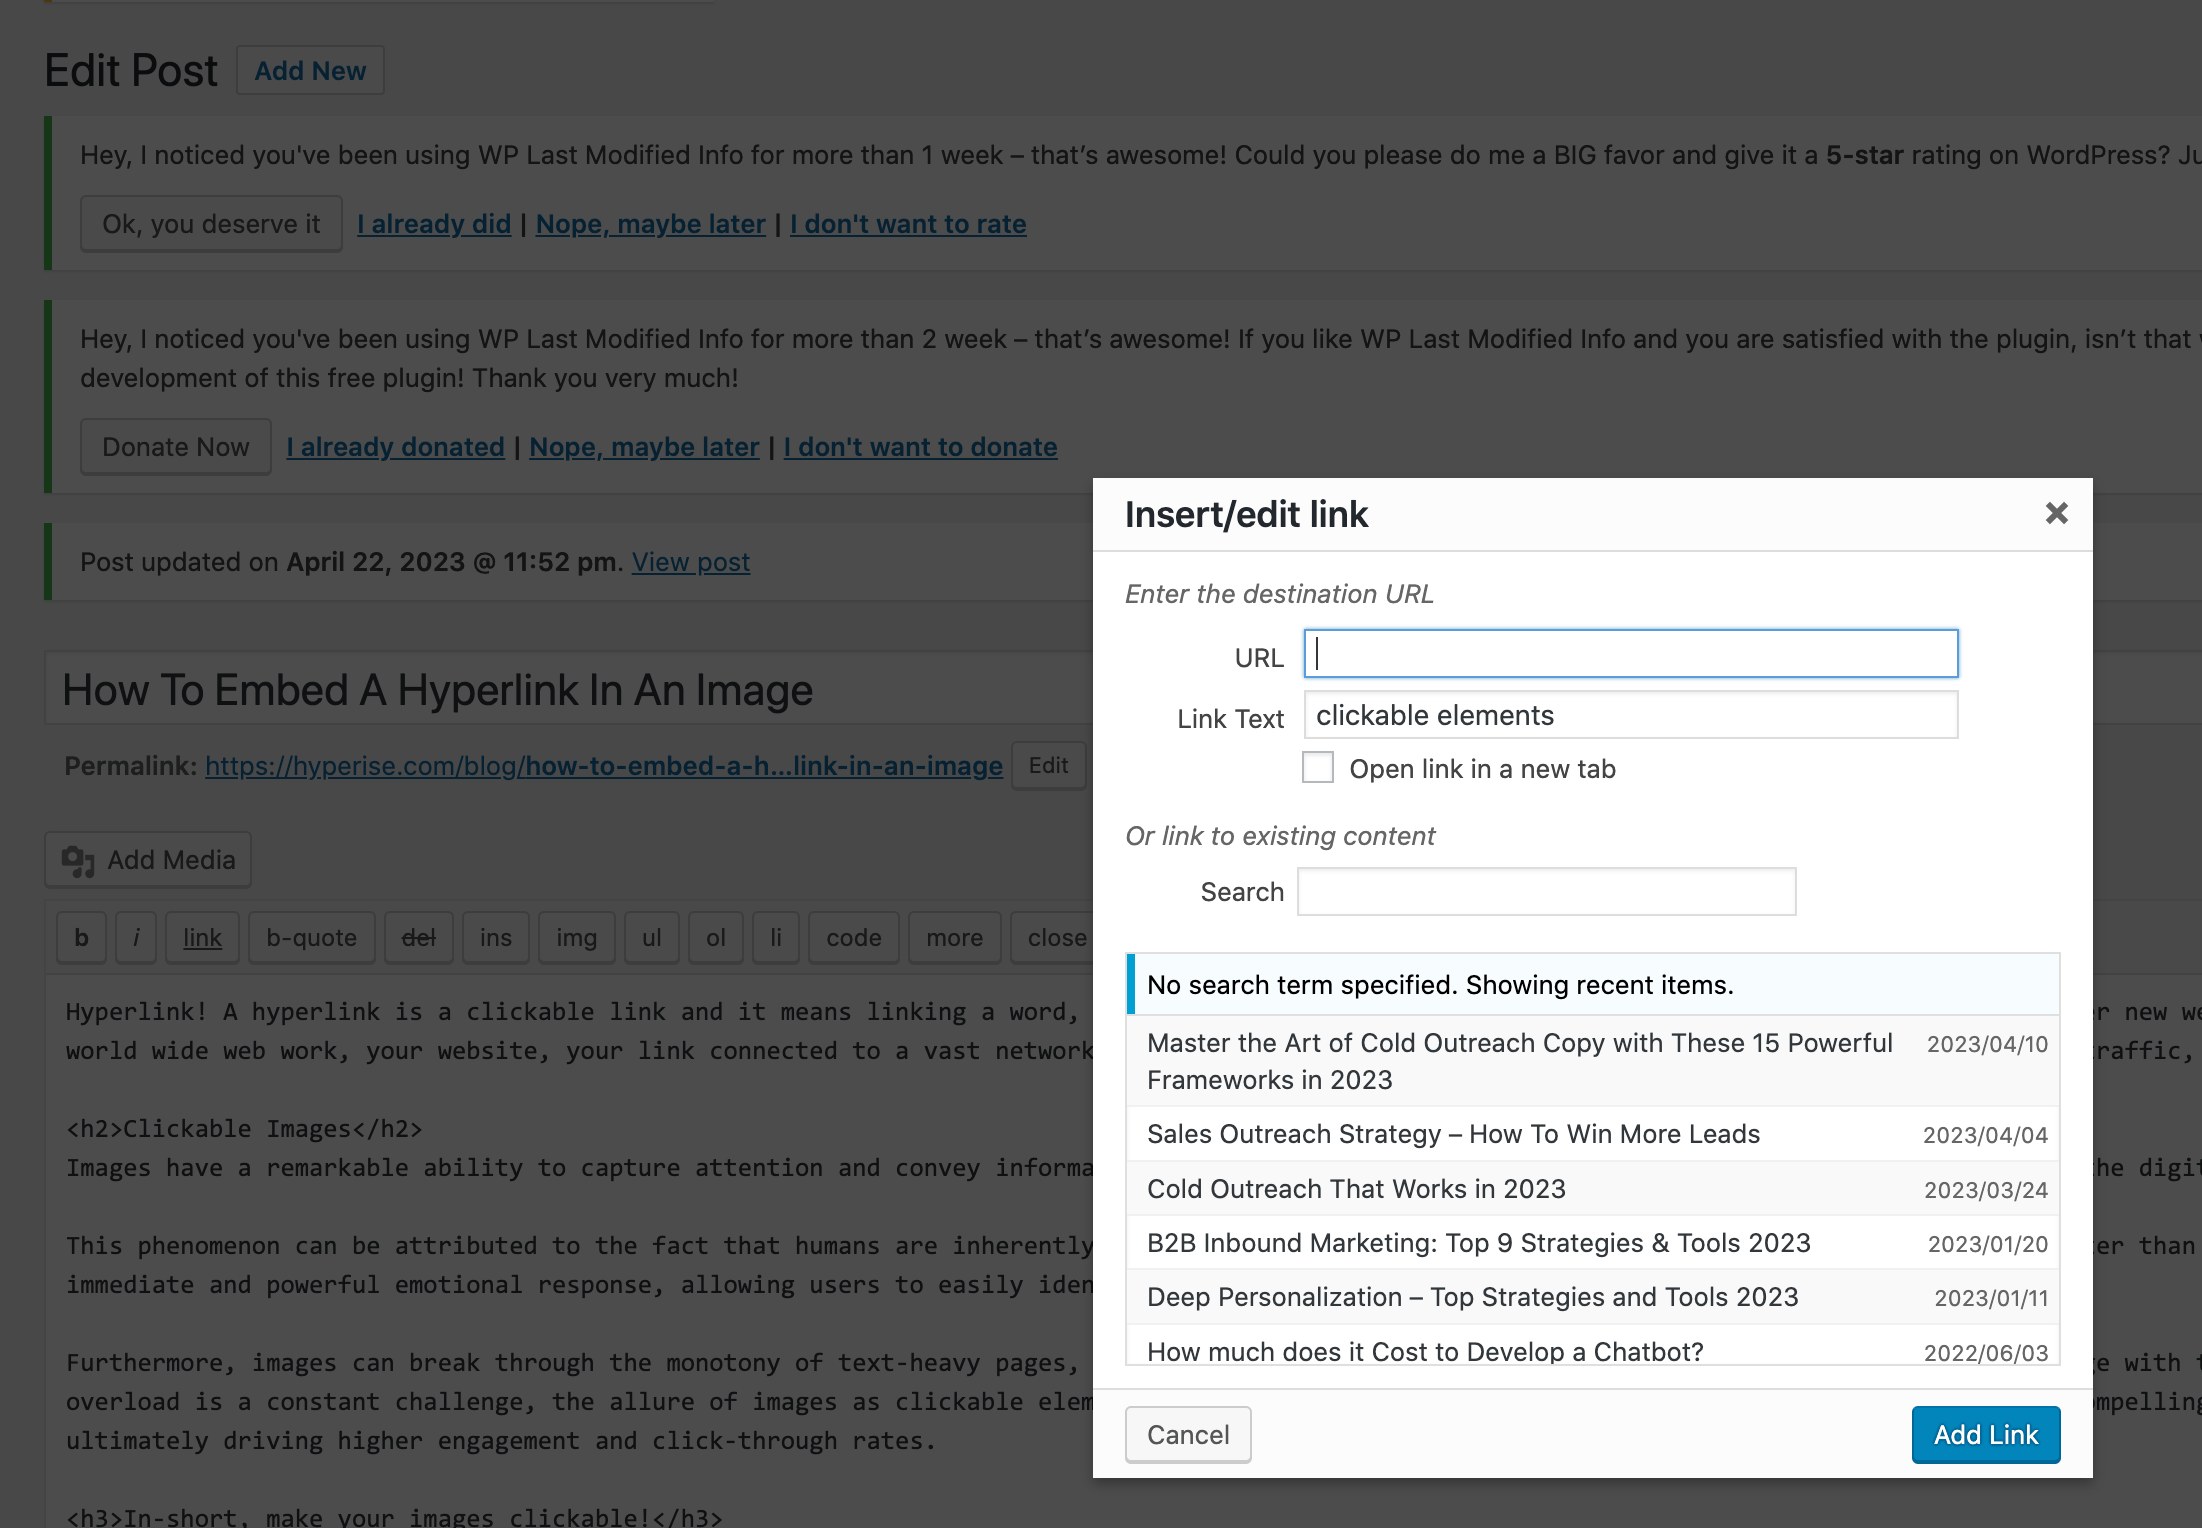
- Linking the Image: In the attachment display settings, find the Link To dropdown menu. You can choose to link to the Media File, Attachment Page, or Custom URL. Select Custom URL if you want to link to a specific webpage.
- Insert URL: Enter the URL you want your image to hyperlink to. Make sure it’s correct! You can also set the link to open in a new tab by ticking the Open link in a new tab box.
- Update Your Post: Once everything looks good, hit Insert into post. Don’t forget to update or publish your post/page to save the changes.
That’s all there is to it! Your image will now serve as a clickable link, enhancing your content and user experience. Just remember to ensure that the linked content is relevant and adds value to your audience.
Also Read This: How to Prove Licensing for Adobe Stock Images
6. Hyperlinking Images in Website Builders
Using website builders like Wix, Squarespace, or Weebly makes hyperlinking images almost as easy as pie. Each platform has its unique steps, but the general method is quite similar. Let's break it down by platform:
Wix
1. Click on the image you want to hyperlink.
2. A toolbar will pop up, where you should select the link icon.
3. Choose to link to Web Address. Enter your URL and decide if you want it to open in a new tab.
4. Save your changes, and voila!
Squarespace
1. In your Squarespace editor, click on the image block you want to edit.
2. In the image settings menu, find the link option.
3. Paste your URL in the link field. Similarly, you can choose to open it in a new window by ticking the appropriate box.
4. Don’t forget to save when you’re done!
Weebly
1. Drag and drop an image element onto your page.
2. Click the image to open the image settings and look for the link option.
3. Type in your URL and hit Save.
Each platform offers a visual way to hyperlink images, making it quick and painless. No need to dive into any code! Just remember, always preview your work to ensure everything’s linking as it should. Happy building!
Also Read This: How to Create a YouTube Channel on Your iPad
7. Best Practices for Hyperlinking Images
Hyperlinking images can be a fantastic way to enhance your website's user experience, but it's essential to follow some best practices to ensure that you're doing it effectively. Here are some tips to guide you:
- Use Relevant Images: Ensure that the images you choose to hyperlink are relevant to the content they link to. This creates a more cohesive experience for your users.
- Maintain Accessibility: Always include
alttext for your images. This not only helps with SEO but also improves accessibility for users who rely on screen readers. - Keep Links Clear: If your image is a call to action, make it apparent what will happen when users click on it. Using graphical cues like arrows, buttons, or overlays can help clarify this.
- Optimize Image Size: Large images can slow down your page load times. Make sure to optimize your images for the web without sacrificing quality.
- Track Clicks: Consider using analytics tools to track how often your images are clicked. This data can help you refine your hyperlinking strategy.
- Avoid Overlinking: Don’t link every image on your site. This can be overwhelming and distract users from your main content. Be strategic about which images deserve a hyperlink.
By keeping these best practices in mind, you can ensure that your images are not only visually appealing but also serve their purpose as effective hyperlinks. A well-implemented hyperlink can drive traffic, inform users, and create a better overall experience.
Also Read This: How to Change the Shape of an Image in Photoshop
8. Troubleshooting Common Issues
Despite best efforts, you may encounter some common issues when hyperlinking images on your site. Don’t worry! Here’s a quick guide to help you troubleshoot:
- The Link Isn't Working: Double-check the URL you’ve used for the hyperlink. Ensure that it's correctly formatted (including
https://orhttp://) and that there are no typos. - Image Doesn't Display: If your linked image isn’t showing up, check that the image source URL is correct and that the image is properly uploaded to your server.
- Alt Text Not Showing: Remember, the
alttext will only show if the image fails to load or for screen readers. Ensure you've entered it correctly in your HTML code. - Link is Overlapping: Sometimes, images can overlap with other elements on the page. Adjust your CSS to ensure that your images and links are laid out properly.
- Mobile Responsiveness Issues: Test your hyperlinks on various devices. Ensure that your images and their corresponding links are easy to click on mobile screens.
- SEO Issues: If you're not seeing the traffic you expect, consider re-evaluating your linking strategy. Are the images giving enough context about the linked page? Are they optimized for search engines?
If you run into any of these problems, take a step back, and systematically check each aspect of your hyperlink setup. Often, the solution is just a small tweak away! Don't hesitate to reach out for help in forums or with web developers if you're still stuck after trying these troubleshooting steps.
Conclusion
Adding a hyperlink to an image can greatly enhance the user experience on your website, providing a quick way to navigate to relevant content. Here’s a quick recap of the steps:
- Choose the Image: Select an eye-catching image that represents the content you're linking to.
- Use HTML Anchor Tags: Wrap the image in an
<a>tag, specifying the href attribute with the desired URL. - Implement Accessibility: Include an
altattribute in the<img>tag for better accessibility.
Here’s a simple example for clarity:
<a href="https://www.example.com"><img src="image.jpg" alt="Description of Image"></a>Remember to consider the context of the hyperlink; it should naturally relate to the image and provide value to your visitors. By following these steps, you can improve the interactivity of your site and guide your audience through a more engaging experience. Start implementing these tips today to see a positive impact on your website's navigation!
 admin
admin


