Thinking about canceling your LinkedIn account? You’re not alone! Whether you've found a new job, are taking a break from job hunting, or simply want to declutter your online presence, it’s crucial to know how to do it effectively. In this guide, we’ll walk you through everything you need to consider and the steps to easily cancel your LinkedIn account. Let’s dive in!
Reasons for Cancelling Your LinkedIn Account

Deciding to cancel your LinkedIn account can stem from various motivations. Here’s a look at some common reasons:
- Privacy Concerns: In today’s digital age, privacy is a top priority. Many users feel uncomfortable having their professional information publicly accessible. By canceling your account, you can take a step back from the online spotlight.
- Job Success: Perhaps you’ve landed the job of your dreams! If you feel confident in your current position and do not need to network or job hunt further, you might choose to close your account.
- Quality Over Quantity: Some users find the sheer volume of connections and updates overwhelming. If you're tired of scrolling through endless posts and notifications, canceling may help you reclaim your focus.
- Unwanted Solicitation: If you find that LinkedIn has turned into a platform for constant sales pitches and spammy messages, it might be time to say goodbye.
- Security Issues: With growing concerns over data breaches, many opt to cancel accounts to protect their information from potential misuse.
- Job Market Changes: If you are shifting industries or taking a break from employment, staying active on LinkedIn may no longer be relevant for you.
Ultimately, your decision to cancel your LinkedIn account should align with your current career needs and personal values. Whatever the reason, there’s no right or wrong answer; it’s all about what feels right for you!
Step 1: Prepare for Account Cancellation

Cancelling your LinkedIn account is a significant step, and it’s important to approach it with some preparation. Think of this phase as packing your bags before going on a trip. You wouldn’t want to forget important items, right? Here’s how you can prepare:
- Review Your Profile: Before taking the plunge, consider reviewing your profile. Are there any connections or endorsements you’ll miss? It might be worth reaching out to key contacts to let them know you’re leaving.
- Download Your Data: LinkedIn allows you to request a copy of your data, including connections, messages, and profile information. To do this, head to the Privacy section in your settings and request your data report. It’s a good way to keep a record for future reference.
- Consider Alternative Platforms: Are you sure about leaving LinkedIn? You might want to explore other social media platforms or job search sites to ensure you have a backup for networking opportunities.
- Update Your Resume: If you’re leaving LinkedIn due to a career change, make sure your resume is updated and reflects your latest skills and experiences.
Taking these steps can help make the cancellation process less daunting. You’ll feel more organized and thoughtful about your decision!
Step 2: Access Your LinkedIn Account Settings

Once you’ve prepared for cancellation, the next step is accessing your account settings. It’s like finding the right door to exit the building. Here’s how to do it with ease:
- Log In: Start by logging into your LinkedIn account using your username and password. Make sure it’s the account you wish to close.
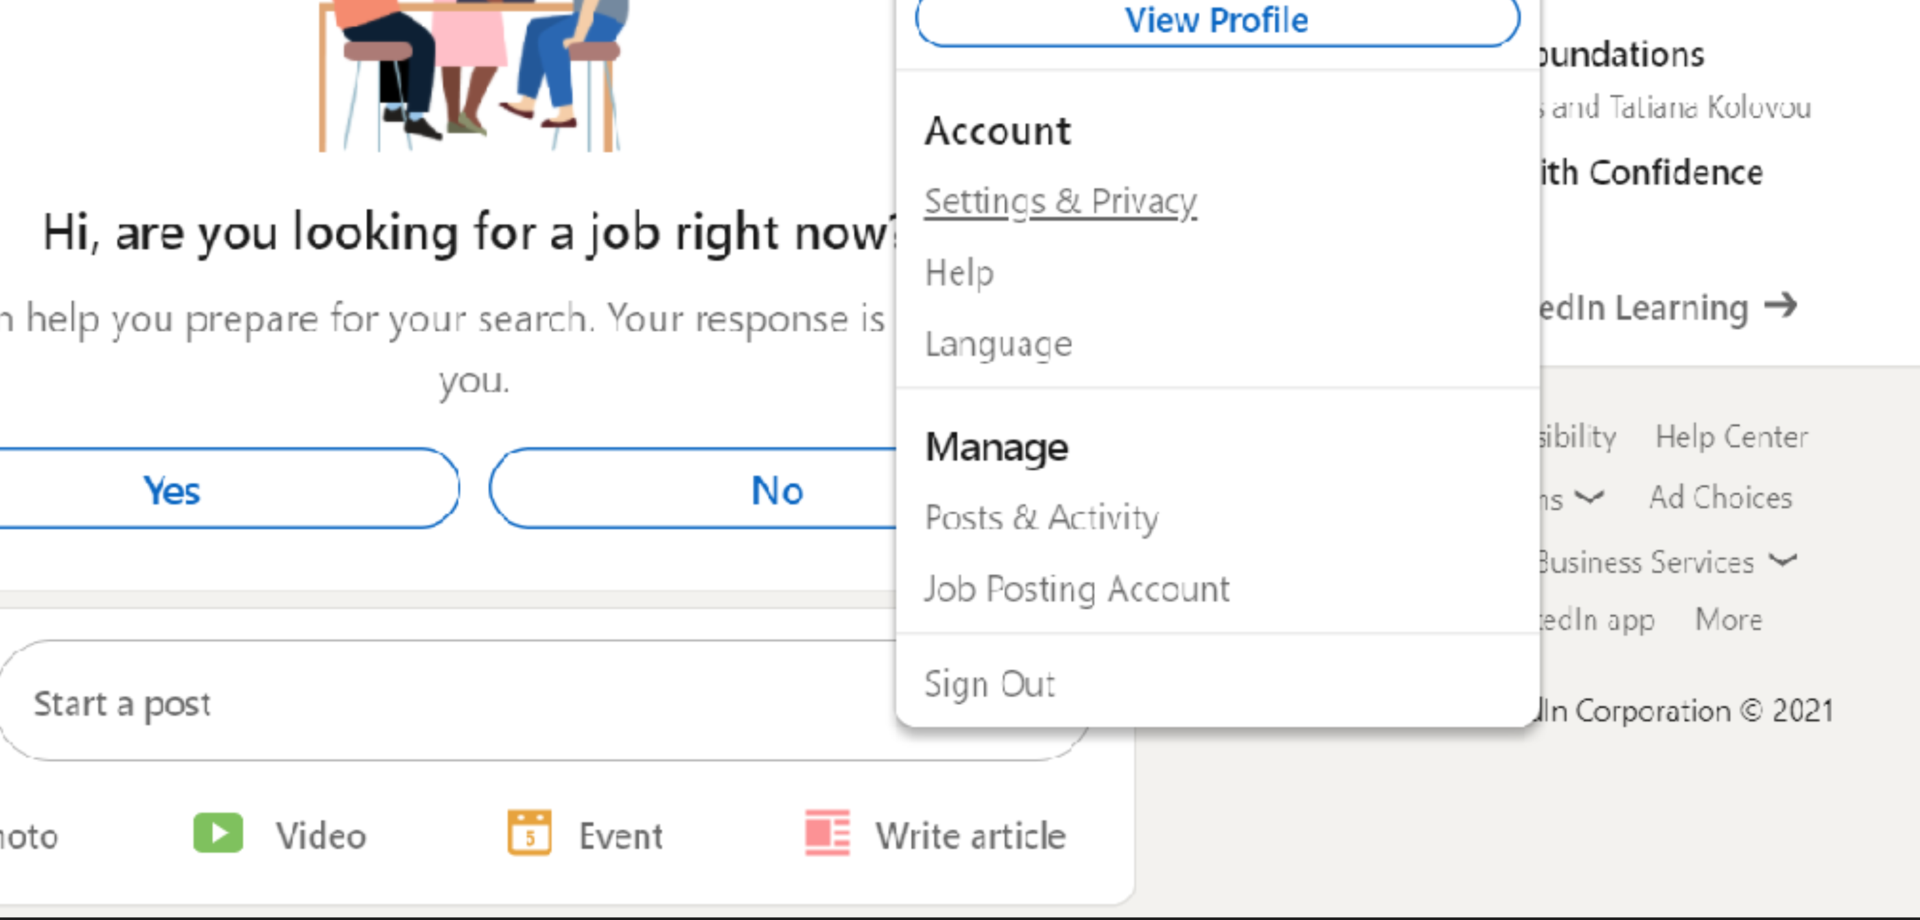
- Find the Me Icon: Look at the top right corner of the page; you’ll see your profile picture or the ‘Me’ icon. Click on it, and a dropdown menu will appear.
- Navigate to Settings: From the dropdown, select ‘Settings & Privacy’. This will take you to the heart of your account management options.
- Personal Data Section: Once you’re in, scroll down to find the ‘Account management’ section. Here, you’ll discover options related to your account’s status.
Once you locate account settings, you’re ready to move on to the actual cancellation process. It’s all about taking it one step at a time!
Step 3: Initiate the Account Closure Process

Now that you’ve decided to cancel your LinkedIn account, it’s time to dive into the actual process of closing it down. Don’t worry; it’s quite straightforward. Here’s how to go about it:
- Log in to your LinkedIn account: Start by visiting the LinkedIn website and entering your credentials. If you can’t remember your password, there’s a simple “Forgot password?” link to help you reset it.
- Access Settings & Privacy: Once you're logged in, click on your profile picture at the top right of your LinkedIn homepage. From the drop-down menu, select “Settings & Privacy” to access your account settings.
- Go to Account Management: In the Settings menu, look for the “Account management” section. You’ll find a variety of account options here. Click on “Closing your LinkedIn account.”
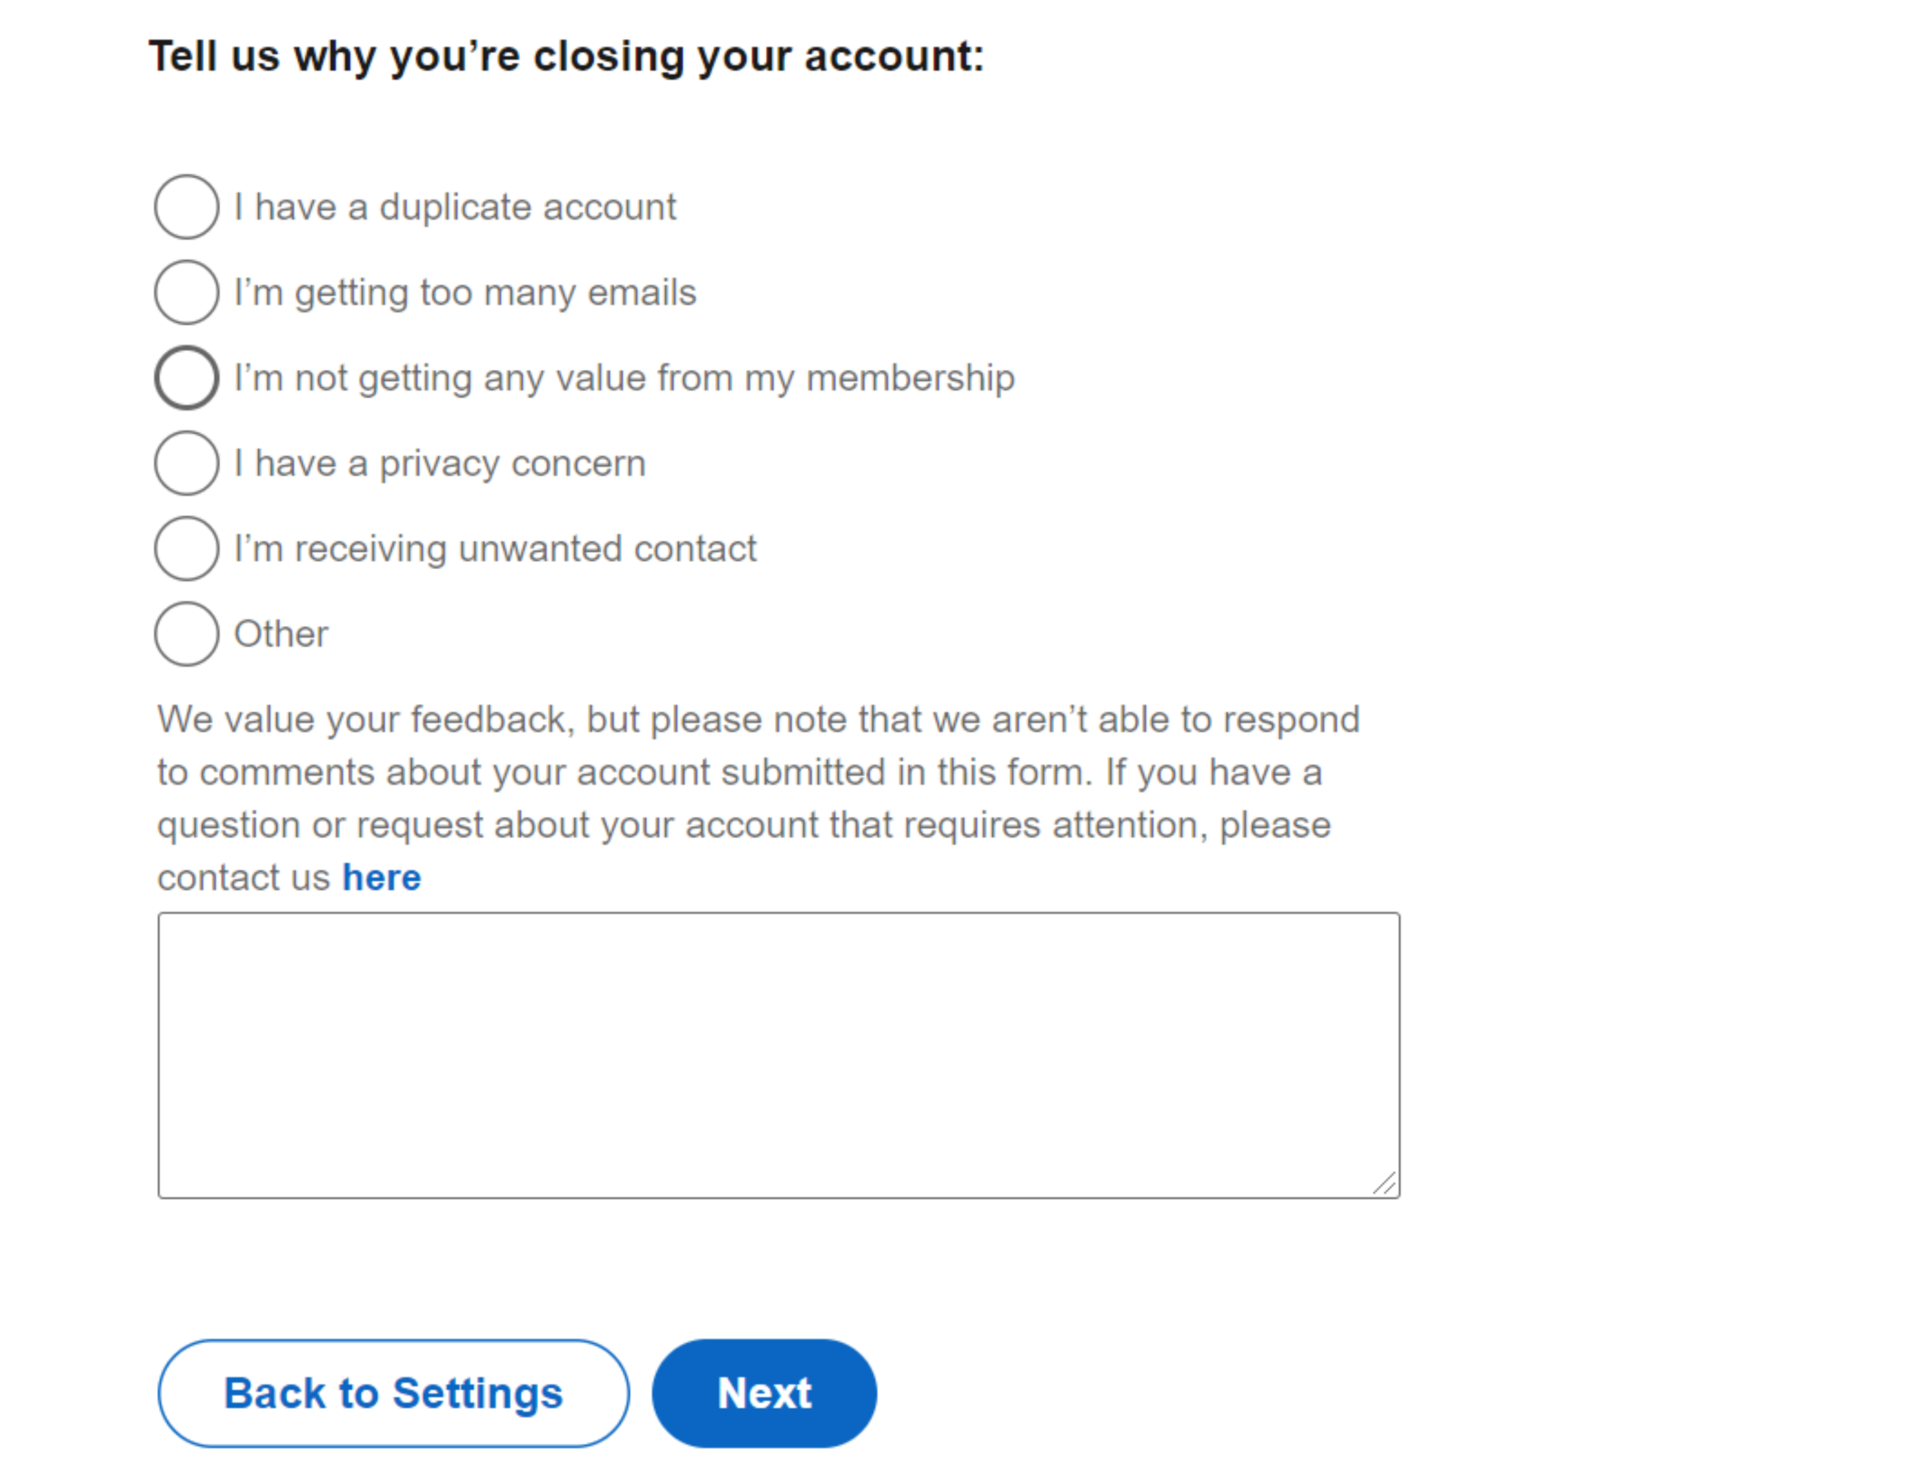
- Choose a Reason: LinkedIn will prompt you to select a reason for closing your account. While it’s not mandatory, providing your feedback can help improve their services. Select from the options provided or choose “Other” if you have a specific reason in mind.
- Follow the Prompts: After selecting a reason, LinkedIn will guide you through the next steps. This may include verifying your identity and confirming that you really want to close your account. Follow these prompts carefully.
Once you've completed these steps, you’re well on your way to saying goodbye to LinkedIn!
Step 4: Confirm Your Decision
Congratulations on reaching the final stage of cancelling your LinkedIn account! This step is crucial, as it solidifies your decision and ensures your account is officially closed. Here’s what to do:
- Review Information: LinkedIn will present a summary of the impact of closing your account, including the loss of connections, recommendations, and possibly stored content. Take a moment to review this information. It’s important to know what you’ll be losing.
- Confirmation Prompt: After reviewing the details, you will be prompted to confirm your decision one last time. This is usually a big red “Close account” button. Click it only if you’re absolutely sure!
- Email Confirmation: Upon confirming, you may receive an email from LinkedIn acknowledging your request to close your account. This email acts as a final confirmation. Keep it for your records, just in case.
- Wait for Account Deactivation: After confirmation, LinkedIn may take a few days to completely deactivate your account. During this limbo period, it’s best not to log in, as that might reactivate your account.
And there you have it! With these steps, you’ve successfully closed your LinkedIn account. If you ever decide to return, remember, LinkedIn gives you the option to reactivate your account within a 20-day window. Best of luck on your future endeavors, wherever they may lead!
7. Step 5: Alternatives to Full Account Cancellation
So, you're thinking about canceling your LinkedIn account, but wait! Before you make a hasty decision, let's explore some alternatives to a complete account cancellation. You might find they can address your concerns without losing your connections and profile entirely!
Here are some options to consider:
- Deactivate Your Account: If you just need a break, deactivating your account is a great option. This will remove your profile from public view while preserving your information for future use.
- Adjust Privacy Settings: If you're overwhelmed by notifications or lookups, tweaking your privacy settings can significantly enhance your experience. You can control who sees your profile and what activities you’re sharing.
- Permanently Delete Certain Information: Instead of leaving LinkedIn altogether, consider simply deleting specific posts or recommendations that you no longer want associated with your professional image.
- Reduce Connection Count: Feeling like your network has grown too large and unwieldy? Spend some time cleaning out your connections—this can create a more comfortable space for you on LinkedIn.
- Pause Your Activity: You can take a break from posting and engaging without needing to cancel your account. Sometimes, a pause can provide you the clarity you need.
Weigh these alternatives carefully. They might just keep you engaged with your professional network while addressing your concerns!
8. Conclusion
In conclusion, canceling your LinkedIn account doesn't have to be a daunting task. With the clear steps outlined in this guide, you'll be empowered to make an informed decision. Remember, it's completely normal to reassess your online presence, especially in a fast-paced digital world.
Before you decide to go ahead with cancellation, don’t forget to consider the alternatives we discussed in Step 5. They might just provide the breathing space you need without losing all the professional connections you’ve built over time.
If you do choose to cancel, you now know the steps to follow to do it smoothly. Sometimes, what feels like the end can really be just a new beginning. So, whether you take a break or move on, trust that you’re making the best choice for your professional life.
Happy networking, and may your professional journey continue, wherever it takes you!


