Are you looking to earn some extra cash by selling your stunning photographs? Adobe Stock is a fantastic platform to showcase your work and reach a global audience. If you're a Lightroom user, you'll be thrilled to know that adding your photos to Adobe Stock is a seamless process. In this guide, we'll walk you through the essential steps to prepare your images in Lightroom, ensuring they're ready for approval. Let's dive in!
Preparing Your Photos in Lightroom

Before you can showcase your images on Adobe Stock, it's crucial to prepare them properly in Lightroom. This preparation ensures that your photos meet Adobe's guidelines and stand out for potential buyers. Here’s how to get started:
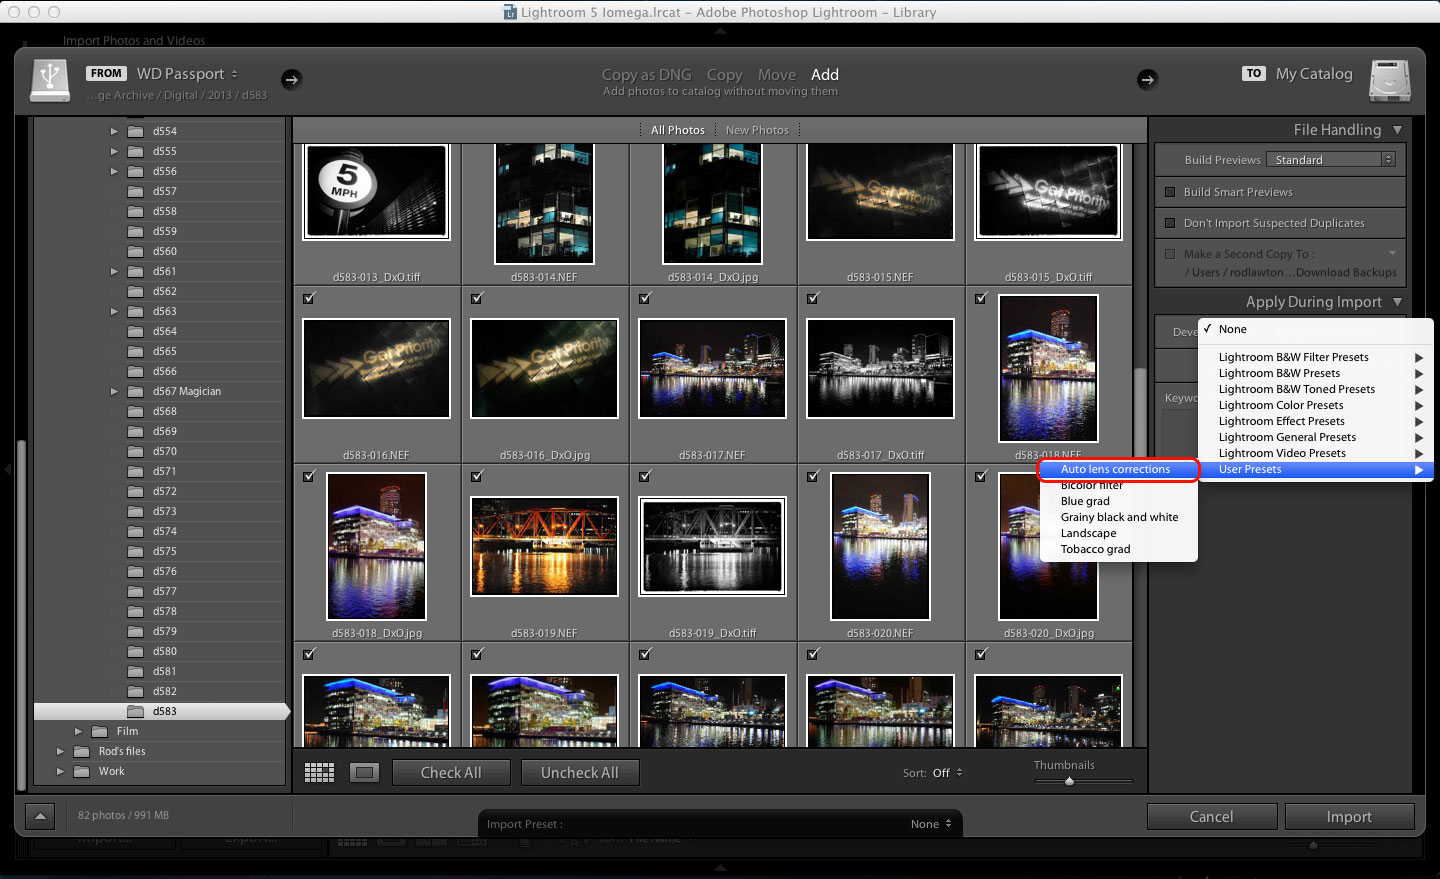
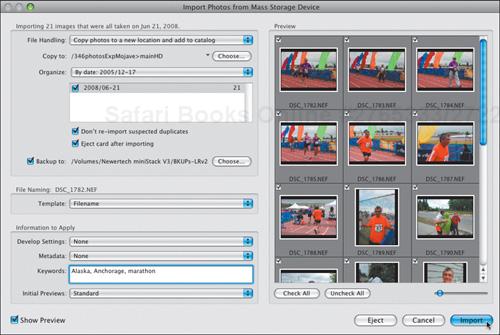
- 1. Importing Your Photos: Start by importing your images into Lightroom. You can do this by clicking on the "Import" button at the bottom left corner. Select the source, choose the images you want, and hit "Import" again.
- 2. Basic Edits: Use Lightroom's editing tools to enhance your photos. Adjust the exposure, contrast, and white balance to improve image quality. You can also use the Crop Tool to refine the composition.
- 3. Keywording: Keywords are vital for making your photos discoverable on Adobe Stock. Add relevant keywords in the "Keywording" panel. Think about what buyers might search for. For instance, if your photo is of a sunset, use terms like "sunset," "nature," and "landscape."
- 4. Export Settings: When you’re happy with your edits, it's time to export your images. Choose File > Export and select the appropriate settings. For Adobe Stock, use JPEG format, set the quality to 100%, and ensure the resolution is at least 300 DPI for print quality.
- 5. Metadata: Don't forget to include essential metadata like the title, description, and copyright information. This helps buyers understand the context of your photo and reinforces your rights as a creator.
Once you’ve completed these steps, your photos will be in tip-top shape for submission to Adobe Stock. Taking the time to prepare your images properly can significantly increase your chances of acceptance and sales.
Also Read This: Quick Tips on Finding the Image ID on Mobile Devices
Exporting Photos from Lightroom

Exporting photos from Adobe Lightroom is a straightforward process, but there are a few different settings you need to consider to best prepare your images for Adobe Stock. Here’s how to do it step by step:
First, select the photo or photos you want to export. You can do this by holding down the Ctrl (Windows) or Command (Mac) key and clicking on each photo in the Library view.
Next, go to File > Export. This will open the export dialog box where you can customize your export settings.
In the Export Location section, choose where you want to save the exported images. You can select a specific folder, or you can create a new one just for your Adobe Stock submissions.
Then, under File Naming, decide if you want to rename your files during the export. Keeping a consistent naming convention can help with organization.
In the File Settings section, choose the format you want to export your images in. Adobe Stock accepts JPEG files, with a color space of either sRGB or Adobe RGB.
In the Image Sizing section, make sure to adjust the size to a minimum of 4 MP (megapixels) to meet Adobe Stock's requirements.
Lastly, click on Export and let Lightroom process the files. Once it’s done, you'll have your images ready for submission to Adobe Stock!
Also Read This: The Best Practices for Growing Your Audience on Rumble
Uploading Photos to Adobe Stock
Once you’ve exported your photos from Lightroom, the next step is to upload them to Adobe Stock. This process is also user-friendly, especially if you follow these simple steps:
Log into your Adobe Stock Contributor account. If you don’t have one yet, it’s easy to sign up – just head to the Adobe Stock website and follow the prompts to create your account.
After logging in, locate the Upload button on the Contributor dashboard. This is typically found on the main page or under the 'My Portfolio' section.
Select the files you exported from Lightroom. You can do this by dragging and dropping files directly into the upload area, or you can click the upload button to select files from your computer.
As your files upload, you’ll need to fill out metadata for each image. This includes assigning a title, keywords, and a description. Keywords are especially important as they help buyers find your images more easily.
Once you’ve added your metadata, review the content for any model or property releases if applicable. If you're intending to sell images with identifiable people or private properties, make sure you comply with the legalities of model or property releases.
Finally, hit the Submit button! Your images will then go through Adobe Stock's review process. Once approved, your photos will be available for purchase by buyers all over the world.
And there you have it! You're all set to share your creativity with the world. Happy uploading!
Also Read This: Pros and Cons of Getty Images: Evaluating the Benefits and Limitations of the Stock Photography Platform
5. Adding Metadata and Keywords
When you’re ready to submit your photos to Adobe Stock, it’s crucial to remember that metadata and keywords are the backbone of your listing. They help people find your images and can dramatically influence your sales!
What is Metadata?
Metadata is information about your photo that doesn’t appear in the image itself but offers valuable context. In Adobe Stock, this includes titles, descriptions, and keywords. Think of it as a little behind-the-scenes guide for potential buyers!
How to Add Metadata in Lightroom:
- Open Adobe Lightroom and select the photo you plan to submit.
- Go to the “Library” module and find the Metadata panel on the right side.
- Fill in the Title, Description, and Keywords sections.
Key Tips for Adding Keywords:
- Use relevant keywords that accurately describe your photo.
- Think like a buyer – what terms would someone search for?
- Aim for 5-15 keywords but avoid keyword stuffing; relevance is key!
Effective metadata enhances discoverability. Taking the time to meticulously fill in these fields can make a world of difference in getting your images noticed by potential buyers.
Also Read This: Find Out How Hard It Is to Get Approved as a Shutterstock Contributor
6. Reviewing Your Submission
Before hitting that all-important submit button, it’s wise to conduct a thorough review of your submission. This step is crucial to ensure your content adheres to Adobe Stock's guidelines and stands the best chance of being accepted.
Here’s What You Should Review:
- Image Quality: Ensure that your images are sharp, well-exposed, and free from artifacts.
- Compliance: Check that all images meet Adobe Stock's technical standards and content requirements.
- Metadata Accuracy: Double-check that your titles, descriptions, and keywords are appropriate and grammatically correct.
Final Checklist:
| Item | Status |
|---|---|
| Image Resolution | ✅ |
| Release Forms (if applicable) | ✅ |
| Metadata Filled | ✅ |
Taking a moment to carefully review your submission can save you time in the long run and boosts your credibility as a contributor. Happy submitting!
Guide to Adding Photos to Adobe Stock from Lightroom
If you're a photographer looking to monetize your work, Adobe Stock is a great platform to showcase your images. Integrating Adobe Stock with Lightroom streamlines the process, allowing you to submit photos directly from your editing software. This guide will walk you through the steps to add photos to Adobe Stock using Lightroom, ensuring your workflow is efficient and straightforward.
Step-by-Step Process to Submit Photos:
- Prepare Your Images: Make sure your photos are edited and meet Adobe Stock's quality standards. Use Lightroom to enhance your photos, adjusting exposure, contrast, and color balance as needed.
- Select Photos for Submission: Once you're happy with the edits, choose the images you plan to submit. You can use the Library module in Lightroom to easily select multiple images.
- Export Settings: Before uploading, you need to export the images. Use the following export settings:
- File Format: JPEG
- Color Space: sRGB
- Quality: 100%
- Upload to Adobe Stock: In Lightroom, go to the Photo menu, select Export, and then choose Adobe Stock. Log in to your Adobe account if prompted.
- Enter Metadata: After selecting your images, add relevant titles, keywords, and descriptions that align with Adobe Stock’s guidelines. This helps your photos get discovered by potential buyers.
- Submit Your Photos: Review your submission details and hit Submit. Your photos will be sent directly to Adobe Stock for review.
Additional Tips:
- Keep your keywords relevant to improve searchability.
- Regularly check for updates on Adobe Stock's submission guidelines.
By following these steps, you can seamlessly add your stunning images from Lightroom to Adobe Stock, helping you reach a wider audience and potentially generate income from your photography.
Conclusion: Submitting photos to Adobe Stock from Lightroom is an efficient way to manage your creative workflow, allowing you to share your work with potential buyers while saving time and maintaining quality control.
 admin
admin


