Welcome to the colorful world of paper nails crafting! If you're looking for a fun, creative activity that allows you to express your personality without the commitment of real nails, you've come to the right place. Paper nails are not just a trend; they are a fantastic way to engage your artistic side and can easily be customized to fit any occasion. Whether you're preparing for a party, looking to enhance your daily style, or just want to enjoy a crafty afternoon, this guide will help you get started on your paper nails journey. So, let’s dive in!
Materials Needed for Fun Paper Nails

Before we start crafting, let’s gather all the materials you’ll need for your paper nails project. Having everything on hand makes the process smooth and enjoyable. Here’s a comprehensive list:
- Colored Paper: Choose vibrant colors and patterns to make your nails pop. Scrapbook paper, origami paper, or even old wrapping paper work wonderfully!
- Nail Templates: You can either buy nail templates or create your own by tracing your natural nails on a piece of paper. This ensures your paper nails fit perfectly.
- Scissors: A good pair of scissors is essential for cutting out the nail shapes. Make sure they are sharp for clean edges.
- Glue Stick or Craft Glue: This will help you adhere the paper nails to your own nails securely. A glue stick is less messy, but craft glue provides a stronger hold.
- Top Coat (Optional): A clear nail polish can help seal your paper nails and make them last longer.
- Decorative Items: Think sequins, glitter, stickers, or rhinestones to add some sparkle and personality to your nails!
- Small Brush or Toothpick: Useful for applying glue precisely and for adding intricate details, especially when working with small decorations.
Once you have all your materials ready, you're just about set to start your paper nails crafting adventure! Don’t forget to find a comfortable workspace with good lighting, and maybe put on some of your favorite music to get into the creative spirit. Let’s get those creative juices flowing!
Also Read This: How to Make a Skype Account: Step-by-Step Video on Dailymotion
3. Step-by-Step Instructions
Creating fun paper nails is a delightful craft activity that you can enjoy alone or with friends. Whether you’re aiming for a stylish look or something quirky, follow these simple steps to make your very own paper nails!
Step 1: Gather Your Materials
- Colored paper or cardstock
- Scissors
- Glue or double-sided tape
- Nail file (optional)
- Optional: Nail polish for added flair
Step 2: Prepare Your Nail Templates
Using your scissors, cut out small nail shapes from your colored paper. Aim for sizes that mimic real nails. You can even use your own nails as a reference! Try out different shapes—square, oval, or stiletto for super fun results.
Step 3: Decorate Your Nails
Now comes the fun part! Use markers, glitter, or even stickers to jazz up your paper nails. If you’re feeling adventurous, add some nail polish for shine. Remember to let everything dry completely before moving on.
Step 4: Attach the Nails
Once your decorations are dry, it’s time to attach the nails. Apply a small amount of glue or double-sided tape to the back of each paper nail. Carefully press them onto your real nails, ensuring they’re aligned properly. If you want a temporary look, double-sided tape is your best friend!
Step 5: Finishing Touches
If you used glue, allow your nails to set for a few minutes. You can also file the edges lightly for a smoother finish. Once they're secure and looking fabulous, you’re ready to show off your craft at your next gathering!
Also Read This: Effective Strategies to Boost Views on Your Dailymotion Videos
4. Tips for Perfecting Your Paper Nails
Now that you’ve got the basics down, let’s dive into some handy tips that will elevate your paper nails from fun to fabulous!
Tip 1: Choose the Right Paper
For the best results, opt for thicker cardstock. It holds its shape better and ensures your nails look polished. If you want more flexibility, consider using scrapbook paper—it comes in a variety of fun patterns!
Tip 2: Experiment with Designs
- Floral Patterns: Perfect for spring or summer vibes.
- Geometric Shapes: Great for a modern, chic look.
- Animal Prints: Fun and fierce for those daring days.
Tip 3: Keep it Neat
Before sticking your nails on, make sure the edges are clean and any decorations are secure. A little attention to detail goes a long way in making your nails look professionally done!
Tip 4: Practice Makes Perfect
If you're new to crafting paper nails, don’t worry if your first attempts aren’t perfect. Keep practicing different shapes and designs. Before you know it, you’ll be a paper nail pro!
Tip 5: Share Your Creations!
Once you’ve perfected your paper nails, share them on social media or with friends. You can even post a tutorial video on platforms like Dailymotion! Who knows, you might inspire others to join in on the fun!
With these tips and the step-by-step guide, you’re all set to create beautiful paper nails. Happy crafting!
Also Read This: How to Use Revlon Hair Color: Tips for a Gorgeous Hair Makeover
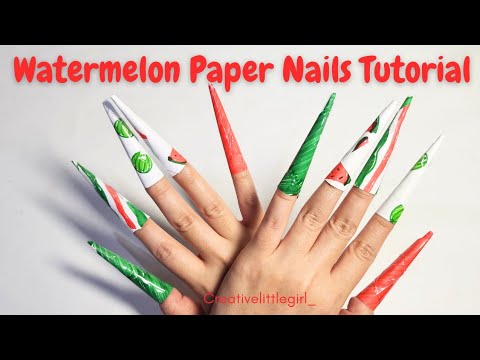
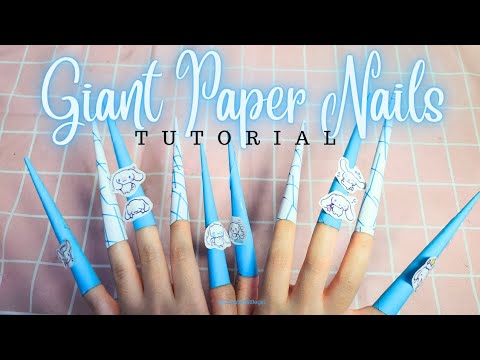
5. Creative Ideas for Nail Designs
If you’ve gathered your materials and are ready to start crafting your paper nails, let’s dive into some exciting design ideas! The beauty of paper nails is that they can be as simple or as elaborate as you like. Here are a few creative ideas to get your imagination flowing:
- Floral Patterns: Use vibrant colors to create delicate flowers on each nail. You can draw roses, daisies, or even abstract floral designs. Just sketch them out lightly with a pencil before filling in with vibrant markers or paint.
- Geometric Shapes: For a modern touch, try using geometric patterns. Triangles, squares, or circles in contrasting colors can give your nails a chic, trendy look.
- Animal Prints: Unleash your wild side by experimenting with animal prints like leopard spots or zebra stripes. They can be fun and bold, adding a fierce flair to your design!
- Ombre Effect: Blend two or more colors to create a stunning ombre effect. Start with a light color at the base and gradually transition to a darker shade at the tip.
- Seasonal Themes: Customize your nails to reflect the seasons! Think pastel colors for spring, warm tones for fall, or icy blues and whites for winter.
Remember, the key is to have fun and let your creativity shine! Mix and match these designs or brainstorm your own unique patterns. It’s all about expressing yourself through your art!
6. How to Share Your Paper Nails on Dailymotion
Now that your fabulous paper nails are ready, it’s time to share them with the world! Dailymotion is a fantastic platform to showcase your creative work. Here’s a simple guide to getting your nail art video up and running:
- Record Your Process: Use a smartphone or camera to capture your crafting process. Make sure you film in a well-lit area so viewers can see the details of your designs. Consider narrating your steps for a more engaging experience!
- Edit Your Video: Use basic video editing software to trim any unnecessary parts and enhance your video with fun music or captions. Adding a catchy title and description will help grab viewers' attention.
- Create a Dailymotion Account: If you don’t have one yet, sign up for a free Dailymotion account. It’s quick and easy! Fill in your profile details so viewers can learn more about you.
- Upload Your Video: Click on the “Upload” button on your Dailymotion dashboard. Choose your edited video file and fill in the necessary information, like the title, description, and tags related to nail art.
- Engage with Your Audience: After uploading, promote your video on social media platforms like Instagram or Facebook. Encourage your friends and followers to check it out, like it, and leave comments!
Sharing your paper nail designs on Dailymotion is a great way to inspire others and connect with fellow craft enthusiasts. So what are you waiting for? Hit that record button and show off your fabulous creations!
 admin
admin


